The safest general method for router bit cleaning is to remove the bit from the router, clear away loose dust, apply a cleaner suitable for the bit material, gently scrub away softened resin and pitch with a nylon or brass brush, wipe and dry the bit thoroughly, then inspect the carbide, shank, and any bearing before storage or reuse.
For U.S. woodworkers, regular router bit cleaning is a simple maintenance step that can prevent a dirty cutter from being mistaken for a dull one. Pine, cedar, plywood, MDF, particleboard, adhesives, and other materials can leave resin, pitch, glue, or fine dust on the cutting surfaces. That buildup can increase friction and heat and may contribute to burning, rough cuts, and greater cutting resistance.
A good cleaning routine does not require aggressive scrubbing or complicated equipment. The key is to use a cleaner compatible with the bit and its coatings, protect the carbide cutting edges from unnecessary abrasion, and treat bearing-guided bits separately because solvents can remove bearing lubrication. Cleaning can restore a contaminated cutting surface, but it cannot repair chipped carbide, a bent shank, or a genuinely dull cutting edge.
Source: powertecproducts.com
Why Router Bits Need Regular Cleaning
Router bits collect more than sawdust. Resin and pitch from wood can form a hard film on carbide cutting edges, flutes, and the surrounding steel body. Adhesive residue and fine particles from manufactured boards can also accumulate. Once the deposits harden, they can change how the cutter contacts the workpiece and make a sharp bit behave as though it is dull.
Cleaning matters because residue can increase friction and heat at the cutting area. That can contribute to burning, rougher cuts, and increased force during routing. A dirty bit may therefore create symptoms that look like a sharpening problem when the underlying issue is contamination.
Cleaning should be treated as maintenance rather than a repair. Removing residue restores the exposed cutting surfaces, but it does not restore missing carbide or correct a damaged cutting geometry.
Source: cdn.shopify.com
Visible resin or pitch
A sticky, dark, amber, or baked-on film around the flutes or cutting edges is a clear reason to clean the bit.
Burn marks
Burning can have several causes, but heavy residue on the cutter is one condition worth eliminating before assuming the bit needs sharpening.
More cutting resistance
If a previously familiar bit suddenly requires more pressure, inspect it for buildup before changing other routing variables.
Rougher cuts
A contaminated bit can produce a less consistent finish, particularly when deposits interfere with the intended cutting geometry.
Which Materials Create More Buildup?
Resinous softwoods such as pine and cedar can leave sticky deposits, while MDF and particleboard can contribute fine abrasive dust. Plywood, laminates, and glued materials can also leave adhesive-related residue. The actual buildup depends on the material, cutter design, routing conditions, and amount of use.
There is no universal cleaning interval that fits every workshop. A better rule is to inspect the bit whenever residue becomes visible or cutting behavior changes. Bits used frequently in resinous or abrasive materials generally deserve more frequent inspection.
Softwoods
Sap and resin can accumulate quickly, especially when the cutter becomes warm.
MDF and particleboard
Fine dust can collect in flutes and around cutting surfaces and may contribute to faster edge wear.
Plywood and laminated materials
Adhesives and surface materials can leave deposits that are different from ordinary wood dust.
What You Need Before Cleaning a Router Bit
Gather the cleaning materials before starting so the bit can be handled in a controlled workspace. At minimum, you need a clean work surface, a suitable cleaner, a cloth, and a small nonabrasive brush. Safety glasses and chemical-resistant gloves are appropriate when the cleaner label calls for them.
The cleaner is the most important variable. Purpose-made blade and bit cleaners are available in different formulations, including products designed to dissolve pitch and resin. Some products are intended to be diluted and rinsed, while others are designed to be wiped away without rinsing. Follow the specific product instructions rather than combining methods from different cleaners.
If your router bit has a special coating, check the cleaner manufacturer’s compatibility information. Some cleaning chemicals can affect particular finishes or coatings, even when the product is suitable for ordinary steel and carbide tooling.
Source: cdn11.bigcommerce.com
Suitable bit cleaner
Choose a cleaner whose instructions cover router bits and the materials or coatings present on your cutter.
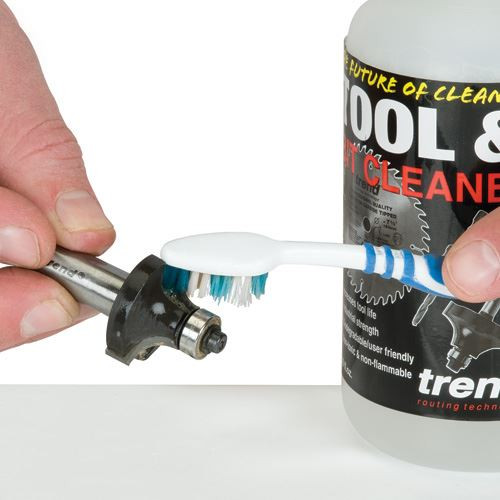
Nylon or brass brush
A small brush helps loosen softened residue without requiring aggressive scraping.
Clean cloth
Use a lint-free or low-lint cloth to wipe away dissolved residue and moisture.
Safety equipment
Wear eye protection and suitable gloves when required by the cleaner’s label or safety data sheet.
Small container
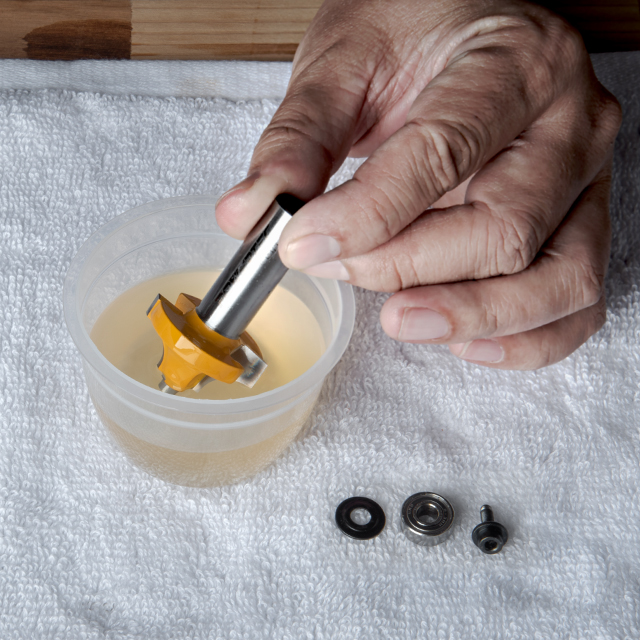
A compatible container can be useful for controlled cleaning, but do not assume every bit or bearing can safely be immersed.
Should You Use a Brass or Nylon Brush?
Both can be useful for removing softened deposits. The brush should loosen residue rather than forcefully scrape the cutting edge. Work with the geometry of the flute and avoid dragging a hard brush across a fragile carbide edge.
Do not use a power wire wheel or similarly aggressive tool to clean a router bit. High-speed mechanical abrasion can remove material, damage coatings, or chip a carbide cutting tip. Cleaning should preserve the cutter geometry rather than modify it.
Preferred approach
Soften the deposit with an appropriate cleaner and use controlled hand brushing.
Avoid aggressive abrasion
Do not use cleaning methods that can grind, round, scratch, or impact the cutting edge.
How to Clean Router Bits Step by Step
The basic cleaning process is straightforward: remove the bit, clear loose debris, apply the appropriate cleaner, allow the residue to soften according to the product instructions, scrub gently, wipe clean, dry thoroughly, and inspect the cutter. Do not clean a router bit while it remains installed in the router.
Start with the least aggressive method that can remove the contamination. If a light application of cleaner and gentle brushing works, there is no reason to escalate to stronger chemicals or harder tools.
Source: boeshield.com
1. Remove the bit
Unplug or otherwise isolate the router according to the tool manufacturer’s safety procedure, remove the bit from the collet, and place it on a stable work surface.
2. Remove loose dust
Brush away loose sawdust and debris before applying liquid cleaner so the cleaner can work on the resin or pitch rather than creating a wet layer of dust.
3. Apply the cleaner
Apply the cleaner to the contaminated cutting surfaces according to its label. Avoid unnecessary exposure of bearings and other components that the cleaner is not designed to treat.
4. Allow deposits to soften
Give the cleaner the manufacturer’s recommended contact time. Do not assume that a longer soak is always better.
5. Scrub gently
Use a nylon or brass brush to loosen the softened residue. Follow the flute shape and avoid levering against the carbide cutting edge.
6. Wipe the bit
Remove dissolved residue with a clean cloth. Repeat the cleaner and brushing process if deposits remain.
7. Dry completely
Dry the steel body and shank thoroughly. If the cleaner requires rinsing, rinse as directed and then dry immediately.
8. Inspect before reuse
Check the carbide tips, cutting edges, shank, and any bearing for damage or abnormal movement before reinstalling the bit.
How Do You Know the Cleaning Worked?
A successful cleaning leaves the cutting surfaces visibly free of resin, pitch, glue, and compacted dust. The flutes should be open, the cutting geometry should be clearly visible, and any bearing should rotate smoothly without obvious grit, looseness, or wobble.
Cleaning is not successful merely because the bit looks brighter. The important result is removal of material that was interfering with the cutting surfaces. If burning or poor cutting remains after the bit is clean, move on to inspecting sharpness, cutter condition, speed, feed rate, and the workpiece.
Clean cutting surfaces
No substantial resin, pitch, glue, or compacted dust should remain on the active cutting areas.
Visible cutting geometry
Carbide edges and flute spaces should be unobstructed so you can inspect them.
Dry steel surfaces
The bit should be dry before storage or installation unless the product instructions specify a protective treatment.
How to Clean Bearing-Guided Router Bits
Bearing-guided router bits need extra care because the bearing contains lubrication that can be affected by solvents. Flush-trim, pattern, rabbeting, roundover, and similar bits may use a guide bearing that should not be treated like the steel and carbide cutting portion.
Before heavy cleaning, inspect the bearing and determine whether it needs to remain installed. If the bearing can be removed according to the bit manufacturer’s instructions, separating it from the cutter can reduce the chance of cleaner reaching the bearing’s internal lubrication.
If the bearing needs cleaning, use a cloth or other controlled method appropriate for the bearing rather than automatically soaking the entire assembly. After cleaning, verify that the bearing rotates smoothly before putting the bit back into service.
Source: burnettetools.com
Do not automatically soak the bearing
Solvent can remove or affect internal lubrication, which may cause a bearing to become rough or fail prematurely.
Inspect before and after cleaning
Check for wobble, roughness, unusual noise, or resistance when the bearing is rotated by hand.
Use the correct lubricant
If the bearing is designed to be serviced, use the lubricant specified or approved by the bearing or bit manufacturer.
Replace questionable bearings
A gritty, loose, noisy, or damaged bearing should not be trusted simply because the cutting portion of the bit is clean.
What If the Bearing Stops Spinning Smoothly?
A bearing that becomes rough after cleaning may have lost lubrication or may already have been damaged. Do not compensate by adding random oil or continuing to use the bit at high speed. Check the manufacturer’s service instructions and replace the bearing if it is not designed to be safely restored.
A clean cutting edge does not make a defective guide bearing safe. The bearing must rotate properly and guide the cutter consistently against the workpiece.
Smooth rotation
The bearing should turn without obvious grinding, sticking, or excessive side play.
No visible damage
Inspect the bearing, screw, washer, and surrounding components before reassembly.
Common Router Bit Cleaning Mistakes to Avoid
Most cleaning problems come from using too much force, the wrong chemical, or an unsuitable method for the bit’s construction. A router bit is a precision cutting tool, so the objective is to remove contamination without changing its geometry or damaging its components.
Household cleaning advice found online can vary widely. A chemical that works on one type of metal or coating may not be appropriate for another. When a manufacturer’s instructions are available, they should take priority over generic cleaning advice.
Source: images.contentstack.io
Cleaning the bit while it is installed
Remove the bit before cleaning. This prevents accidental contact with the cutter and keeps cleaning chemicals away from the router.
Using excessive mechanical force
Do not scrape aggressively or use a power wire wheel. The purpose is to remove deposits, not grind the cutter.
Using an incompatible cleaner
Check the cleaner’s instructions for compatibility with carbide, steel, coatings, plastics, and other components on the bit.
Soaking bearings with the bit
Avoid exposing bearings to solvents unless the manufacturer specifically says the method is acceptable.
Leaving moisture on the steel body
Dry the bit promptly after cleaning and rinsing because the steel portion can corrode.
Assuming cleaning fixes a dull bit
Cleaning removes contamination. It does not restore a worn, chipped, cracked, or incorrectly ground cutting edge.
Storing bits loose together
Protect carbide edges from striking other tools by using individual holders, compartments, sleeves, or another method that prevents contact.
Cleaning Versus Sharpening Versus Replacement
Use cleaning when residue is the obvious problem. Consider sharpening when the cutter is clean but the cutting edge has become genuinely dull and the bit is otherwise serviceable. Replacement is appropriate when the bit has damaged carbide, a bent or damaged shank, a failed bearing that is not economically serviceable, or other defects that make continued use unsuitable.
A useful troubleshooting sequence is clean first, inspect second, and only then decide whether sharpening or replacement is necessary. This avoids trying to correct a contamination problem by removing more material from an otherwise usable cutting edge.
Clean
Visible resin, pitch, glue, or dust is interfering with the cutting surfaces.
Sharpen
The bit is clean and structurally sound but the cutting edges are worn and suitable for sharpening.
Replace
Carbide is chipped or missing, the shank is damaged, a critical component is defective, or the cutter cannot be restored reliably.
How Often Should You Clean Router Bits?
There is no single cleaning schedule that fits every router bit or material. Inspect the bit after use and clean it when residue is visible or when cutting performance changes. A bit used heavily in resinous wood may need attention much sooner than a cutter used briefly on clean, dry hardwood.
For a busy shop, a short inspection after each project is practical. If you routinely process materials that create heavy buildup, cleaning at shorter intervals can prevent deposits from hardening and becoming more difficult to remove.
The best routine is condition-based rather than calendar-based: inspect the cutter, remove contamination before it becomes severe, and check the bit again before the next job.
Source: boeshield.com
After a resin-heavy project
Inspect the bit immediately and clean visible deposits before they harden.
After MDF or abrasive board work
Remove accumulated dust and inspect the cutting edges because fine particles can hide damage or buildup.
When burning appears
Clean and inspect the bit before changing multiple router settings or assuming the cutter is dull.
Before long-term storage
Clean and dry the bit, protect appropriate steel surfaces from corrosion according to the manufacturer’s recommendations, and store the cutter so its edges cannot contact other tools.
What to Check Before Putting a Clean Bit Back in the Router
Cleaning is the right time to perform a quick condition check. Look closely at each carbide tip and cutting edge for chips, cracks, missing material, or obvious damage. Inspect the shank for damage and verify that a guide bearing, when present, turns smoothly without excessive play.
If anything looks questionable, do not assume that a clean surface means the bit is ready for use. A damaged cutting tool can remain unsafe or produce poor results even when it has been thoroughly cleaned.
Carbide
Look for chipped, cracked, or missing cutting material.
Shank
Check for damage, corrosion, or anything that could prevent proper seating in the collet.
Bearing
Verify smooth rotation and inspect the mounting hardware.
Storage
Keep cutters separated or protected so carbide edges do not strike each other.
Frequently Asked Questions
Q
What is the best way to clean router bits?
Remove the bit from the router, clear loose debris, apply a cleaner suitable for the bit, allow the residue to soften according to the cleaner’s instructions, gently brush the buildup away, wipe the bit clean, and dry it thoroughly. Use extra care around bearings and special coatings.
Q
Can I use a wire brush to clean a router bit?
A small brass brush can be useful for stubborn residue when used gently. Avoid aggressive steel brushes and power wire wheels because they can damage cutting edges, coatings, or carbide tips. The cleaner should do most of the work.
Q
Can I soak a router bit in cleaner?
Some router bit cleaners are specifically designed for immersion or soaking, but the method depends on the product and the bit. Do not automatically soak a bearing-guided bit with its bearing installed because solvents can remove bearing lubrication. Follow the cleaner and bit manufacturer’s instructions.
Q
Can I use mineral spirits or other solvents to clean router bits?
Some woodworking maintenance guides use solvents for particular cleaning jobs, but suitability depends on the bit, coatings, bearings, and cleaner. If you use a solvent, follow its label, provide appropriate ventilation, use required protective equipment, and keep it away from components that the manufacturer says should not be exposed.
Q
How do I clean a router bit with a bearing?
Inspect the bearing before cleaning. If heavy cleaning is needed, remove the bearing when the bit design and manufacturer instructions allow it. Clean the cutting portion separately, and clean the bearing surface with a controlled amount of suitable cleaner rather than automatically immersing the bearing. Reinstall or replace the bearing according to the manufacturer’s instructions and verify smooth rotation.
Q
Why is my router bit still burning wood after cleaning?
Burning can have several causes. Once the bit is clean, inspect the cutting edges for dullness or damage and check the router speed, feed rate, cutting depth, bit selection, and workpiece. Cleaning removes contamination but cannot restore a dull or damaged cutter.
✦ Wrapping Up
Conclusion
Router bit cleaning is a basic maintenance task that helps keep resin, pitch, glue, and dust from interfering with the cutter. The safest routine is controlled rather than aggressive: remove the bit, clear loose debris, use a compatible cleaner, gently brush the softened residue, wipe and dry the bit, and inspect it before use.
Pay particular attention to bearing-guided cutters. Solvent exposure can affect bearing lubrication, so the bearing should be treated separately when necessary. After cleaning, do not assume every performance problem is solved. If the bit remains hot, burns the workpiece, vibrates, or produces a poor finish, inspect the cutting edges and the rest of the routing setup.
💡 Key Takeaway
After your next routing project, remove the bit, inspect it for resin and pitch, clean the buildup with a compatible cleaner and gentle brush, dry it completely, and check the carbide and bearing before storing or reinstalling it.