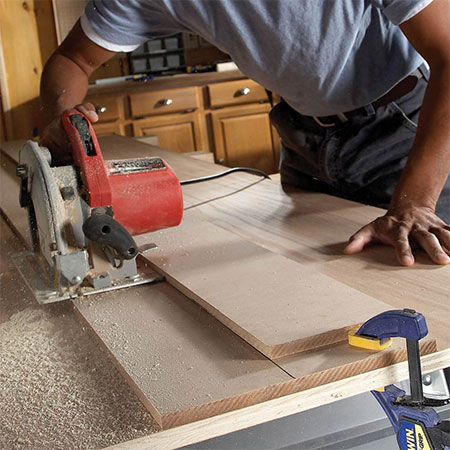
The easiest way to make straight circular saw cuts is to secure the workpiece, mark the cut accurately, set the blade depth correctly, and guide the saw against a straightedge, speed square, rip fence, or guide rail instead of trying to steer the saw freehand.
For homeowners, DIYers, and woodworkers in the United States, a circular saw is one of the most practical tools for breaking down dimensional lumber, plywood, MDF, OSB, and other sheet goods. It can make accurate straight cuts, but the result depends heavily on how the material and saw are set up. A long pencil line alone is difficult to follow consistently, especially when cutting a full 4-by-8-foot sheet of plywood.
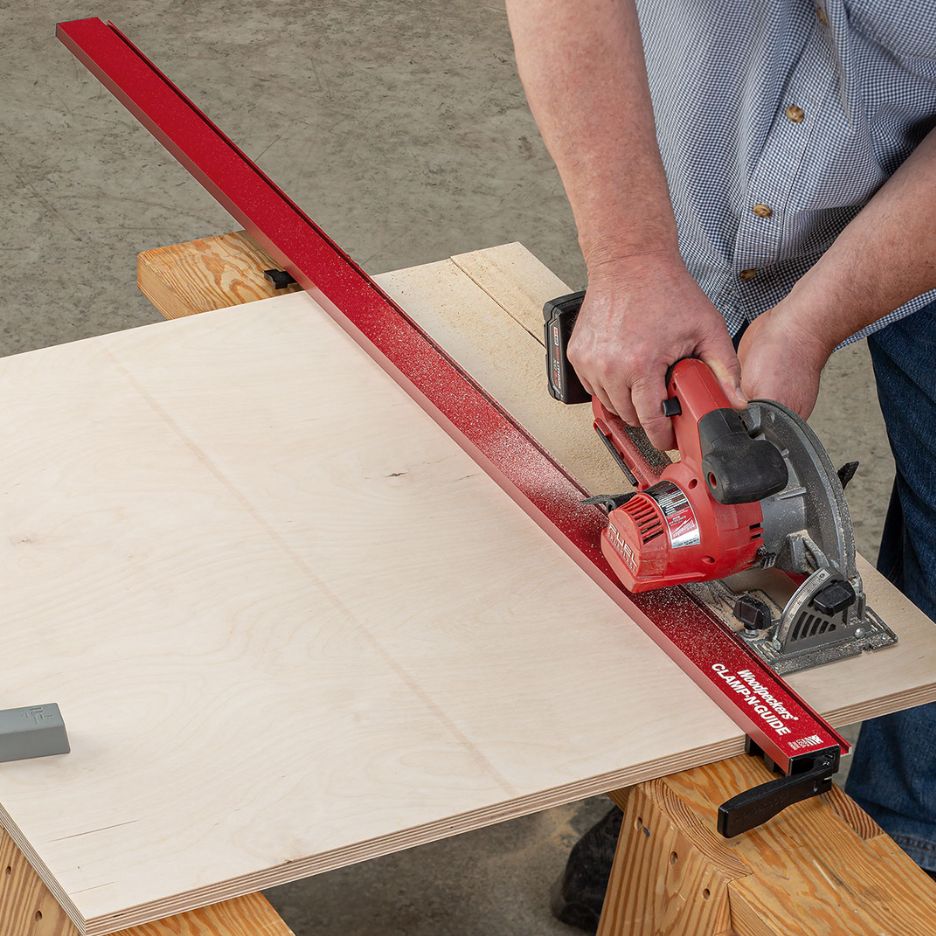
The most reliable approach is to give the saw a physical reference. A speed square works well for short crosscuts, while a clamped straightedge, shop-made cutting guide, rip fence, or compatible guide rail is better for long cuts. The saw should move forward smoothly with the shoe kept flat against the workpiece or guide. If the blade starts drifting, do not force it sideways to recover the line. Stop the saw, allow the blade to stop, and correct the setup before continuing.
Source: home-dzine.co.za
What Makes a Circular Saw Cut Straight?
A circular saw makes a straight cut when the blade travels through the material without being forced sideways. The saw shoe provides the stable platform, the blade establishes the kerf, and a straight guide controls the direction. Your hands should maintain forward movement and control rather than continually correcting the saw from side to side.
The longer the cut, the harder it becomes to maintain accuracy by sight alone. Small steering movements accumulate over several feet. That is why a straightedge or guide rail is especially useful for ripping plywood, trimming panels, and making long cuts in lumber.
A straight cut also depends on the workpiece staying stable. If the board shifts, the saw can move with it. If the waste section drops and pinches the blade, the saw may bind or kick back. Good support is therefore part of cutting accuracy as well as safe operation.
Source: ultimatetools.ca
Stable workpiece
Support the material on a solid work surface or sawhorses so the section being cut remains stable throughout the cut.
Straight reference
Use a speed square, rip fence, straight board, level, shop-made guide, or compatible guide rail when accuracy matters.
Sharp blade
A sharp blade cuts with less resistance and makes it easier to maintain a controlled feed rate.
Consistent feed
Move the saw at a controlled pace that allows the blade to cut without excessive pushing or hesitation.
Crosscuts Versus Rip Cuts
A crosscut runs across the width or grain direction of a board. A rip cut generally runs along the length or grain direction. With sheet goods such as plywood, the terms are still used even though the grain structure may not be as straightforward as it is with solid lumber.
Short crosscuts are often easiest with a speed square or crosscut guide. Long rip cuts are usually easier with a straightedge, rip fence, or guide rail because the reference needs to remain accurate over a greater distance.
Short crosscut
A speed square can provide a quick physical reference for 90-degree cuts and certain angled cuts.
Long rip cut
A clamped straightedge or guide rail keeps the saw traveling consistently over the length of the workpiece.
How to Set Up for a Straight Circular Saw Cut
Start by preparing the workpiece, saw, blade, and guide before pulling the trigger. A few minutes spent on setup can prevent a crooked cut or a dangerous bind later in the cut.
For typical woodworking, place the material on stable supports with enough clearance underneath for the blade. Make sure the planned cut will not strike a sawhorse, workbench, clamp, or other support. Secure the workpiece so it cannot move while you operate the saw.
Check the blade, lower guard, shoe, bevel setting, and cutting depth. The blade should be appropriate for the material and in good condition. The shoe should sit flat, and the bevel should be set to the angle required for the project. For a standard straight 90-degree cut, the blade should be perpendicular to the shoe.
For many cuts, a blade depth that extends only slightly beyond the material is easier to control than a deeply exposed blade. Follow the saw manufacturer’s instructions for the appropriate adjustment and cutting capacity.
Source: kelvinpowertools.com
Mark the cut
Measure from a reliable reference edge and draw a clear cutline. Identify which side of the line is the waste side.
Secure the material
Clamp or otherwise support the workpiece so it remains stable without placing clamps in the path of the saw.
Check the blade
Inspect the blade for damage, excessive wear, pitch buildup, or other conditions that could affect cutting.
Set blade depth
Adjust the blade so it is not unnecessarily deep while still passing completely through the material.
Check the bevel
Set the bevel to the required angle and verify that the shoe sits flat before starting.
Measure the Guide Offset
When using a straightedge beside the saw rather than directly under the blade, you must account for the distance between the blade and the edge of the saw shoe. This distance varies by saw design and which side of the shoe you use.
Measure from the blade’s cutting edge to the shoe edge that will ride against the guide. Position the straightedge so that the blade, not the shoe, lands on your intended cutline. Make a test cut on scrap material before cutting an expensive panel.
For a homemade guide, the easiest method is to trim the guide with the same saw that will be used for the project. Once trimmed, the guide’s cut edge can represent the blade’s actual cutting path, reducing the need to repeatedly calculate the offset.
Do not assume the offset
Two circular saws can have different blade-to-shoe dimensions, so measure the actual saw being used.
Test on scrap
A test cut quickly confirms whether the guide is positioned correctly before the final workpiece is cut.
Step-by-Step: How to Make Straight Circular Saw Cuts
Once the workpiece and guide are ready, the actual cut should be controlled and deliberate. The goal is to let the guide establish direction while you maintain the saw’s forward movement and keep the shoe supported.
For a long cut in plywood or another sheet good, a guide rail or clamped straightedge is generally easier to follow than a pencil line. For a short crosscut, a speed square can provide the required reference with less setup.
Source: todoferreteria.com
1. Mark the final cut
Measure carefully, mark the intended cut, and determine the waste side of the line.
2. Position the workpiece
Support the panel or board so the cut is clear underneath and neither section can collapse into the blade.
3. Position the guide
Place the straightedge, fence, or guide rail using the measured blade-to-shoe offset. Clamp it securely when necessary.
4. Check the saw
Confirm blade depth, bevel angle, blade condition, guard operation, and that the shoe can travel without obstruction.
5. Place the saw
Set the front portion of the shoe on the material with the blade clear of the workpiece before starting the motor.
6. Start at full operating speed
Start the saw according to its instructions and allow the blade to reach its normal operating speed before entering the material.
7. Make the cut
Keep the shoe flat and, when using a guide, maintain firm contact between the shoe and guide while moving forward smoothly.
8. Finish the cut safely
Continue supporting the saw and workpiece until the blade clears the material. Release the trigger and wait for the blade to stop before setting the saw down.
What a Good Cut Should Look and Feel Like
A properly controlled cut should progress without repeated sideways corrections, excessive motor strain, burning, or sudden changes in feed resistance. The kerf should remain close to the intended line and the saw should remain stable on the material.
If the saw starts pulling, burning, vibrating excessively, or requiring unusual force, stop and investigate. The cause could be a dull or inappropriate blade, incorrect support, a misaligned guide, excessive cutting depth, or material movement.
Straight kerf
The cut remains consistently aligned with the intended path rather than gradually wandering.
Stable shoe
The saw shoe remains fully supported and does not rock or lift during the cut.
Controlled feed
The saw advances without excessive force, hesitation, or repeated changes in direction.
Choosing the Right Method for Straight Cuts
The best guiding method depends mainly on the length of the cut, the required accuracy, the shape of the workpiece, and how often you make similar cuts. A speed square is fast for short cuts, while a guide rail is convenient when you regularly break down large sheets.
A rip fence can be useful when the workpiece has a straight reference edge and the required cut is parallel to that edge. A clamped straightedge is more flexible because it does not depend on the workpiece edge being straight.
For repeated precision work, a purpose-made guide system or track saw can reduce setup time. A standard circular saw can still make very accurate cuts, but the quality of the result depends more heavily on careful positioning and maintaining contact with the guide.
Source: evolutionpowertools.com
Speed square
Best suited to short 90-degree crosscuts and selected angled cuts on boards.
Rip fence
Useful for repeatable parallel cuts when the workpiece edge is straight enough to serve as the reference.
Clamped straightedge
A versatile choice for long cuts because the guide can be positioned anywhere on the workpiece.
Shop-made guide
A custom guide can provide a repeatable reference and can be trimmed specifically for one circular saw.
Guide rail
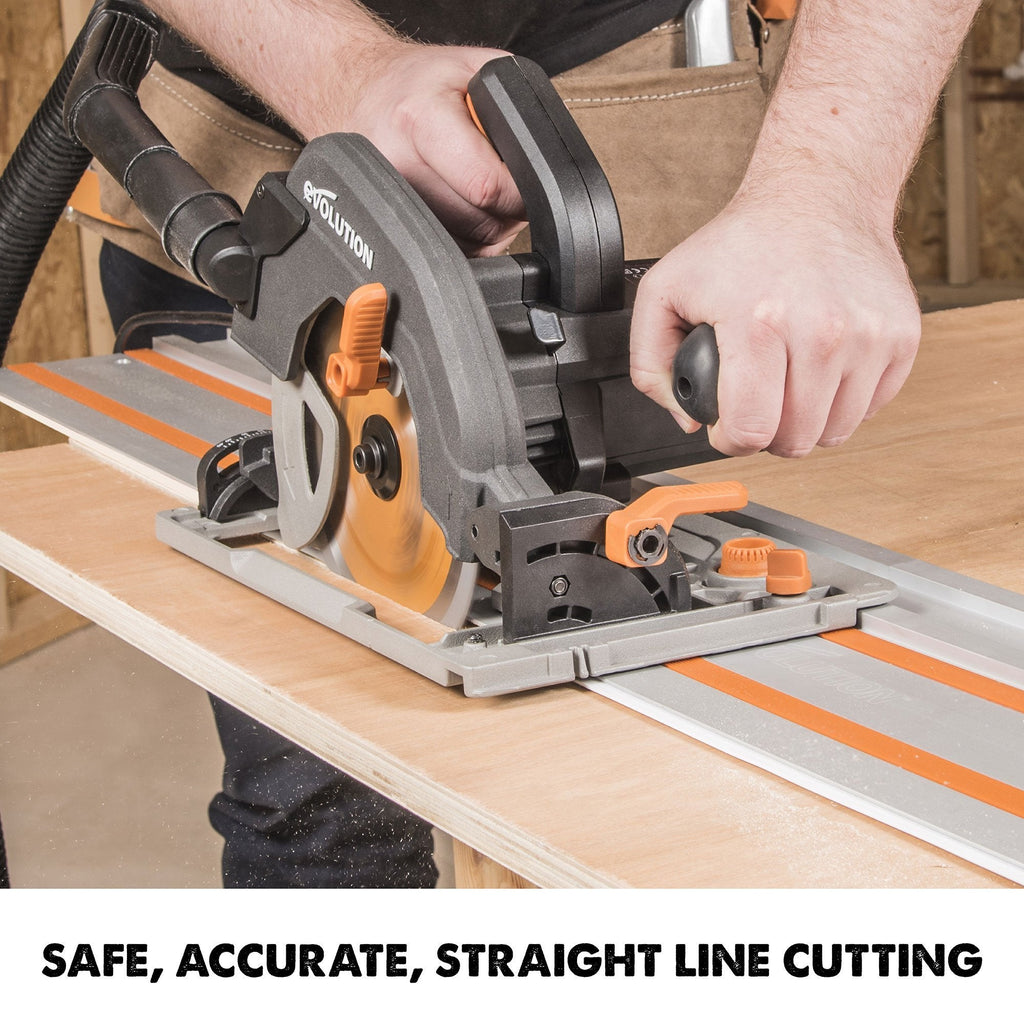
A dedicated rail provides a defined path for compatible saws and is particularly useful for long sheet-good cuts.
When a Guide Rail Is Worth Using
A guide rail becomes especially useful when cutting long panels where even a small amount of freehand drift would affect the finished dimensions. It also helps when you need repeatable cuts or want to reduce the amount of visual steering required.
Before using a guide rail, confirm that the specific circular saw is compatible with the rail. Some saws connect directly while others require an adapter or a particular base configuration. Follow the tool and rail manufacturer’s instructions for setup and adjustment.
Long sheet cuts
A rail provides a continuous reference over a long cutting path.
Repeat work
A properly positioned rail can make repeated panel cuts easier to set up consistently.
Precision work
A guide reduces the need to steer the saw by eye and can improve repeatability.
How to Get Cleaner Straight Cuts in Plywood and Sheet Goods
Straightness and surface quality are related but different problems. A perfectly straight cut can still have splintering or tear-out if the blade is poorly suited to the material or the unsupported face of the sheet is allowed to break away.
For plywood, MDF, and finished sheet goods, select a blade designed for the material and the required finish. Blades with more teeth generally remove smaller amounts of material per tooth and can produce a cleaner finish, although the exact blade selection should follow the material and saw manufacturer’s recommendations.
Support both the workpiece and the cutoff where practical without creating a situation in which the material can pinch the blade. A sacrificial surface such as rigid foam can support large panels while allowing the blade to pass through the material without contacting a workbench.
If the visible face of plywood matters, consider which side of the sheet should face down based on the cutting direction of the specific circular saw. A test cut on scrap is the safest way to determine which face gives the desired result with your particular blade and saw.
Source: selbst.de
Use the correct blade
Choose a blade intended for plywood, sheet goods, framing lumber, or the specific material being cut.
Keep the blade sharp
A dull blade can increase resistance, heat, and the amount of force needed to move the saw.
Use proper support
Support large sheets over their surface rather than balancing them on a few isolated points.
Control feed rate
Move steadily instead of pushing aggressively or stopping repeatedly in the middle of the cut.
Test the finish
Make a short test cut on scrap when the appearance of the finished edge matters.
Why Straight Cuts Sometimes Splinter
Splintering can result from the blade exiting the material, an unsuitable blade, dull or damaged teeth, insufficient support, or cutting technique. Veneered plywood and melamine-faced panels can be particularly sensitive because the thin surface layer can chip as the teeth exit.
A finer blade appropriate for the material can reduce surface damage, but tooth count alone does not guarantee a clean edge. Blade geometry, material, feed rate, support, and saw condition all influence the result.
Blade-related damage
A damaged, dull, or unsuitable blade can increase tear-out and make the saw harder to control.
Unsupported fibers
Material that is unsupported near the cut can break away as the blade exits.
Excessive feed pressure
Forcing the saw can increase vibration and reduce control over the cutting path.
Common Problems With Circular Saw Straight Cuts
When a circular saw produces a crooked, rough, or inconsistent cut, changing your hand position is rarely the first thing to try. Check the setup in a logical order: workpiece support, blade condition, guide alignment, cutting depth, bevel setting, and feed technique.
Never try to correct a significant deviation by twisting the saw while the blade is engaged. A sideways correction can cause the blade to bind. Stop the saw, allow it to come to a complete stop, remove it safely, correct the cause, and restart from a suitable position.
Source: keybladesfixings.co.uk
The cut wanders away from the line
Possible causes include freehand steering, an incorrectly positioned guide, excessive feed pressure, or material movement. Use a physical guide and verify its offset.
The saw feels difficult to push
Check the blade condition, cutting depth, material support, and whether the kerf is closing around the blade.
The blade burns the material
A dull blade, inappropriate blade, slow feed, or material binding can contribute to burning. Stop and inspect rather than continuing to force the saw.
The cut is straight but rough
Check whether the blade is appropriate for the material and whether the required finish calls for a finer-tooth blade.
The workpiece moves
Improve support and clamping before making another cut. Do not rely on one hand to hold the material while operating the saw.
The saw vibrates or pulls unexpectedly
Stop the cut and inspect the blade, shoe, guide alignment, material support, and saw settings before continuing.
Safety Boundaries You Should Not Ignore
A circular saw is a high-speed cutting tool and can cause severe injury if the blade contacts a person or if the material kicks back. Use the guard system supplied with the saw and do not operate a saw if its safety guard is damaged or not functioning correctly.
Keep both hands on the intended saw handles whenever the tool design calls for two-handed control, and keep hands away from the blade path and the underside of the workpiece. Wear appropriate eye protection and follow the manufacturer’s instructions for hearing and respiratory protection based on the material and work environment.
Keep cords away from the cutting path on corded saws. Remove loose clothing, jewelry, and other items that could interfere with tool operation. Make sure other people are clear of the cutting area before starting the saw.
If the blade binds, the material shifts, or the saw begins to kick back, do not fight the tool. Release the trigger as appropriate, keep control of the saw, wait for the blade to stop, and determine why the problem occurred before attempting another cut.
Never bypass the guard
The upper and lower blade guards are safety components and should function as intended by the saw manufacturer.
Keep hands away from the cut
Never place a hand underneath or directly ahead of the blade to support the material.
Avoid unsupported offcuts
Arrange supports so the material does not close on the blade or fall unexpectedly as the cut finishes.
Stop when something changes
Unexpected vibration, binding, burning, pulling, or loss of control is a reason to stop and inspect the setup.
Frequently Asked Questions
Q
Can a circular saw make perfectly straight cuts?
A circular saw can make very accurate straight cuts when the material is stable, the saw is properly adjusted, and the cutting path is controlled with an appropriate guide. A clamped straightedge or guide rail generally makes long cuts more repeatable than following a pencil line freehand.
Q
What is the easiest way to cut a straight line with a circular saw?
For a short crosscut, use a speed square or suitable crosscut guide. For a long cut, clamp a straightedge or use a compatible guide rail. Position the guide using the actual distance from the blade to the edge of the saw shoe and confirm the setup with a scrap cut.
Q
Why does my circular saw keep cutting crooked?
Common causes include trying to steer the saw freehand, a dull or damaged blade, excessive feed pressure, an incorrectly positioned guide, inadequate workpiece support, or a blade that is being pinched. Check the setup before attempting to correct the cut with sideways pressure.
Q
How do I cut plywood straight with a circular saw?
Support the plywood across its surface, mark the cut, select a blade suitable for plywood, and use a straightedge or guide rail. Keep the saw shoe flat and move at a steady pace. If the finished surface matters, make a test cut first to determine the best blade and workpiece orientation.
Q
Should I use a guide rail or a straightedge?
Either can work well. A straightedge can be inexpensive and flexible, especially for occasional DIY work. A compatible guide rail can make long cuts faster to set up and easier to repeat, particularly when the same type of sheet cutting is performed frequently.
Q
What should I do if the circular saw starts drifting during a cut?
Do not twist or force the saw back toward the original line while the blade is cutting. Stop the saw safely, wait for the blade to stop, remove it from the workpiece, and inspect the guide, blade, material support, cutting depth, and bevel setting before restarting.
✦ Wrapping Up
Conclusion
Making straight circular saw cuts is less about developing a perfect steering technique and more about creating a stable cutting system. Secure the material, use a suitable blade, set the saw correctly, and give the shoe a reliable physical guide whenever the cut needs to remain accurate over a long distance.
For short board cuts, a speed square can provide fast and repeatable guidance. For long plywood and sheet-good cuts, a clamped straightedge, shop-made guide, rip fence, or compatible guide rail can make the cutting path much easier to control. If a cut begins to wander or the saw behaves unexpectedly, stop rather than trying to force the blade back into position.
💡 Key Takeaway
For your next straight circular saw cut, mark the line, support the material, measure the blade-to-shoe offset, clamp a straightedge or guide rail, set the blade depth and bevel correctly, and make one test cut on scrap before cutting the final piece.