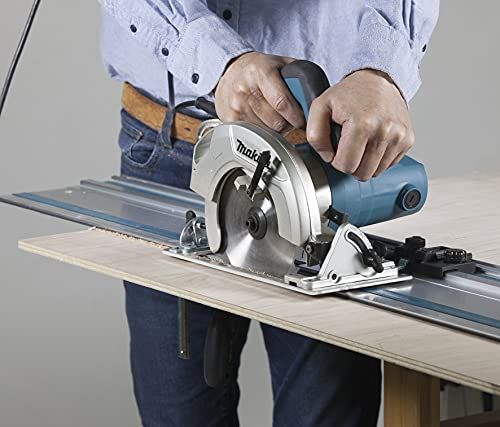
A circular saw rip cut is a lengthwise cut made in the same direction as the wood grain. For a straight, controlled cut, support the workpiece properly, set the blade depth correctly, use a sharp blade suited to the material, and guide the saw with a rip fence, straightedge, or guide rail.
For U.S. DIYers, carpenters, remodelers, and woodworkers, a circular saw is one of the most practical ways to break down dimensional lumber and full-size sheet goods without moving the material to a table saw. A rip cut follows the length of a board or panel, making it useful for narrowing plywood, trimming boards to width, cutting strips, and breaking down large panels before assembly.
The challenge is keeping the blade on the intended path while preventing the workpiece from shifting, sagging, or pinching the blade. A good setup matters as much as the saw itself. Before cutting, disconnect the saw when changing the blade or making adjustments, confirm that the blade guard works freely, secure the material, and keep your hands away from the blade path. During the cut, let the saw do the work instead of forcing it through the material.
Source: paoson.com
What Is a Circular Saw Rip Cut?
A circular saw rip cut is a straight cut made lengthwise through a piece of wood. On a dimensional board, that normally means cutting in the same general direction as the grain. On plywood, MDF, or another sheet good, the term usually refers to cutting along the long dimension rather than across the panel’s shorter dimension.
The distinction matters because the cutting load, blade selection, and support requirements can change with the material. A rip cut through a 2×6, for example, behaves differently from a long cut through a 4×8 sheet of plywood. The basic objective remains the same: keep the blade moving along a controlled path while the workpiece remains stable.
The circular saw removes a narrow strip of material called the kerf. The kerf is wider than the blade’s steel plate because the teeth extend outward. When laying out a cut, the side of the line that contains the material you intend to keep must account for the kerf.
Source: kelvinpowertools.com
Rip cut
A lengthwise cut, generally following the grain in solid wood or following the long dimension of a sheet good.
Kerf
The width of material removed by the blade. It affects the final dimensions of the cut pieces.
Offcut
The portion of material removed from the piece you intend to keep.
Guide
A fence, straightedge, or guide rail that helps keep the saw traveling along the intended cut path.
When Are Rip Cuts Useful?
Rip cuts are common when narrowing dimensional lumber, cutting plywood into cabinet components, trimming shelving, preparing strips for framing or furniture, and reducing large panels to manageable sizes. A circular saw is especially useful when the material is too large or awkward to move to a stationary saw.
Narrowing boards
Remove material from the length of a board to create a narrower piece.
Breaking down plywood
Divide large panels into smaller sections before moving them to a workbench or assembly area.
Repeat-width cuts
Use a fixed guide to make multiple pieces to the same approximate width.
What You Need Before Making a Rip Cut
The best rip cuts start with preparation. You need a circular saw and a blade that matches the material, but you also need a stable cutting surface and a method for controlling the saw’s path. A rip fence can work well for cuts close to a straight board edge. For wide plywood cuts, a long straightedge or guide rail generally provides better control because the guide can be positioned directly on the desired cut line.
Before starting, inspect the saw for obvious damage and make sure the blade is properly installed. The lower guard should move freely and return to its protective position when the saw leaves the material. Use eye protection and follow the safety instructions supplied with the particular saw and blade.
For large panels, plan how the material will be supported before turning on the saw. The panel should not be balanced precariously between two supports with the cut positioned where the material can sag and pinch the blade.
Source: herramientas.wiki
Circular saw
Use a saw capable of cutting the material’s thickness and fitted with a blade approved for the saw.
Correct blade
Choose a blade designed for the material and the type of finish required.
Guide
Use a saw-specific rip fence, straightedge, guide rail, or suitable shop-made guide.
Supports
Provide enough support to keep the workpiece stable and prevent the cut from closing around the blade.
Clamps
Secure guides and workpieces where appropriate so they cannot shift during the cut.
Eye protection
Wear suitable eye protection and use additional personal protective equipment when required by the work environment.
How Deep Should the Circular Saw Blade Be Set?
Set the blade depth according to the saw manufacturer’s instructions and the material being cut. For many ordinary through-cuts, only enough blade should project below the workpiece to complete the cut. Excessive blade exposure increases the amount of exposed tooth below the material without improving the cut itself.
Always make the depth adjustment with the saw disconnected from its power source. After adjustment, check that the shoe sits flat on the material and that the blade will clear the support beneath the workpiece.
Too shallow
The blade may fail to cut completely through the workpiece.
Too deep
More blade is exposed below the workpiece than necessary, increasing the potential hazard.
Correct setup
The blade reaches completely through the material while the saw remains stable on its shoe.
How to Make Circular Saw Rip Cuts Step by Step
The most reliable method is to establish the cut line first, secure the material and guide, then make one controlled continuous cut. Do not try to correct a wandering blade by twisting the saw aggressively. If the blade begins to move away from the guide, release the trigger and allow the blade to stop before reassessing the setup.
The following sequence works for many common U.S. woodworking and construction applications, but the saw’s own operating instructions take priority when they specify a different procedure.
Source: bigcommerce.com
1. Measure the finished width
Determine the final dimension you need and mark the material clearly. Account for the blade kerf so the cut removes material from the correct side of the layout line.
2. Establish a straight reference
Use the workpiece edge with a compatible rip fence or use a straightedge or guide rail positioned to place the blade exactly where required.
3. Secure the material
Support the workpiece so it cannot move and arrange the supports so the kerf remains open as the saw passes through.
4. Set the blade
Disconnect the saw while adjusting depth or changing the blade. Set the cutting depth for the material and verify that the blade is suitable for the application.
5. Check the guide
Measure from the saw blade to the guiding surface when using a straightedge or fence. Confirm the measurement at both ends of a long guide.
6. Position the saw
Place the shoe firmly on the workpiece with the blade clear of the material before starting the saw.
7. Start the cut
Start the saw according to the manufacturer’s instructions and allow the blade to reach operating speed before entering the material when the saw design calls for it.
8. Maintain steady pressure
Move forward at a controlled rate while keeping the shoe flat and the guide firmly referenced. Do not force the saw if the blade begins to slow significantly.
9. Finish the cut
Keep the saw supported until the blade has completely cleared the workpiece. Release the trigger and allow the blade to stop before setting the saw down.
10. Inspect the result
Check the finished width, straightness, edge quality, and whether the blade showed signs of binding or excessive heat.
How to Use a Circular Saw Rip Fence
A rip fence attaches to the saw’s shoe and references the edge of the workpiece. It is useful when the board edge is straight and the desired cut falls within the fence’s adjustment range. Measure the distance from the blade to the fence according to the saw and fence design, then lock the fence securely.
Before making the actual cut, verify the setting with a scrap piece when the dimension is important. Keep the fence against the reference edge throughout the cut without pushing the saw sideways into the fence.
Best use
Cuts that maintain a consistent distance from a straight edge.
Main limitation
The reference edge must be straight enough for the fence to maintain the intended path.
Repeatability
A locked fence can make repeated cuts at the same offset without remarking every workpiece.
How to Rip Wide Plywood With a Straightedge or Guide Rail
A straightedge or guide rail is generally more useful than a short rip fence when the cut is far from the panel edge. Measure the offset between the saw blade and the guide surface, transfer that measurement to the panel, and position the guide so the blade follows the intended cut line.
Clamp the guide where necessary and confirm that the saw’s entire shoe can remain supported throughout the cut. For very long panels, make sure the guide and workpiece are adequately supported at both ends and along the cutting area.
Measure the offset
The guide does not necessarily sit directly on the cut line unless the saw system is designed for that purpose.
Keep the shoe supported
The saw base should not drop or rock as it approaches the end of the panel.
Clamp securely
A moving guide can ruin the cut and create an unsafe operating condition.
Choosing a Blade for Rip Cuts
Blade selection affects cutting speed, edge quality, resistance, and the amount of material removed. A blade designed primarily for fast ripping in solid lumber generally has a different tooth arrangement from a fine-finish blade intended for plywood or cabinet work.
For solid wood, a blade intended for ripping can help clear chips efficiently during a long cut. For plywood and finished sheet goods, a blade with a tooth configuration intended for cleaner sheet-material cuts may reduce splintering. Always verify the blade’s diameter, arbor requirements, maximum rated speed, and material compatibility before installation.
A dull or damaged blade can increase the effort needed to push the saw and can contribute to binding, overheating, poor cut quality, or unsafe behavior. If a blade is cracked, damaged, badly worn, or otherwise unsuitable, remove it from service rather than trying to compensate by pushing harder.
Source: powertoolworld.co.uk
Solid lumber
Consider a blade designed for efficient ripping when speed and chip removal are priorities.
Plywood
Use a blade designed for sheet goods when a cleaner edge and reduced splintering are important.
MDF and similar panels
Use a blade specifically rated for the material and follow the blade manufacturer’s guidance.
Damaged blade
Do not continue cutting with a cracked, damaged, excessively dull, or otherwise unsuitable blade.
Why Does a Circular Saw Struggle During a Rip Cut?
A circular saw can slow down during a rip cut when the feed rate is too aggressive, the blade is dull, the material is unusually dense, the blade is inappropriate for the application, or the workpiece is moving or pinching the kerf. A long rip cut also places a sustained load on the motor and blade.
If the saw begins to bog down, do not simply push harder. Ease the feed pressure and check the setup. If the problem continues, stop the saw safely and inspect the blade, support arrangement, and cut path.
Saw slows down
Reduce feed pressure and check whether the blade or material is causing excessive resistance.
Burn marks
Inspect for a dull or unsuitable blade, excessive friction, or a cut that is closing around the blade.
Repeated binding
Stop and reassess material support and alignment rather than forcing the saw through the cut.
How to Keep Circular Saw Rip Cuts Straight
The most effective way to improve straightness is to guide the saw mechanically instead of relying entirely on freehand control. A rip fence works well when the board edge is straight. A clamped straightedge or guide rail is more flexible for large panels and cuts that are far from an edge.
The saw shoe must remain flat against the material throughout the cut. If the shoe rocks, loses support, or encounters an obstruction, the blade can deviate from the intended line. Keep your forward movement smooth and avoid sideways pressure that can force the blade against the guide or kerf.
For high-value or dimension-critical work, make a test cut in scrap material first. Verify the actual finished width rather than assuming the guide’s scale or your initial measurement is perfect.
Source: paoson.com
Use a mechanical guide
A fence, straightedge, or guide rail reduces the amount of steering required from the operator.
Keep the shoe flat
A stable shoe helps maintain the blade’s intended angle and path.
Support long workpieces
Prevent unsupported material from dropping or shifting as the cut progresses.
Make a test cut
Confirm the actual finished dimension before committing to expensive or difficult material.
What If the Board Edge Is Not Straight?
A standard edge-mounted rip fence follows the reference edge, so a crooked board edge can produce a crooked cut. In that situation, use a straightedge or guide rail positioned independently of the irregular edge. Clamp the guide securely and make the guide reference the cut you actually need rather than the board’s existing edge.
For rough construction lumber, you may need to establish one straight reference edge before using an edge-guided rip fence. For large sheet goods, a long straightedge or track-style guide can bypass an imperfect edge altogether.
Irregular board edge
Do not rely on that edge as the fence reference when it cannot provide a consistent path.
Straightedge solution
Position a straight guide based on the desired cut instead of the existing edge.
Circular Saw Rip Cut Safety and Common Mistakes
Circular saws can cause severe injuries if the blade contacts a person or if the workpiece is thrown during a kickback event. The basic safety principle is to keep the blade controlled, keep the workpiece stable, and keep your body out of the blade’s line of travel.
Portable circular saws are designed with upper and lower blade guards that protect the operator from the rotating blade. Do not defeat, tie back, or otherwise disable a functioning guard. If the guard does not operate correctly, stop using the saw until the problem has been addressed according to the manufacturer’s instructions.
Kickback can occur when the blade binds or catches the workpiece. Poor support, an unsuitable blade, excessive feed pressure, incorrect cutting technique, or material movement can contribute to the problem. Stand in a position that does not place your body directly behind the blade’s projected path, and keep both hands on the saw’s intended handles or gripping areas when operating.
Source: bethanie.co.za
Never cut with a defective guard
If the blade guard does not function as intended, stop and correct the issue before operating the saw.
Do not support material by hand near the cut
Use a stable support arrangement rather than placing a hand underneath or close to the blade.
Avoid the blade line
Position your body so that a sudden movement of the saw or workpiece does not direct the blade toward you.
Do not force a binding saw
Release the trigger and let the blade stop before investigating the cause of binding.
Secure guides
A straightedge or fence must remain fixed during the cut.
Protect your eyes
Use appropriate eye protection to reduce exposure to flying chips and particles.
Why Does a Circular Saw Kick Back During a Rip Cut?
Kickback happens when the rotating blade becomes trapped, stops cutting freely, or catches the material and transfers force back toward the operator. During a rip cut, the kerf can close as the workpiece shifts or bends, placing pressure against the blade. A wandering cut can also create side pressure that makes the blade bind.
The safest response to unexpected binding is not to wrestle with the saw. Release the trigger while maintaining control, allow the blade to stop, and then identify the reason for the binding before restarting.
Poor support
A workpiece that sags can close the kerf around the blade.
Dull blade
A blade that does not cut efficiently can increase resistance and encourage binding.
Forcing the cut
Excessive feed pressure can make it harder to maintain control and can overload the blade.
Wandering cut
Side pressure against the blade can increase friction and create a binding condition.
Common Rip-Cutting Mistakes to Avoid
Many poor rip cuts can be traced to setup rather than the saw itself. Measuring only once, using an irregular board edge as a guide, failing to support a large panel, or trying to correct a wandering cut while the blade is running can turn a simple operation into a difficult one.
Take the time to establish the reference, secure the workpiece, and verify the blade and guide before starting. A few extra minutes of setup are usually more useful than trying to repair an inaccurate cut afterward.
Starting without a stable support plan
Large panels need support that remains effective throughout the entire cut.
Ignoring kerf
Cutting directly on the wrong side of a layout line can make the finished piece undersized.
Using a crooked edge as a guide
An irregular edge can transfer its shape directly into the cut.
Pushing too fast
An aggressive feed can increase resistance and make the saw harder to control.
Reaching near the blade
Never use a hand to steady material close to the rotating blade.
Frequently Asked Questions
Q
Can you make a rip cut with a regular circular saw?
Yes. A standard handheld circular saw can make rip cuts in suitable wood products when the blade, cutting depth, support, and guiding method are appropriate for the job. A rip fence, straightedge, or guide rail can make long cuts substantially easier to control.
Q
Is a rip cut the same as cutting with the grain?
For solid wood, a rip cut generally follows the grain, while a crosscut runs across it. With plywood and other sheet goods, the terms are commonly used according to the direction of the cut even though the material does not have a single continuous grain direction like a solid board.
Q
What is the best way to rip plywood with a circular saw?
Support the plywood properly, mark the required dimension, and use a long straightedge or compatible guide rail when the cut is far from the panel edge. Position the guide using the saw’s blade-to-guide offset unless the guide system is designed to align directly with the cut line. Secure the guide and maintain steady forward movement.
Q
Why does my circular saw cut crooked when ripping?
Common causes include an inaccurate guide setup, a crooked reference edge, insufficient workpiece support, a shoe that is not staying flat, excessive feed pressure, or a dull or unsuitable blade. Make a test cut and check the guide-to-blade measurement before changing your technique.
Q
Should the circular saw blade be deeper than the wood?
The blade needs enough depth to complete the cut, but excessive blade exposure below the workpiece is unnecessary. Follow the saw manufacturer’s instructions for depth adjustment and set the blade for the material being cut. Make depth adjustments only with the saw disconnected from its power source.
Q
Can a circular saw replace a table saw for rip cuts?
A circular saw can handle many ripping tasks, especially breaking down plywood, sheet goods, and larger boards. A table saw is built around a stationary blade and fence and can be more suitable for certain repeated or narrow rip-cut operations. The appropriate tool depends on the material size, required accuracy, cut dimensions, workspace, and task.
✦ Wrapping Up
Conclusion
Circular saw rip cuts are straightforward when the workpiece, blade, and guide are set up correctly. The key is not simply following a marked line; it is creating a stable cutting system in which the material cannot move, the saw shoe remains supported, and the blade can travel through an open kerf without unnecessary side pressure.
For narrow cuts near a straight edge, a compatible rip fence can provide a practical reference. For wide plywood and other large panels, a clamped straightedge or guide rail gives more flexibility. Use the correct blade, set an appropriate cutting depth, make a test cut when dimensions matter, and stop immediately if the saw begins binding or behaving unexpectedly.
💡 Key Takeaway
Before your next circular saw rip cut, measure the finished dimension, account for the kerf, establish a rigid guide, support the workpiece on both sides of the cut, verify the blade and guard, and make one controlled pass without forcing the saw.