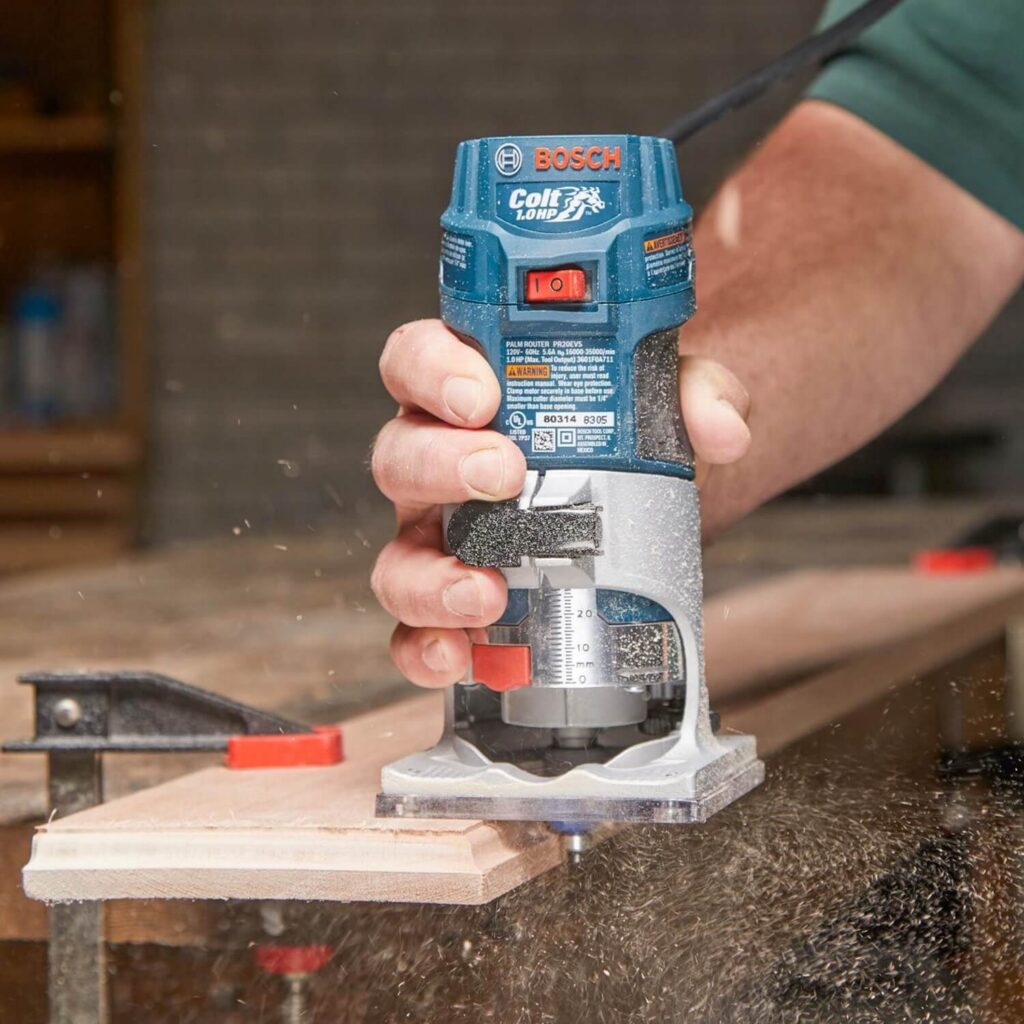
A trim router is a compact handheld router designed for controlled, light-duty work such as flush trimming, edge profiling, small grooves, template routing, and detail work. For most U.S. woodworking projects, the best results come from using the correct 1/4-inch-shank bit, securing the workpiece, setting a shallow cutting depth, keeping the base flat, and feeding the router in the correct direction.
For American DIYers, cabinetmakers, furniture builders, and home-shop woodworkers, a trim router can handle many jobs that do not justify the size and weight of a full-size router. It is commonly used for trimming laminate and wood edging, rounding over furniture edges, cutting small dados and grooves, routing hinge recesses, and following templates. Its compact body makes it easier to control around narrow edges and smaller workpieces, although it is still a high-speed cutting tool that requires deliberate setup and safe handling.
A trim router is also called a palm router or laminate trimmer, depending on the design and manufacturer. Modern compact routers may be corded or cordless and may accept fixed, plunge, tilt, offset, or guide bases. The exact capabilities vary by model, so the owner’s manual remains the authority for compatible bits, maximum bit diameter, speed settings, depth limits, and operating procedures.
This guide focuses on practical use rather than a particular brand or model. It explains how the tool works, which bits are useful, how to make common cuts, how to choose between a trim router and a larger router, and how to troubleshoot problems such as tear-out, burning, wobbling, and uneven cuts.
Source: cloudfront.net
What Is a Trim Router?
A trim router is a small handheld router built around a compact motor and base. The motor spins a router bit at high speed while the base supports the tool against the workpiece. Most trim routers used in the United States are designed around 1/4-inch-shank router bits, although compatibility varies by model.
The name comes from one of the tool’s original common applications: trimming laminate flush with a substrate. The same compact design is now widely used for woodworking, cabinetry, furniture making, sign work, edge profiling, template routing, and small joinery operations.
The main advantage is control. A smaller router is easier to maneuver around narrow edges and smaller parts than a heavier full-size router. That advantage does not mean the tool is automatically safer or more accurate; good results still depend on proper support, bit selection, feed direction, depth control, and technique.
Source: woodmagazine.com
Motor
The motor rotates the cutting bit. Corded and cordless versions are available, with power and speed characteristics varying between models.
Collet
The collet grips the router bit shank. Many compact routers use a 1/4-inch collet, so the bit must match the router’s specified shank size.
Base
The base rides on the workpiece and provides stability. Clear or open bases can improve visibility around the cutting area.
Depth adjustment
The adjustment mechanism controls how far the cutter extends below the base. Fine adjustment is useful when dialing in a precise cut.
Guide or accessory mount
Depending on the model, the router may accept an edge guide, template guide, plunge base, or other accessory.
Trim Router vs. Full-Size Router
Choose a trim router when the job emphasizes maneuverability, edge work, template routing, small grooves, or light material removal. Choose a larger router when the job involves deeper cuts, larger-diameter bits, substantial material removal, or work that demands more motor capacity and a broader base.
The distinction is about the job rather than simply motor size. A compact router can perform surprisingly varied work when equipped with the right base and bit, but pushing a small tool beyond its intended capacity can reduce control and increase the chance of poor cuts.
Trim router
Compact, maneuverable, convenient for edge work, flush trimming, small profiles, templates, and light joinery.
Full-size router
Better suited to larger cutters, deeper cuts, heavy stock removal, and demanding routing operations.
Plunge router
Useful when the bit must enter the middle of a workpiece rather than starting from an existing edge.
What Can You Do With a Trim Router?
A trim router can perform a wide range of light routing operations when the bit and base are appropriate for the task. The most common applications are flush trimming, edge profiling, shallow grooves, template routing, small recesses, and detail work.
Flush trimming is especially well suited to a compact router. A bearing-guided flush-trim bit can follow an existing edge or template while the cutter removes the material that extends beyond it. This is useful for laminate, veneer, plywood edging, solid-wood edging, and pattern work.
Edge profiling is another common application. Roundover bits soften sharp corners, chamfer bits create angled edges, and other profile bits can produce decorative shapes. Small profiles are generally easier to control with a trim router than large decorative cutters.
A trim router can also cut shallow dados, grooves, rabbets, hinge recesses, and template-guided features. For larger or deeper versions of these operations, a larger router may provide better capacity and stability.
Source: bigcommerce.com
Flush trimming
Trim laminate, veneer, edging, or a workpiece against a template so the finished edge matches the guide surface.
Roundovers
Remove a sharp corner and create a small rounded profile on furniture, shelves, boxes, and other projects.
Chamfers
Cut a controlled angled edge for appearance, edge softening, or detail work.
Grooves and dados
Cut shallow channels for joinery, decorative lines, inlays, or hardware when the router and bit are appropriate for the depth.
Template routing
Follow a template with a bearing-guided bit or guide accessory to reproduce a shape accurately.
Sign and detail work
Use suitable small bits for lettering, decorative lines, and shallow carving while maintaining controlled movement.
When a Trim Router Is the Wrong Tool
Do not select a trim router simply because it is convenient. Large panel-raising cutters, substantial stock removal, deep cuts, and operations requiring a larger bit diameter may exceed the router’s design limits. The manufacturer’s manual should be checked for maximum cutter size, speed requirements, and permitted accessories.
For a large workpiece or a cut that leaves very little base support, stability can also become the limiting factor. A wider auxiliary base, guide, jig, or larger router may provide better control.
Large cutters
Use only cutter sizes approved by the router manufacturer.
Deep material removal
Multiple shallow passes are generally more controllable than attempting one deep pass.
Large joinery
A larger router or purpose-built jig may provide better stability and capacity.
Choosing the Right Trim Router Bit
The router bit determines what the tool actually cuts, so bit selection should come before turning on the router. Match the bit to the intended profile, material, cutting depth, shank size, and router’s published limits.
For most beginners, a small collection of common bits is more useful than a large assortment. A straight bit, bearing-guided flush-trim bit, roundover bit, and chamfer bit cover many everyday woodworking tasks.
Source: popularwoodworking.com
Flush-trim bit
Uses a bearing to follow a template or existing surface and trim another material flush to it.
Straight bit
Creates straight-sided grooves, dados, and shallow recesses.
Roundover bit
Creates a rounded edge. Bearing-guided versions can follow the edge of a workpiece.
Chamfer bit
Creates an angled edge and is useful for breaking sharp corners or producing decorative profiles.
V-groove bit
Cuts a V-shaped channel for decorative lines, lettering, and some sign-making applications.
Ogee or other profile bit
Creates a decorative edge profile when the router has enough capacity and the bit size is within the manufacturer’s limits.
How to Install a Router Bit
Disconnect the router from power or remove its battery before changing a bit. Clean the collet and inspect the bit for damage. Insert the shank according to the router manufacturer’s instructions, avoiding contact between the end of the bit and the bottom of the collet. Tighten the collet securely with the specified wrench or locking system.
Before starting the router, verify that the bit is fully supported, the collet is tight, the base is secured, and the cutter can rotate without contacting the workpiece, clamps, guide, or any other object.
Match the shank
A 1/4-inch router requires a compatible 1/4-inch-shank bit unless the manufacturer specifically provides another collet option.
Inspect the cutter
Do not use a bit with cracked carbide, damaged bearings, bent components, or other visible defects.
Secure the collet
A loose bit can move or eject during operation, creating a serious hazard.
Check clearance
Confirm that the bit has adequate clearance before switching the router on.
How to Use a Trim Router Safely and Accurately
Good trim-router technique starts before the motor runs. Secure the workpiece, install the correct bit, set the depth, choose the appropriate speed if the router has variable speed, and establish the correct feed direction. Keep the base supported throughout the cut and let the cutter remove material without forcing the tool.
For a first project, use scrap material of the same or similar species and thickness. A test cut lets you confirm the depth, profile, feed direction, and surface quality before cutting the finished workpiece.
Source: levoite.com
1. Secure the workpiece
Clamp the material so it cannot shift during routing. Keep clamps outside the router’s travel path.
2. Install the correct bit
Disconnect power before installing the bit and verify that the bit is compatible with the router.
3. Set the cutting depth
Start with a shallow setting when removing material. Increase the depth gradually when the operation requires more material removal.
4. Make a test cut
Use scrap material to verify the profile, depth, speed, and feed direction.
5. Position the router
Place the base securely on the workpiece before the bit enters the cut whenever the operation allows it.
6. Start the router safely
Keep the bit clear of the material at startup unless the specific operation and tool design call for another controlled procedure.
7. Feed steadily
Move at a controlled pace without stopping unnecessarily in the cut or forcing the motor.
8. Inspect the result
Turn off the router, wait for the bit to stop completely, and inspect the cut before making another pass.
Understanding Router Feed Direction
Feed direction matters because the rotating cutter tends to pull the router in the direction of rotation when the cut is made incorrectly. For typical handheld routing along the outside edge of a workpiece, the standard feed direction is generally counterclockwise when viewed from above. For inside edges, the direction changes.
A climb cut moves the router in the same direction as the cutter’s tendency to pull the tool. It can sometimes reduce tear-out in a controlled, very shallow operation, but it also increases the chance that the router will grab and move unexpectedly. It should not be treated as the default technique for beginners.
When the correct feed direction is unclear, consult the router and bit manufacturer’s instructions and test the cut on scrap material.
Outside edge
A conventional handheld pass is generally made counterclockwise around the outside perimeter when viewed from above.
Inside edge
The conventional feed direction reverses around an inside perimeter.
Climb cut
Use only when the application specifically calls for it and you can maintain firm control. Take a very small cut rather than attempting heavy material removal.
Signs of a Good Cut
A good trim-router cut normally has a consistent profile, clean edges, and no unexpected gouges or deep burn marks. The router should feel controlled rather than fighting the operator, and the motor should not sound excessively strained.
If the result is rough, stop and diagnose the cause rather than simply increasing pressure. Check the bit condition, cutting depth, feed direction, router speed, workpiece support, and material grain.
Consistent edge
The profile remains even from the beginning to the end of the pass.
Controlled sound
The motor maintains a normal operating sound without obvious bogging or excessive strain.
Limited tear-out
The cut follows the intended edge with minimal fiber breakout.
Trim Router Guides, Bases, and Jigs
Accessories can significantly expand what a trim router can do. An edge guide helps maintain a fixed distance from an edge, while a larger auxiliary base can improve stability on narrow or irregular workpieces. Template guides and pattern-routing accessories help reproduce shapes consistently.
The right accessory depends on the cut. A fence or edge guide is useful for straight grooves and dados, a template is useful for repeated shapes, and a wider base can reduce tipping when the router has limited contact with the workpiece.
Source: toolnut.com
Edge guide
Keeps the router at a controlled distance from an edge and is useful for straight grooves, dados, fluting, and similar cuts.
Auxiliary base
Provides additional support when the standard base has too little contact area.
Template guide
Allows the router to follow a template for repeatable shapes and recesses.
Circle-cutting guide
Turns the router into a controlled circle-cutting setup when the accessory is compatible with the router.
Plunge base
Provides controlled entry into the middle of a workpiece for operations that cannot start from an edge.
When an Edge Guide Is Better Than a Bearing
A bearing-guided bit follows a surface that physically contacts the bearing. An edge guide instead references a separate edge or fence. This distinction matters when you need to cut a groove at a fixed distance from an edge rather than simply copy an existing contour.
An edge guide can also improve control on straight cuts where the router bit does not have a suitable bearing. Set the guide carefully, clamp the workpiece, and test the distance on scrap before routing the finished piece.
Use a bearing
Choose a bearing-guided bit when the goal is to copy an existing edge or template.
Use an edge guide
Choose an edge guide when the goal is to maintain a specific distance from an edge.
Use a template
Choose a template when the same shape needs to be reproduced across multiple pieces.
Common Trim Router Problems and How to Fix Them
Most trim-router problems can be traced to a small group of variables: the bit, depth, feed direction, router speed, material grain, base stability, or workpiece movement. Diagnose the symptom before changing several variables at once.
Make one controlled adjustment at a time and test it on scrap. This makes it easier to identify the actual cause instead of masking one problem with another.
Source: craftyhangouts.com
Tear-out
Possible causes include cutting against unfavorable grain, using an unsuitable feed direction, taking too deep a cut, or using a dull bit. Reduce the depth, change the feed approach where appropriate, support the exit edge, and use a sharp bit.
Burn marks
Possible causes include a dull bit, excessive dwell time, an inappropriate speed setting, or feeding too slowly. Keep the router moving and verify the bit condition and speed guidance.
Wobbling or uneven depth
The router may be tipping because too little of the base is supported. Increase support, use a wider base or guide, and clamp the workpiece securely.
Rough surface
Check bit sharpness, cutting depth, feed rate, and router speed. Multiple light passes can produce a cleaner result than one aggressive pass.
Router grabs the work
Stop the operation and check feed direction, cutter engagement, depth, and workpiece support. Do not attempt to overpower a router that is pulling unexpectedly.
Bit slips
Stop immediately, disconnect power, and inspect the collet, shank, and tightening procedure. Do not continue using a bit that cannot be securely retained.
How to Reduce Tear-Out
Tear-out happens when the cutter lifts or breaks wood fibers instead of cleanly shearing them. Grain direction is a major factor, especially on edge profiles and cross-grain cuts.
Start with a shallow pass and use a sharp bit. When practical, leave a small amount of material for a final cleanup pass. Supporting the edge with a backing piece can also reduce breakout at an exit point.
Reduce cutting depth
Remove less material per pass so the bit has less work to do.
Check grain direction
Plan the routing sequence so the cutter works with the grain where practical.
Use a sharp bit
Dull cutters increase cutting resistance and can worsen the surface.
Support fragile edges
Use a backing piece or alter the routing sequence when an unsupported exit edge is likely to chip.
Why Does My Trim Router Leave Burn Marks?
Burn marks usually indicate excessive heat at the cutting edge. A dull bit can create heat because it rubs instead of cutting efficiently. Holding the router in one place too long can also concentrate heat in one area.
Check the bit first, then review feed rate, depth, and speed. The correct speed depends on the router and cutter, so follow the manufacturer’s guidance rather than assuming that maximum RPM is always appropriate.
Inspect the bit
Clean resin or pitch from the cutter and replace or sharpen a bit that is no longer cutting properly.
Keep moving
Avoid pausing with the cutter engaged in one location.
Take lighter passes
Reducing the amount of material removed at once can reduce load and heat.
Trim Router Safety Checklist
A trim router has a small body, but its bit can spin at very high speed. Treat it like any other high-speed cutting power tool. Wear appropriate eye protection, control airborne dust, keep hands away from the cutter, and follow the manufacturer’s operating instructions.
For U.S. workshops, dust control deserves particular attention when routing wood or engineered wood products. Use suitable dust extraction when the router supports it, keep the work area clean, and use respiratory protection when required by the conditions and applicable workplace practices.
Disconnect power before changing bits, adjusting accessories, cleaning around the cutter, or troubleshooting a mechanical problem. After switching off the router, wait until the bit has completely stopped before setting the tool down or moving it away from the work.
Source: boschtools.com
Wear eye protection
Protect your eyes from chips and airborne debris generated during routing.
Control dust
Use compatible dust extraction and appropriate protective measures for the material and work environment.
Secure the material
Never rely on one hand to hold a workpiece while routing with the other.
Keep the bit clear
Keep hands, cords, clamps, clothing, and other objects away from the rotating cutter.
Disconnect power for adjustments
Unplug a corded router or remove the battery from a cordless model before changing bits or making adjustments.
Wait for a complete stop
Do not set down or reposition the router while the bit is still rotating.
Follow the manual
Use the manufacturer’s specified bit sizes, accessories, speed ranges, and operating procedures.
Before Every Cut
A short pre-cut inspection can prevent many routing problems. Confirm that the bit is secure, the depth is locked, the base is stable, the workpiece is clamped, and the intended path is free of screws, nails, clamps, and other obstructions.
If the cut is unfamiliar, make a test pass on scrap material. The test should use the same or similar material and the same bit and setup whenever possible.
Bit secure
Check the collet and bit installation before powering the router.
Base stable
Make sure enough of the base is supported throughout the cut.
Workpiece secure
Clamp the material so it cannot shift unexpectedly.
Path clear
Check for hardware and obstacles that could contact the bit.
Personal protection ready
Use suitable eye, hearing, and dust protection for the operation and work environment.
How to Choose a Trim Router for Your Projects
Choose a trim router based on the work you actually expect to do rather than choosing by motor rating alone. The most useful features depend on whether you mainly trim edges, make decorative profiles, cut grooves, use templates, or work away from electrical outlets.
For frequent edge work, a stable base and precise depth adjustment can matter more than having the highest available power. For jobsite or outdoor work, a cordless model may be convenient if you already use the same battery platform. For extended shop use, a corded model can eliminate battery charging and platform compatibility concerns.
Source: bigcommerce.com
Bit compatibility
Confirm the supported shank size and maximum cutter dimensions before buying.
Depth adjustment
A precise adjustment mechanism makes it easier to dial in shallow cuts and repeat settings.
Base design
A stable, visible base helps when working around edges, templates, and narrow surfaces.
Variable speed
Variable speed can be useful when the bit or material calls for a different operating speed.
Corded or cordless
Choose based on your workspace, expected runtime, existing battery platform, and preference for unrestricted movement.
Accessory compatibility
Check whether the router accepts the guides, bases, dust collection accessories, and templates you expect to use.
Dust extraction
A compatible dust collection setup can improve visibility and reduce airborne debris.
A Simple Decision Guide
If most of your work involves laminate, veneer, edge banding, small roundovers, and chamfers, a basic trim router with a stable base may cover your needs. If you expect to cut many grooves or repeat straight cuts, prioritize an effective edge guide. If your projects require controlled entry into the middle of a board, consider a compatible plunge base or a full-size plunge router.
If you already own a cordless tool system, staying within that battery platform can simplify charging and battery management. If you do not own a battery platform, compare the complete cost of the tool, battery, and charger rather than comparing bare-tool prices.
Mostly edge trimming
Prioritize maneuverability, base stability, visibility, and depth adjustment.
Mostly grooves and dados
Prioritize an accurate edge guide and repeatable depth adjustment.
Mostly template work
Prioritize guide compatibility, base visibility, and suitable bearing-guided bits.
Frequent jobsite work
A cordless platform may provide convenient mobility if compatible batteries are already available.
Heavy routing
Consider a larger router when the work exceeds a compact router’s published capacity.
Frequently Asked Questions
Q
What is a trim router mainly used for?
A trim router is mainly used for light and controlled routing jobs such as flush trimming laminate or wood edging, rounding or chamfering edges, cutting small grooves, routing templates, and making small recesses. Its compact size makes it especially useful when maneuverability matters.
Q
Can a trim router cut dados?
Yes. A trim router can cut shallow dados when the router, bit, material, and guide setup are appropriate. An edge guide or straightedge can help maintain a consistent path. For wide, deep, or repeated heavy-duty dados, a larger router may provide more capacity and stability.
Q
What size bit can I use in a trim router?
The maximum bit size depends on the specific router and manufacturer instructions. Many compact routers use 1/4-inch-shank bits, but shank size and maximum cutter diameter are separate specifications. Never assume that a bit will fit or be safe simply because its shank matches the collet.
Q
Can I use a trim router on plywood?
Yes. Trim routers are commonly used on plywood for flush trimming, edge profiling, grooves, and template work. Plywood can have changing grain direction and thin veneers, so shallow passes, a sharp bit, proper feed direction, and good edge support can help reduce tear-out.
Q
Why does my trim router keep tipping?
Tipping usually happens when too little of the router base is supported by the workpiece, particularly near narrow edges. Slow down, improve workpiece support, use a wider auxiliary base or appropriate guide, and avoid forcing the router through the cut.
Q
Should I use a corded or cordless trim router?
Either can work well. Corded models avoid battery runtime and charging considerations, while cordless models provide freedom from a power cord. If you already own compatible batteries, a cordless model can simplify your setup. The actual choice should be based on the jobs, runtime, power source, and accessories you need.
✦ Wrapping Up
Conclusion
A trim router is a compact and versatile woodworking tool that can handle many jobs around a U.S. home shop, garage workshop, cabinet shop, or jobsite. Its strengths are control, maneuverability, and convenience for light routing rather than replacing a full-size router for every operation.
The most reliable workflow is straightforward: select a compatible sharp bit, secure the workpiece, set a conservative cutting depth, test the setup on scrap, maintain the correct feed direction, keep the base supported, and make additional shallow passes when needed. If the router begins to grab, burn, wobble, or produce excessive tear-out, stop and diagnose the setup instead of applying more force.
The best trim-router setup is therefore the one that matches the job. For edge trimming, profiling, small grooves, and template work, a compact router can provide precise results when the bit, guide, material, and technique are properly matched.
💡 Key Takeaway
For your next trim-router project, start with a sharp 1/4-inch-shank bit that matches the cut, clamp the workpiece firmly, make a shallow test pass on scrap, and verify the feed direction before routing the finished piece.