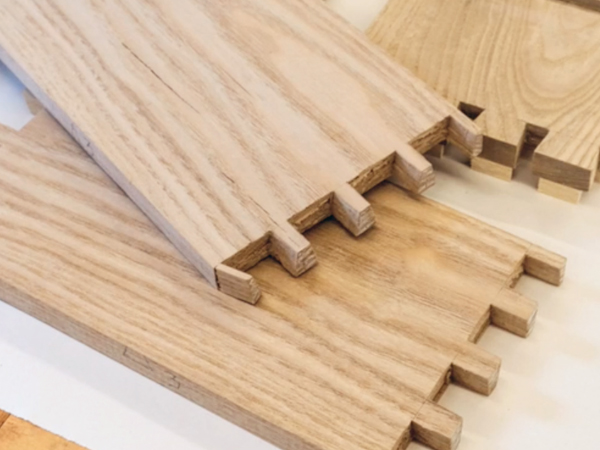
A router dovetail guide is usually a dovetail jig, template, and guide bushing system that controls a router while a dovetail bit cuts repeatable interlocking joints in wood. For most U.S. woodworking projects, the reliable approach is to prepare consistent stock, match the router bit and bushing to the jig, clamp the boards accurately, make a test joint, and adjust the bit depth or template position before cutting the final parts.
For woodworkers in the United States, router-cut dovetails are especially useful for drawers, cabinets, boxes, chests, and other casework where repeatable joinery matters. A router can produce the basic geometry quickly, but the router itself does not determine the final accuracy. The jig, template, guide bushing, bit geometry, stock thickness, clamping, and setup all work together.
The most important rule is simple: do not use expensive project stock for the first cut. Make a test joint from matching scrap, examine how the pins and tails fit, and make small adjustments before routing the actual pieces. A tight dovetail should assemble with controlled pressure rather than requiring excessive force or leaving a loose gap.
Source: media.popularwoodworking.com
What Is a Router Dovetail Guide?
In woodworking, the term router dovetail guide generally refers to the jig and guiding components that control a router while cutting a dovetail joint. The most common setup uses a router, a dovetail router bit, a guide bushing, and a template with fingers or another shaped guide surface. The guide bushing follows the template while the cutter removes the wood underneath.
A dovetail joint has two complementary parts: tapered tails and the corresponding tapered sockets or pins. When correctly cut, the parts mechanically interlock and provide substantial long-grain glue surfaces. Router jigs make this geometry repeatable, which is why they are widely used for drawers, cabinets, boxes, and casework.
A router dovetail guide is different from a simple straightedge. A straightedge can guide a router for a straight cut, while a dovetail template controls the specific tapered pattern needed for a mating joint. Some systems are designed for half-blind dovetails, while others can produce through dovetails, sliding dovetails, or multiple joint patterns.
Source: images.contentstack.io
Router
Provides the rotating cutting power. A stable router with a suitable collet and compatible base is required.
Dovetail bit
Creates the angled sides of the dovetail. Bit angle, diameter, cutting height, and shank size must match the jig or intended joint.
Guide bushing
Follows the template and controls the router’s position relative to the cutting pattern.
Template or fingers
Defines the spacing and shape of the dovetail pattern.
Clamps and stops
Hold the workpieces in the correct position so the joint is cut consistently.
Half-Blind Versus Through Dovetails
Half-blind dovetails hide the ends of the tails from one face. They are common on drawers because the drawer front can remain visually clean while the joint connects the front to the drawer side. Many fixed-template router jigs are designed specifically for this application.
Through dovetails remain visible from both sides of the joint. They are often used for boxes, chests, cabinets, and furniture where the joint itself is part of the appearance. Through-dovetail systems may require separate operations for tails and pins and often provide adjustable fingers so the spacing can be customized.
Choose half-blind
Use this style when the outside face should conceal the joint, such as many traditional drawer-front applications.
Choose through
Use this style when you want the interlocking dovetail pattern visible on the finished corner.
What You Need Before Cutting Dovetails With a Router
Before making a cut, confirm that every part of the setup is compatible. Dovetail jigs are not universal systems in the practical sense: templates, guide bushings, bit diameters, bit angles, shank sizes, router bases, and workpiece thickness ranges can vary substantially between models.
Read the instructions for the exact jig you are using. Manufacturer instructions take priority over generic measurements because the required bit projection and guide-bushing relationship depend on the template geometry. Some commercial systems include a specific bit and bushing, while others require you to select compatible components separately.
Prepare the wood before setting up the jig. The mating parts should have straight reference edges and consistent thickness within each group of identical parts. A drawer may intentionally use different thicknesses for the front and sides, but all drawer fronts should match one another and all drawer sides should match one another.
Source: m.media-amazon.com
Router and base
Use a router that accepts the required guide bushing or adapter and has adequate control for the jig. A stable base is more important than excessive motor power.
Correct router bit
Use the bit specified by the jig whenever possible. Match the diameter, angle, cutting height, and shank requirements.
Guide bushing
Verify the bushing outside diameter and mounting system. The bushing must be centered and must not contact the rotating cutter.
Prepared stock
Mill the boards square, flat, and consistently thick before routing the joint.
Test material
Keep scrap from the same material and thickness as the project parts for setup cuts.
Clamping and support
Make sure the jig can be secured firmly to the bench and that the workpieces cannot shift during routing.
Eye, hearing, and dust protection
Wear appropriate eye and hearing protection and control wood dust with suitable collection and respiratory protection when needed.
Why Bit and Bushing Compatibility Matters
The guide bushing and template establish the router’s path, while the bit determines the cut made inside that path. Changing the bushing diameter or using a bit with different geometry can alter the resulting joint. A bit that looks similar to the specified cutter may still produce a different fit.
The cutter must also have sufficient clearance from the guide bushing. Before powering the router, rotate the bit by hand with the router disconnected from power and verify that the cutter cannot strike the bushing. A contact between a rotating carbide cutter and a metal bushing can damage the cutter and create a dangerous situation.
Check the manual first
Use the jig manufacturer’s stated bit and bushing combination rather than assuming that similar-looking parts are interchangeable.
Verify clearance
With the router disconnected from power, confirm that the bit rotates freely without touching the guide bushing.
How to Set Up a Router Dovetail Jig
Accurate dovetails come from accurate setup. The safest and most repeatable sequence is to prepare the router first, establish the workpiece position, make a test cut, inspect the joint, and only then move to the final parts.
Start with the router unplugged or otherwise disconnected from its power source. Install the guide bushing and dovetail bit according to the jig’s instructions. Secure the bit properly in the collet and avoid clamping the collet directly against the end of the bit. Leave the amount of shank engagement specified by the router and bit manufacturer.
Set the cutting depth according to the jig instructions. Do not rely on a generic projection measurement when the manufacturer provides a model-specific setting. Template thickness, bushing geometry, bit geometry, and workpiece thickness all influence the required setting.
Source: woodworkersjournal.com
1. Prepare the router
Disconnect power, install the correct bushing and bit, tighten the collet properly, and verify cutter clearance.
2. Secure the jig
Clamp or fasten the jig so it cannot move while the router is being operated.
3. Prepare the boards
Place the boards against the correct stops and reference surfaces. Keep the intended inside and outside faces clearly marked.
4. Clamp firmly
Tighten the jig clamps enough to prevent movement without crushing soft material.
5. Make a test cut
Use matching scrap before cutting the final parts.
6. Inspect the joint
Check fit, depth, alignment, shoulder condition, and whether adjoining faces become flush.
7. Make one adjustment at a time
Change only the variable related to the observed problem, then make another test cut.
Clamping and Board Orientation
Board orientation is one of the easiest ways to make a perfect-looking joint on the wrong faces. Before routing, mark the inside face, outside face, top edge, and mating parts. For drawer work, label each component so you know which side belongs at each end of the jig.
On a typical half-blind setup, the drawer front or back is positioned according to the jig’s instructions while the drawer side is held against the front reference surface. The boards must sit squarely against the stops, and the required offset must be established by the jig rather than estimated by eye.
Do not assume that two different dovetail jigs use the same board orientation. Follow the specific template instructions for the model in front of you.
Mark the inside faces
Clear labeling prevents accidentally routing the decorative face or assembling a drawer with reversed parts.
Use the jig’s stops
Alignment stops establish the relationship between the boards. Keep both parts fully seated against their intended references.
Support wide work
Long or wide boards may need additional bench support so their weight does not pull them out of alignment.
Making the First Test Cut
Use scrap that matches the actual project stock. A test piece made from a different thickness can produce a misleading result because dovetail depth and template position are sensitive to stock dimensions.
Place the router on the template with the cutter clear of the wood. Start the router according to the manufacturer’s operating procedure, allow it to reach operating speed, and move the router in the direction specified by the jig instructions. Keep the guide bushing firmly against the template throughout the cut.
Do not lift the router away from the template while the bit is still rotating. Complete the cut, switch off the router, and wait for the cutter to stop before removing the router from the jig.
Look for complete sockets
A partially cut socket or tail can prevent the joint from assembling and may indicate that the router was not kept against the template.
Check the shoulder
Tear-out along the shoulder can reveal an unsuitable feed approach, unsupported grain, or the need for a controlled scoring technique.
Dry-fit before gluing
The test joint should be evaluated without glue so you can identify setup problems while adjustments are still easy.
How to Adjust a Dovetail Router Joint
Make adjustments from the evidence shown by the test joint. Do not change several settings at once because you will lose track of which adjustment corrected the problem.
For many half-blind dovetail jigs, bit depth is the primary control for how tightly the tails engage the sockets. A small change can have a noticeable effect, so make very small adjustments and repeat the test cut. The exact direction and amount of adjustment should follow the jig’s instructions.
If the tails fit securely but the adjoining surfaces are not flush, the problem may be template position, board positioning, or alignment rather than bit depth. Moving the wrong adjustment can turn a correctly sized joint into a loose or overly tight one.
Source: masonwoodshop.com
Joint is too tight
For a setup where bit depth controls the fit, reducing the depth slightly can loosen the joint. Confirm the adjustment direction in the jig instructions.
Joint is too loose
For the same type of setup, increasing bit depth slightly can tighten the joint. Make a fresh test cut after each small change.
Joint fits but sits proud
Check template position and workpiece alignment. A proud joint can indicate that the relationship between the template and board is incorrect.
Joint fits but sits recessed
Check the template position and board orientation before changing cutter depth.
Edges are uneven
Verify that the workpieces were fully seated against the alignment stops and that the boards were square to the jig.
A Practical Adjustment Sequence
First determine whether the tails physically fit the sockets. If they do not, concentrate on cutter depth or the relevant fit adjustment specified by the jig. If they fit but the faces do not align, inspect template position and board orientation.
Next inspect the edges of the joint. If one side is shifted while the cutter geometry itself appears correct, check the stops, reference edges, and clamping. Once the joint works correctly on one side of the jig, make a test cut at the other end if your jig uses separate alignment positions.
When the test joint is correct, keep the setup unchanged. Record the bit, bushing, stock thickness, and jig settings if the project will be repeated later.
Change one variable
Single-variable adjustments make troubleshooting much faster and reduce the chance of chasing multiple setup errors.
Use matching scrap
The test material should reproduce the same thickness and reference surfaces as the finished parts.
Record successful settings
A written setup record can save time when making multiple drawers or repeating the same joint later.
Common Router Dovetail Problems and Fixes
Most failed router dovetails can be traced to setup, alignment, cutter selection, or workpiece movement rather than a fundamental problem with the router. Diagnose the visible symptom first and make the smallest appropriate correction.
Tear-out deserves particular attention because the rotating cutter can pull fibers from the workpiece as it exits an edge. Grain direction, species, bit sharpness, feed direction, depth of cut, and workpiece support all influence the result. A backer or sacrificial support can reduce damage at vulnerable exits, and some setups benefit from a shallow scoring pass before the full cut.
If the router chatters or leaves a rough surface, check that the bit is sharp and securely mounted, the shank is properly seated, the router speed is appropriate for the bit and material, and the workpiece and jig are firmly secured. Avoid forcing the router through the cut.
Source: powertoolworld.co.uk
Tight joint
Check the setup’s depth-of-cut adjustment and make a small test adjustment rather than forcing the joint together.
Loose joint
Check cutter depth, template position, bit selection, and whether the boards were prepared to the required thickness.
Tear-out
Inspect grain direction, cutter sharpness, feed technique, workpiece support, and whether a scoring or backer-board technique is appropriate.
Uneven pin or tail spacing
Check the template, adjustable fingers, workpiece stops, and whether the router was kept against the guide throughout the cut.
Router chatters
Check bit seating, shank size, router stability, speed, cutting depth, and whether the material is securely clamped.
A router bit is a high-speed cutting tool, so setup adjustments should always be made with the router disconnected from power. Never reach near a cutter to clear chips or inspect alignment while the router is running.
Secure the workpiece and jig before routing. Keep both hands in the intended control positions, maintain a stable stance, and follow the router manufacturer’s instructions for feed direction and operating speed. Use appropriate eye and hearing protection and control wood dust with extraction and suitable respiratory protection where necessary.
Do not improvise a bit, guide bushing, or template combination when the cutter could contact the bushing or when the resulting geometry is unknown. If the manufacturer’s instructions do not cover a proposed setup, make a separate compatibility determination before using it on a powered router.
Disconnect power before adjustments
Unplug or otherwise isolate the router before changing bits, bushings, templates, or making close-range adjustments.
Secure the work
A moving workpiece can ruin the joint and create a loss-of-control hazard.
Control dust
Use dust collection and appropriate personal protection rather than relying on a disposable mask alone in every workshop condition.
Stop if the setup is uncertain
Do not power the router until the cutter, bushing, template, workpiece, and feed path have been verified.
Choosing a Router Dovetail Jig for Your Project
The right dovetail jig depends on the joint type, workpiece dimensions, desired repeatability, and how much adjustment you need. A simple fixed-template jig can be practical for standard half-blind drawer work, while an adjustable-finger system provides more control over through-dovetail spacing and joint layout.
When comparing jigs, check the maximum board width and supported stock thickness before considering convenience features. Also check whether the package includes the required dovetail bits, straight bits, guide bushings, templates, adapters, and setup gauges. The advertised price of a jig may not represent the complete cost of the accessories needed for your intended joint.
Guide-bushing compatibility is another important consideration. The router must accept the required bushing or an appropriate adapter, and some router-table configurations require an insert that supports the same guide-bushing standard.
Source: images.finewoodworking.com
Fixed-template jig
A good fit for repeatable standard joints when you do not need extensive control over finger spacing.
Adjustable-finger jig
Useful when you want to change tail and pin spacing or produce different through-dovetail layouts.
Router-table system
Can provide a stable platform for certain operations but requires a compatible table, insert, bushing arrangement, and safe work-holding method.
Handheld router system
Works well for many drawer and casework applications when the router base, bushing, and jig are properly matched.
When a Simple Shop-Made Guide Makes Sense
A commercial dovetail jig is not the only way to guide a router. A woodworker can build a guide or template for certain dovetail operations, including sliding dovetails, provided the guide accurately controls the router and the cutter path is understood.
A shop-made guide is most useful when the joint has a straightforward geometry and the required accuracy can be established with a reliable reference. For repeated drawer production or adjustable through dovetails, a purpose-built jig may save setup time and make repeatability easier.
Do not confuse a shop-made guide with freehand routing. A dovetail bit should not be used freehand to create a precision mating joint unless the operation is specifically designed and controlled for that technique. A guide surface, template, or other positive reference is normally what makes the process repeatable.
Use a shop-made guide
Consider one when you need a specific sliding dovetail or simple repeated groove and can establish accurate reference surfaces.
Use a commercial jig
Consider one when you need repeatable drawers, adjustable through dovetails, multiple joint configurations, or established setup references.
Frequently Asked Questions
Q
Can you cut dovetails with a router without a dovetail jig?
Yes, but a router still needs a reliable guide or template if you want accurately repeatable dovetails. A shop-made guide can control the router for some dovetail operations. Freehand routing is generally unsuitable for precision mating dovetails because even a small change in the router path changes the joint geometry.
Q
What router bit is used for dovetail joints?
A dovetail router bit with angled cutting edges is used to form the tapered sides of the joint. The correct diameter and angle depend on the joint design and jig. Many jig systems specify a particular bit and guide-bushing combination, so the manufacturer’s instructions should be followed rather than choosing a bit based only on appearance.
Q
Why are my router dovetails too tight?
On many half-blind dovetail setups, excessive cutting depth can make the tails too large for the sockets. Depending on the jig, reducing the depth slightly can loosen the fit. Other causes include the wrong bit or bushing, incorrect stock thickness, template misalignment, or a setup that does not match the jig instructions.
Q
Why do my dovetail joints sit proud after assembly?
If the tails fit correctly but the adjoining faces do not become flush, inspect template position and workpiece alignment before changing the cutter depth. A template positioned too far in one direction can alter the relationship between the tail length and socket depth. Also check that the boards were fully seated against the jig’s stops.
Q
How do I prevent tear-out when routing dovetails?
Start with a sharp, appropriate bit and secure the workpiece firmly. Follow the jig’s recommended feed direction and consider a controlled scoring pass or sacrificial backer where the cutter exits vulnerable grain. Make test cuts in the same material first, because different species and grain patterns can behave differently.
Q
Should I use a plunge router for dovetail jig work?
A plunge router is not automatically required. Many half-blind dovetail operations are performed with the router resting on the jig template, so the plunge function may not be used. The important considerations are compatibility with the guide bushing, stable control, adequate collet capacity, and the requirements of the specific jig.
✦ Wrapping Up
Conclusion
A router dovetail guide makes precision dovetail joinery much more repeatable by controlling the router’s path with a template, guide bushing, and work-holding system. The quality of the final joint depends less on raw router power than on accurate stock preparation, compatible tooling, careful alignment, and disciplined test cuts.
For a reliable workflow, prepare the boards first, identify the exact jig and bit combination, set up the router with the power disconnected, clamp the work securely, and cut a matching scrap test joint. Use the appearance and fit of that joint to determine the next adjustment. Once the test joint fits correctly and the faces align, keep the setup unchanged while routing the final parts.
💡 Key Takeaway
Before routing your project pieces, make one complete dovetail test joint from matching scrap and correct only the specific setup variable indicated by the test result.