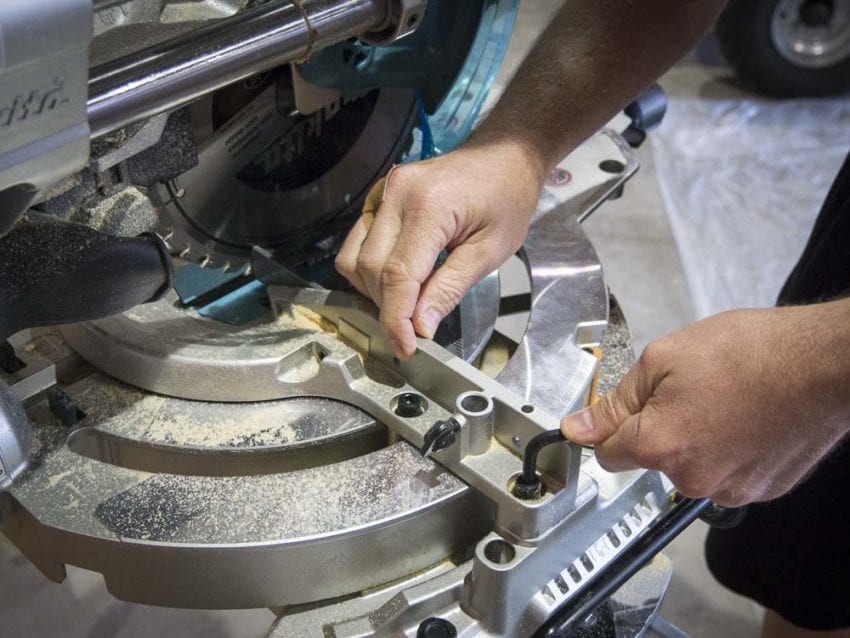
Miter saw fence alignment means positioning the fence so it is straight, stable, and square to the blade when the saw is set to 0 degrees. The safest approach is to disconnect power, inspect the table and fence, use a reliable combination square against the flat blade body, make small fence adjustments, tighten the hardware gradually, and confirm the result with a test cut.
For a U.S. homeowner, DIYer, trim carpenter, or shop woodworker, an accurately aligned miter saw can make the difference between a clean crosscut and a joint that repeatedly needs correction. Fence alignment is especially important when cutting baseboard, casing, dimensional lumber, cabinet parts, picture frames, and other work where small angular errors accumulate.
The fence is the reference surface that supports the workpiece while the blade travels through it. If the fence is not square to the blade at the 0-degree miter setting, a cut marked at 90 degrees can come out slightly angled. A bent or bowed fence can create a separate problem because the workpiece may not remain supported consistently along its length. Manufacturer procedures vary, so the adjustment points and hardware on your particular saw should always be checked against its owner’s manual.
Source: popularmechanics.com
What Miter Saw Fence Alignment Means
Miter saw fence alignment is the process of positioning the fence so the workpiece reference surface has the correct relationship to the blade and saw table. At the normal 0-degree miter setting, the goal is for the blade to make a true 90-degree crosscut relative to the workpiece edge supported against the fence.
A fence can have more than one alignment problem. It can be tilted relative to the table, angled relative to the blade, bowed along its length, or have separate left and right sections that do not sit in the same plane. These conditions can produce different symptoms, so the inspection should determine which problem actually exists before an adjustment is made.
A useful distinction is that the fence is not simply being adjusted because its printed scale says 0 degrees. The scale and pointer are indicators, while the physical relationship between the blade, fence, and table determines the cut. A pointer can read zero while the saw still needs mechanical adjustment.
Source: finehomebuilding.com
Fence square to the blade
This is the primary check for a 90-degree crosscut. A combination square can reveal a gap between the flat blade body and the square positioned against the fence.
Fence straightness
A straightedge can reveal a bowed or twisted fence that may prevent long workpieces from sitting consistently against the reference surface.
Two-piece fence alignment
Separate left and right fence sections should be checked individually and then checked together so a long board does not encounter a step between them.
Miter scale accuracy
The pointer should indicate the correct angle after the physical alignment is established. Pointer adjustment should not be used to compensate for an incorrectly positioned fence.
Why a Small Fence Error Matters
An angular error becomes more visible as the workpiece gets longer or when several pieces are assembled together. For example, two pieces intended to form a 90-degree corner depend on both cuts being accurate. Small errors can create a visible gap at the joint even when each individual cut looks close to square.
For repetitive trim work, cabinet parts, and framing components, the effect can compound because a small error is repeated across multiple pieces. That is why a test cut with scrap material is more useful than relying only on the miter scale.
Tools and Preparation for Fence Alignment
You do not need a large collection of measuring equipment to align most miter saw fences. A reliable combination square or try square, a straightedge, the correct hex key or wrench for the fence hardware, and a piece of scrap lumber are usually enough. Feeler gauges can help quantify small gaps, but they are optional for a basic setup.
Before touching the adjustment hardware, disconnect the saw from its power source. For a corded model, unplug it. For a cordless model, remove the battery according to the manufacturer’s instructions. The blade should be stationary, and the work area should be clear enough to make the alignment check without reaching around an energized tool.
If the saw has recently been transported, dropped, used heavily on a jobsite, or stored for a long period, perform a complete inspection rather than assuming the fence alone is responsible for inaccurate cuts.
Source: protoolreviews.com
Combination square or try square
Use a square with a straight, undamaged edge. It should be long enough to span the relevant area without rocking.
Straightedge
Use a straightedge to check whether a one-piece or two-piece fence is bowed or whether separate fence sections line up.
Correct adjustment tool
Use the hex key, socket, wrench, or screwdriver specified for your saw. Avoid substituting a poorly fitting tool that can damage the fastener.
Scrap lumber
Use a flat piece of suitable scrap for the final test cut. A test piece is preferable to checking accuracy only by sight.
Light source
A flashlight can make small gaps easier to see when checking a square against the fence or blade.
Check the Blade Before Adjusting the Fence
Inspect the blade for chipped teeth, excessive pitch or resin buildup, visible damage, and signs of wobble. A damaged or contaminated blade can create cutting problems that may be mistaken for a fence alignment issue.
Also check that the blade is properly installed according to the saw manufacturer’s instructions. If the blade itself is damaged, replace it before performing precision alignment.
Check the Table and Fence Surface
Clean sawdust and debris from the miter table and fence. Then place a straightedge against the fence to look for obvious bows, twists, or steps. A fence that is physically distorted may not be correctable simply by loosening its mounting bolts.
If your saw uses sliding fence sections, confirm that they are locked securely and that they do not move when moderate hand pressure is applied. Follow the owner’s manual if the model has a specific procedure for positioning the sliding sections.
How to Align a Miter Saw Fence Step by Step
The exact fastener locations vary by manufacturer and model, but the basic alignment method is consistent: establish the 0-degree position, place a square between the fence and the flat blade body, identify any gap, adjust the fence in small increments, and recheck before fully tightening the hardware.
Do not force the fence into position or use the blade teeth as a reference. The teeth can have alternating geometry or set, which can make a measurement misleading and can also create an unnecessary safety hazard.
Source: acmetools.com
1. Set the miter angle to 0 degrees
Place the miter table at the manufacturer’s 0-degree detent and lock the miter mechanism securely. The saw should be in the configuration specified by the owner’s manual for checking the fence.
2. Position the saw head correctly
On a sliding saw, follow the manufacturer’s specified position for the head and slide mechanism. Some procedures call for the head to be lowered and the slide locked before checking alignment.
3. Place the square against the fence
Put the square’s reference edge against the fence and bring the other edge toward the flat body of the blade. Keep the square clear of the blade teeth.
4. Look for gaps
Check along the blade body rather than at only one point. A flashlight behind the square can make a narrow gap easier to identify.
5. Loosen the fence hardware slightly
If an adjustment is required, loosen the specified fence bolts or screws only enough to allow controlled movement. Do not remove hardware unless the owner’s manual requires removal.
6. Make a small adjustment
Move the fence only as much as needed to close the gap. Small movements are easier to control and reduce the chance of overshooting the desired position.
7. Snug the hardware and recheck
Lightly snug the hardware, then check the square again. Tightening can shift the fence, so the alignment should be verified after the fasteners are secured.
8. Fully tighten and verify again
When the fence remains correctly aligned, tighten the hardware according to the manufacturer’s instructions. Perform one final square check before making a powered cut.
One-Piece Fence
A continuous one-piece fence is usually adjusted as a single reference surface. Some designs connect the two sides with a common structure, while others use several mounting points. Align the fence according to the manufacturer’s procedure rather than assuming that every bolt should be loosened.
After the first adjustment, check both sides of the fence. A change at one end can affect the other end, especially on a rigid continuous fence.
Two-Piece or Sliding Fence
With separate left and right fence sections, align one side first and then use a straightedge to make sure the other section is in the same plane. The exact sequence depends on the saw design.
The two fence faces should not form a step that causes a long workpiece to pivot or rock as it moves from one side to the other. Sliding sections also need to remain securely locked after adjustment.
Fixed Fence Designs
Some miter saws do not provide a conventional adjustable fence. On those models, the manufacturer’s procedure may adjust the miter detent plate, table, or another mounting component instead of moving the fence itself.
Do not force a fixed fence simply because another saw uses adjustable fence bolts. Identify the adjustment method for your model first.
How to Confirm the Alignment With a Test Cut
A square check tells you how the saw is positioned mechanically, but a test cut confirms how the complete system performs on material. Use a flat, stable piece of scrap and make a controlled 90-degree crosscut after the fence has been tightened.
Check the cut with a reliable square. If the cut is not square, return to the alignment sequence instead of compensating by changing the pointer alone. Confirm that the blade, fence, table, and miter setting are all being measured from appropriate reference surfaces.
A useful additional check is a flip test. Cut the end of a piece of stock, make a second short cut, then flip the cut piece and bring the two matching faces together. If a triangular gap appears, the saw is not producing a true 90-degree result under that test condition. The direction and size of the gap can help determine whether further calibration is needed.
Source: tylynnm.com
Square test
Place a reliable square against the freshly cut edge and inspect for a visible gap.
Flip test
Flip a test piece and compare the two cut faces. A visible wedge-shaped gap indicates an angular error.
Repeated-cut check
Make several cuts from the same setup. If the results vary, investigate workpiece movement, fence movement, blade condition, or cutting technique rather than assuming the fence angle alone is responsible.
Long-stock check
For trim and longer boards, confirm that the entire workpiece stays against the fence without rocking, bowing, or encountering a step between fence sections.
What a Successful Test Looks Like
The workpiece should sit firmly against the fence, the cut should be square when the saw is set to 0 degrees, and repeated cuts from the same setup should produce consistent results. The fence should remain stationary when the workpiece is positioned against it.
If you are preparing a saw for finish carpentry, make the final verification using material similar to the stock you will actually cut. A saw can be mechanically aligned while other factors, such as a bowed workpiece or poor support, still affect the finished joint.
If the Test Cut Is Still Not Square
Do not immediately move the fence again. First repeat the square check with the blade body, verify that the miter setting is actually at 0 degrees, inspect the fence for movement or bowing, and confirm that the blade is installed correctly.
If the saw uses a sliding mechanism, check the alignment through the range required by the manufacturer. A saw that cuts accurately with the head in one position but changes angle during a slide may need attention beyond simple fence alignment.
Common Miter Saw Fence Alignment Problems
Most fence alignment problems become easier to diagnose when the symptom is separated from the likely cause. A crooked crosscut, inconsistent angle, or visible gap at a trim joint does not automatically mean the fence is incorrectly positioned.
The following checks help prevent unnecessary adjustments and are especially useful after transporting a saw to a U.S. jobsite or moving it between a garage and a workshop.
Source: manualslib.com
The cut is consistently out of square
Check the fence-to-blade relationship at 0 degrees, then verify the miter mechanism and blade condition. A consistent error points toward a setup or calibration issue.
The cut changes during a sliding motion
Inspect the sliding mechanism and verify the alignment procedure for your model. The problem may not be limited to the fence.
The workpiece rocks against the fence
Look for a bowed fence, misaligned two-piece fence, damaged material, or debris between the stock and fence.
The pointer reads zero but the cut is wrong
Treat the pointer as an indicator rather than the primary accuracy reference. Verify the physical blade-to-fence relationship and then reset the indicator if necessary.
The fence moves when tightened
Use smaller adjustments and tighten the mounting hardware progressively while repeatedly checking the square. The fence may shift as clamping force is applied.
A miter joint has a gap
Check the actual angle of both mating pieces, the condition of the workpiece, blade sharpness, and the surface where the finished trim will be installed.
Fence Alignment Versus Blade Alignment
Fence alignment and blade alignment are related but not identical checks. A miter saw can have a fence problem, a bevel problem, a miter mechanism problem, or a combination of these. Adjusting the wrong component can make diagnosis more difficult.
If the blade is not perpendicular to the table when the saw is supposed to be at 0 degrees bevel, correct that condition according to the manufacturer’s procedure before relying on a fence measurement that assumes a properly positioned blade.
When Not to Adjust the Fence
Do not adjust the fence merely because a single piece of wood produced a poor joint. First determine whether the material itself is flat and straight and whether the blade is appropriate and undamaged.
Do not bend or grind a factory fence as a first response to an alignment problem. If the fence appears physically damaged or the adjustment range cannot restore proper alignment, consult the manufacturer or a qualified tool repair professional.
Safety Boundaries During Alignment
Never make mechanical adjustments while the saw is connected to power. Keep hands away from the blade teeth even when the blade is stationary, and follow the manufacturer’s instructions for locking the head or blade assembly during setup.
Before making a powered test cut, remove squares, wrenches, hex keys, loose tools, and other objects from the cutting area. Perform an unpowered check of the blade path and guard operation when the manufacturer’s instructions call for it.
Frequently Asked Questions
Q
How do I know if my miter saw fence is out of alignment?
Set the saw to its 0-degree miter position, disconnect power, and place a reliable square against the fence and the flat body of the blade. A visible gap between the square and blade indicates that the blade-to-fence relationship needs attention. Also check the fence with a straightedge for bowing or twisting.
Q
Should the miter saw fence be perfectly square to the blade?
For a standard 0-degree crosscut, the blade and fence should have the correct 90-degree relationship specified by the saw manufacturer. The exact adjustment method varies by model, so use the owner’s manual for the appropriate tolerance and adjustment procedure.
Q
Can I align a miter saw fence without a combination square?
A reliable square is the preferred basic reference because it provides a direct geometric check. A straightedge can help identify fence bowing, and test cuts can confirm the result, but visual inspection alone is less dependable for precision work.
Q
Why is my miter saw still cutting crooked after I aligned the fence?
Check the blade condition and installation, bevel alignment, miter detent or table alignment, sliding mechanism, fence straightness, and workpiece stability. Also verify the test material is flat and that the workpiece remains firmly against the fence during the cut.
Q
Do I need to align both sides of a two-piece miter saw fence?
Yes. Each fence section should be checked according to the manufacturer’s procedure, and the two sections should also be checked relative to each other. A step between the sections can cause a long workpiece to rock or change position as it contacts the fence.
Q
How often should I check miter saw fence alignment?
Check it whenever accuracy becomes questionable and after events that can disturb the setup, such as transportation, a significant impact, or major maintenance. For precision work, a quick square and test-cut check before an important project can catch problems before they affect finished material.
✦ Wrapping Up
Conclusion
Miter saw fence alignment is primarily about creating a dependable physical reference between the fence and blade at the required cutting angle. The process is straightforward when it is approached in the right order: disconnect power, inspect the saw, establish the 0-degree position, check the blade body against the fence with a reliable square, make controlled adjustments, tighten the hardware without shifting the fence, and verify the result with a test cut.
If the saw remains inaccurate after a careful fence adjustment, do not keep moving the fence blindly. Recheck the blade, miter mechanism, bevel setting, fence straightness, sliding system, and workpiece. Some saws use different adjustment systems, so the owner’s manual should take priority whenever its procedure differs from a general alignment method.
💡 Key Takeaway
Before your next precision project, disconnect the saw, check the fence with a reliable square, make only small adjustments, and confirm the final setting with a scrap test cut. Once the fence and the rest of the saw are verified, record the setup or mark any repeatable reference points so future checks are faster.