Miter saw calibration means checking and adjusting the saw so the table, fence, blade, miter settings, and bevel stops produce the angles shown on the controls. For a typical U.S. woodworking or jobsite saw, start with a clean, stable saw, unplug it or remove its battery, verify the blade and table, square the fence, set the 0-degree miter position, check the bevel stops, reset the indicators, and finish with test cuts.
For American woodworkers, trim carpenters, remodelers, and DIY users, a miter saw is often used for everything from framing lumber and baseboard to door casing and picture frames. Small alignment errors can become visible gaps when two angled pieces meet, so calibration should be based on physical checks rather than simply trusting the printed scale.
The exact adjustment points vary by manufacturer and model. Some saws allow the fence to move, while others require adjustment of the miter detent plate or table assembly. Bevel stops can also use different mechanisms. Your owner’s manual should therefore control the final adjustment procedure, especially when a screw, stop, lock, or guard must be moved.
A reliable calibration process separates the reference surfaces from the angle indicators. First make the mechanical relationships accurate, then move the pointers or scales so they display the correct values. This prevents a common mistake: setting the pointer to zero even though the blade itself is not actually square.
Source: finehomebuilding.com
What Does Miter Saw Calibration Mean?
Miter saw calibration is the process of aligning the saw’s working parts so that the blade reaches the intended cutting angle relative to the table and fence. A square crosscut normally requires the blade to be perpendicular to the table and correctly aligned with the fence when the miter setting is at 0 degrees.
Miter and bevel describe two different movements. The miter angle pivots the saw head or table horizontally, changing the angle across the face of the workpiece. The bevel angle tilts the blade relative to the table, changing the angle across the thickness or edge of the workpiece. A compound cut combines both.
Calibration is different from simply reading the scale. The scale tells you what the manufacturer intends the setting to represent; a square, straightedge, angle gauge, and test cut tell you whether the physical setup actually produces that angle.
Source: protoolreviews.com
Blade-to-table alignment
The blade should reach the intended bevel reference, commonly 90 degrees to the table at the 0-degree bevel position.
Blade-to-fence alignment
At the 0-degree miter setting, the blade should be square to the fence so a crosscut produces a true right angle.
Miter scale and detents
The miter mechanism should stop at the intended reference angles, while the pointer should accurately indicate the selected setting.
Bevel stops
The common 0-degree and 45-degree bevel positions should be checked independently because a correct 0-degree setting does not automatically prove that a 45-degree stop is accurate.
When Should You Calibrate a Miter Saw?
Check a new saw before precision work, particularly after shipping or transportation. Recheck an established setup after moving the saw, after heavy jobsite use, after changing or servicing components, or whenever test cuts begin showing gaps or inconsistent angles.
The required frequency depends on how the saw is used. A stationary shop saw that stays protected may need fewer adjustments than a jobsite saw that is repeatedly transported. A quick test cut can tell you whether a full calibration is necessary.
After transportation
Vibration and impacts can change the relationship between the fence, detent plate, table, or bevel stops.
After inaccurate cuts appear
Gaps in crosscuts or miter joints are a reason to inspect alignment before changing cutting technique.
After mechanical work
Blade, fence, table, pivot, or adjustment hardware work can change the reference geometry.
Tools and Preparation for Miter Saw Calibration
Calibration does not require an elaborate measurement laboratory. For most workshop and jobsite miter saws, a reliable square, a straightedge, suitable hand tools, and clean scrap material are enough to establish the important reference points. A feeler gauge or a thin strip of paper can help reveal small gaps, although a feeler gauge provides a more controlled measurement.
Choose a flat, stable work surface before checking the saw. Dust, chips, pitch, or debris trapped between a fence and table can create a false alignment error. Clean the table, fence, blade area, and adjustment surfaces before measuring.
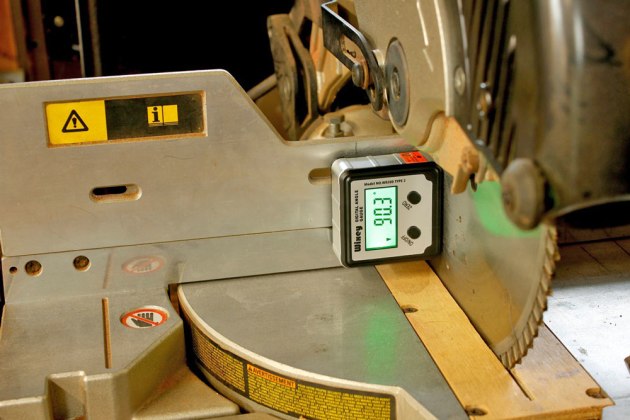
A digital angle gauge can be useful for checking bevel angles, especially when the manufacturer’s scale is difficult to read. It should complement rather than replace the owner’s manual and physical test cuts.
Source: res.cloudinary.com
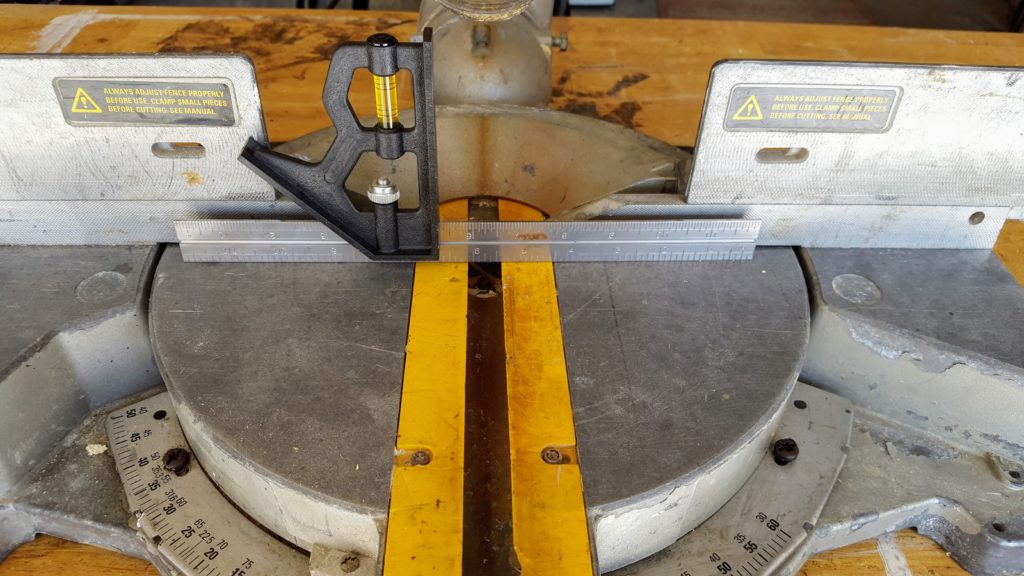
Combination or machinist square
Use a known-accurate square to check 90-degree relationships. Check the square itself before relying on it for precision work.
Straightedge
Use a straightedge to check whether the table or two-piece fence surfaces are reasonably aligned.
Feeler gauges
Use feeler gauges to identify and compare small gaps between reference surfaces.
Hex keys and screwdrivers
Use the adjustment tools specified by the saw manufacturer rather than forcing hardware with an incorrect tool.
Scrap lumber
Keep flat, straight scrap available for verification cuts after each major adjustment.
Safety Before You Adjust Anything
Disconnect the saw from power before placing a square near the blade or loosening adjustment hardware. For cordless models, remove the battery pack according to the manufacturer’s instructions. The blade must be completely stopped before any inspection.
Do not defeat or remove a blade guard merely to make calibration easier. If a fence must be moved or a guard component must be repositioned for a manufacturer-specified adjustment, follow the model-specific instructions and restore all safety components before operating the saw.
After an adjustment, move the saw head through its intended travel without power and verify that the blade, guard, fence, clamp, and workpiece path do not interfere. This is particularly important after changing fence position or bevel settings.
Disconnect power
Unplug corded saws or remove the battery from cordless saws before calibration.
Keep hands away from the blade
Treat the blade as hazardous even when the motor is off and never use the teeth as a measuring reference.
Restore the normal setup
Before making a powered test cut, reinstall or reposition any fence or guard component required for normal operation.
How to Calibrate a Miter Saw Step by Step
Calibrate the saw in a logical order: clean and inspect it, verify the table, square the fence, establish the 0-degree miter position, check the 0-degree and 45-degree bevel positions, then reset the indicators and verify the results with test cuts. The order matters because later adjustments depend on earlier reference surfaces.
Do not assume every saw uses the same adjustment screws. The procedure below describes the measurement logic; the owner’s manual should identify the exact hardware and adjustment direction for your model.
Source: popularwoodworking.com
1. Inspect the blade
Disconnect power and inspect the blade for damaged teeth, heavy buildup, visible warping, or other conditions that could affect measurement or cutting.
2. Check the table
Place a straightedge across the table in several directions and look for significant gaps or rocking before using the table as a reference.
3. Check the fence
Use a straightedge to check that the fence is straight and that split fence sections are aligned with one another.
4. Square the blade to the fence
Set the miter and bevel controls to their 0-degree reference positions and use a square against the fence and flat blade body.
5. Adjust the miter mechanism
If the blade is not square to the fence, use the adjustment procedure specified for the saw, which may involve the fence, detent plate, scale, or table assembly.
6. Check the 0-degree bevel
Use a square between the table and flat blade body to verify that the blade is perpendicular to the table at the 0-degree bevel position.
7. Check the 45-degree bevel
Move to the appropriate 45-degree bevel stop and use a suitable 45-degree reference or test cut to verify the setting.
8. Reset the indicators
Only after the physical alignment is correct should you adjust the miter and bevel pointers or scales to show the correct values.
How to Check the Blade Against the Table
Set the bevel to its 0-degree reference position and secure the saw head as directed by the manufacturer. Place the base of a reliable square flat on the saw table and bring the square’s vertical edge against the flat body of the blade.
Do not use the carbide teeth as the reference because tooth geometry can vary and can interfere with accurate contact. If the square does not sit flush against the blade body, inspect the manufacturer’s bevel-stop adjustment and correct the angle before continuing.
Rotate the blade by hand when practical and safe to check more than one portion of the blade body. A consistent relationship is more useful than a single contact point.
No visible gap
The square and blade body should remain in close, consistent contact at the reference position.
Gap changes as the blade rotates
Investigate blade condition, mounting, or arbor-related issues instead of assuming the bevel stop is the only problem.
How to Square the Fence
With the blade at the 0-degree miter and 0-degree bevel reference positions, place the square against the fence and blade body. Look for light or a measurable gap between the square and the blade.
If the fence is adjustable, loosen its mounting hardware only enough to permit controlled movement. Align the fence to the square, lightly snug the hardware, recheck the alignment, and then tighten it fully while preventing the fence from shifting.
For a two-piece fence, check both sections. One fence can be square to the blade while the two fence faces are still not aligned with one another. Use a straightedge to compare the two sections after establishing the primary reference.
One-piece fence
Follow the model-specific procedure for moving the connected fence assembly into square.
Two-piece fence
Square one side first, then align the second side with the established reference.
Fixed fence
Some saws require adjustment of the miter table or detent mechanism rather than the fence itself.
Calibrating the Miter and Bevel Angles
Once the table and fence are established as reliable references, calibrate the miter and bevel mechanisms. The goal is not simply to make the pointer display 0 or 45 degrees; the goal is to make the blade physically reach the intended angle and then make the indicator agree with that position.
For the miter setting, place the saw at the 0-degree detent and verify the blade against the fence. If the mechanical alignment is wrong, use the adjustment procedure in the owner’s manual. Some models use adjustable detent plates, while others require the table or blade carriage to be repositioned.
After the blade is physically square, check the pointer. If it does not point exactly to 0 degrees, loosen the pointer’s retaining screw, position it correctly, and retighten it. The same principle applies to other calibrated indicators.
Source: manualslib.com
Calibrate 0-degree miter first
A reliable square reference at 0 degrees establishes the foundation for ordinary crosscuts.
Check common miter stops
After 0 degrees is correct, verify frequently used stops such as 45 degrees with a suitable test method or angle reference.
Set 0-degree bevel
Use the table and blade body to verify that the blade is perpendicular at the upright position.
Set 45-degree bevel
Use a 45-degree square, drafting triangle, digital angle gauge, or controlled test cut depending on the saw design.
How to Check a 45-Degree Bevel
The 45-degree bevel stop should be checked after the 0-degree bevel reference is correct. The physical adjustment varies considerably among saws, so identify the correct stop screw or mechanism from the manual before turning anything.
If access is limited because of the fence or blade housing, use the manufacturer’s specified procedure for creating clearance. Never improvise by placing your hands or an unprotected measuring tool in the blade’s hazardous area.
After setting the stop, make a test cut on flat scrap. A test piece can reveal an error that is difficult to see when measuring a crowded blade area.
Single-bevel saw
Verify the available bevel direction and its specified stop positions.
Dual-bevel saw
Check both left and right bevel directions because one side being accurate does not establish the accuracy of the other.
Indicator mismatch
If the cut is correct but the scale is wrong, adjust the indicator rather than disturbing the mechanical stop.
How to Verify Miter Saw Calibration With Test Cuts
A calibrated-looking scale is not enough. The final check should involve actual cuts in suitable scrap material. Test cuts expose errors caused by the combined geometry of the table, fence, blade, miter mechanism, bevel mechanism, and workpiece positioning.
For a 90-degree crosscut, cut a flat, reasonably wide piece of scrap and examine the cut with an accurate square. Another useful method is a flip test: cut the end of a board, cut off a section, flip the section over, and bring the two matching cut faces together. A triangular gap indicates that the cut was not truly square.
For 45-degree miters, cut two pieces and bring the angled ends together to form a right-angle corner. For more demanding work, four equal-length pieces can be cut at 45 degrees and dry-fitted into a square or frame. Gaps show that further alignment or technique checks are needed.
Source: tylynnm.com
90-degree crosscut test
Use a square or flip test to identify whether the cut is truly perpendicular.
45-degree miter test
Join two 45-degree pieces to form a 90-degree corner and inspect the joint for gaps.
Four-piece frame test
Use four equal-width pieces when checking demanding miter work because errors accumulate around multiple corners.
45-degree bevel test
Cut scrap with the bevel set to 45 degrees and compare the resulting angle with a known-accurate reference.
How to Read a Gap in a Test Joint
The location and shape of a gap can provide clues about the problem, but it should not be treated as a diagnostic proof by itself. A gap can result from miter error, bevel error, fence alignment, stock movement, material twist, blade deflection, or inconsistent workpiece pressure.
If both pieces are straight and the gap remains consistent, recheck the miter setting and fence alignment. If the joint changes when the workpiece is repositioned, inspect the fence, stock, clamping, and support arrangement before making another saw adjustment.
Gap at the toe
Recheck the miter angle and confirm that the workpiece was held consistently against the fence.
Gap at the heel
Recheck the same references rather than assuming the opposite adjustment is automatically required.
Uneven gap across the thickness
Inspect bevel alignment and the flatness or orientation of the workpiece.
Changing result between cuts
Look for material movement, blade condition, head deflection, fence movement, or inconsistent technique.
Miter Saw Calibration Troubleshooting and Common Mistakes
When a calibrated saw still produces inaccurate cuts, do not immediately turn another adjustment screw. First identify whether the error comes from the saw, blade, material, measurement tool, or cutting technique. Changing several settings at once makes it difficult to know which adjustment solved or created the problem.
A dull, damaged, dirty, or warped blade can produce poor results even when the saw’s geometry is correct. Likewise, a bent or uneven workpiece can make a correctly calibrated saw appear inaccurate. Always use straight, stable scrap when verifying the setup.
Another common mistake is checking only one part of the blade or pressing a square against the carbide teeth. The teeth are not the intended reference surface for most squareness checks. Use the flat blade body and follow the manufacturer’s instructions.
Source: lowes.com
The pointer says 0, but the cut is not square
Check the physical blade-to-fence relationship. Reset the pointer only after the mechanical alignment is correct.
The blade is square at one position but not another
Inspect the blade, arbor, mounting surfaces, pivot mechanism, and head movement rather than repeatedly adjusting the stop.
The fence will not stay aligned
Check mounting hardware, fence design, contact surfaces, and the adjustment method specified by the manufacturer.
The 0-degree setting is accurate but 45 degrees is not
The 45-degree bevel stop may require its own adjustment. Verify the 45-degree position independently.
Cuts are inconsistent even after alignment
Inspect blade condition, workpiece support, clamping, material flatness, head deflection, and cutting technique.
The saw cannot hold calibration
Excessive mechanical play, damaged components, stripped adjustment hardware, or worn pivot parts may require manufacturer service or qualified repair.
Calibration Mistakes to Avoid
Do not calibrate on a dirty table. Sawdust trapped under a square or between a fence and table can create a false angle.
Do not adjust the indicator before correcting the actual blade position. The pointer is an information display, not the reference that makes the cut accurate.
Do not assume a 0-degree calibration proves every other angle is correct. Check the common 45-degree miter and bevel positions independently.
Do not keep tightening adjustment hardware after the alignment begins to move. Excessive force can shift the setting or damage hardware. Use the manufacturer’s specified tightening procedure.
Do not make the final calibration judgment from a narrow piece of scrap. A wider, flat test piece makes small angular errors easier to observe.
Change one adjustment at a time
This preserves a clear reference and makes troubleshooting easier.
Recheck after tightening
Hardware can move the fence or table slightly as it is tightened, so verify the alignment again.
Use a known-accurate reference
A damaged or inaccurate square can make a perfectly aligned saw appear defective.
When Calibration Is Not the Right Fix
Calibration cannot correct every mechanical problem. If the saw head has excessive side-to-side play, the arbor is damaged, the blade does not run true, an adjustment mechanism is broken, or a structural component is bent, further calibration may only mask the underlying problem.
In those cases, stop using the saw for precision or hazardous work and consult the manufacturer’s service information or a qualified power-tool technician. A saw that cannot maintain its mechanical alignment should not be treated as a simple scale-adjustment problem.
Damaged blade or arbor
Replace the blade or obtain appropriate service rather than compensating for mechanical damage with angle adjustments.
Excessive head play
Inspect the pivot and related components according to the service documentation.
Bent or damaged fence
Repair or replace the affected component when it cannot provide a reliable reference.
Frequently Asked Questions
Q
How do I know if my miter saw needs calibration?
Make a controlled test cut on flat scrap and check it with an accurate square. You should also inspect the fence and blade alignment if you see gaps in crosscuts or miter joints. A saw that has been transported, dropped, heavily used, or recently serviced deserves an alignment check before precision work.
Q
Should I calibrate the miter saw before or after changing the blade?
Inspect the blade first and make sure it is correctly installed and suitable for the saw. If the blade is changed, recheck critical alignment and make a test cut because blade condition, mounting, or blade runout can affect the result. Follow the manufacturer’s blade installation instructions.
Q
Why is my miter saw at 0 degrees but the cut is not square?
The printed 0-degree position does not guarantee that the blade is physically square. The fence, detent plate, miter table, blade-to-fence relationship, or indicator may be out of alignment. Check the blade against the fence with a reliable square and correct the mechanical alignment before resetting the pointer.
Q
How often should I calibrate my miter saw?
There is no universal interval that fits every saw and user. Check it before precision work and whenever the saw has been transported, adjusted, serviced, or begins producing inconsistent cuts. Jobsite saws may need more frequent checks because they are moved and handled more often than stationary shop saws.
Q
Can I use a digital angle gauge to calibrate a miter saw?
Yes. A digital angle gauge can be useful for checking bevel angles and confirming an adjustment. Use it on clean, suitable reference surfaces and follow its calibration instructions. It should supplement physical alignment checks and test cuts rather than replace the saw’s manufacturer-specific adjustment procedure.
Q
Why are my 45-degree miter joints still leaving gaps after calibration?
A gap can come from several sources besides the printed 45-degree setting. Recheck the miter angle, fence alignment, blade condition, stock flatness, workpiece support, and cutting technique. For a four-piece frame, small angular errors can accumulate around the four corners, so use equal-width, straight test pieces and dry-fit the assembly before making project cuts.
✦ Wrapping Up
Conclusion
Accurate miter saw calibration starts with reliable reference surfaces, not the numbers printed on the saw. Clean the machine, inspect the blade, verify the table and fence, establish the 0-degree miter and bevel positions, check the 45-degree stops, and then reset the indicators so they match the physical settings.
The final test should always involve actual scrap material. A square can reveal a basic alignment error, while flip tests and miter-joint tests show how the complete saw setup behaves during cutting. If the saw repeatedly loses alignment or shows excessive mechanical movement, investigate the underlying hardware instead of compensating with the angle scale.
💡 Key Takeaway
Before your next precision project, spend a few minutes checking the table, fence, 0-degree miter, 0-degree bevel, and 45-degree bevel, then make a test cut on straight scrap. If the test passes, record the verified settings and use the same reference procedure whenever the saw is moved or serviced.