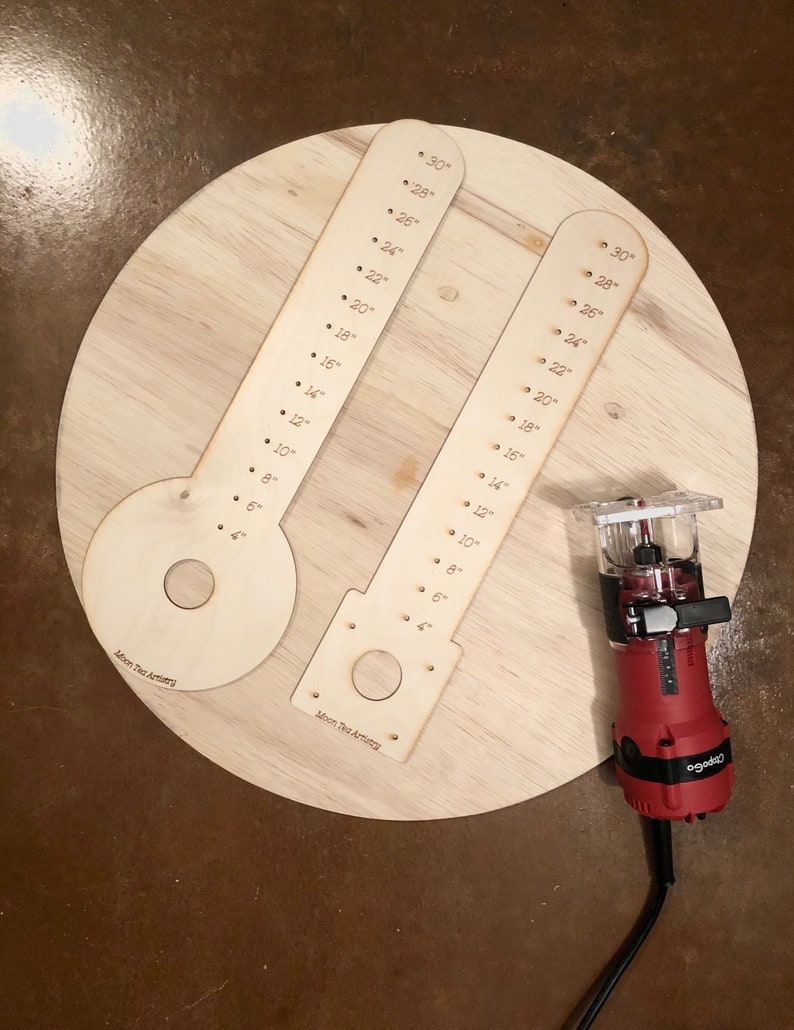
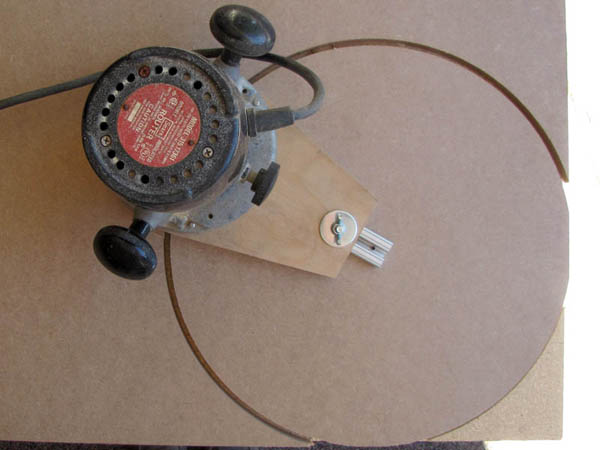
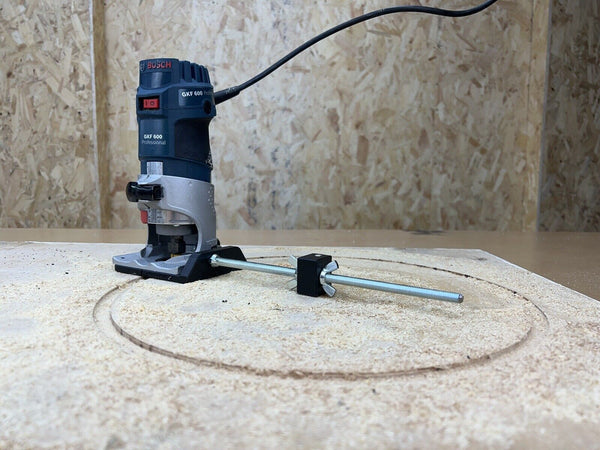
The most reliable way to cut a circle with a router is to attach the router to a circle-cutting jig or trammel and rotate it around a fixed center point. Set the pivot-to-bit distance to the required radius, make shallow passes, and keep the workpiece firmly supported.
For U.S. woodworkers, router circle cutting is a practical way to make round tabletops, speaker openings, cutting boards, shelves, wheels, rings, templates, and decorative panels from common materials such as plywood, MDF, and solid wood. A router guided by a fixed pivot can produce a much more consistent circular path than trying to guide the tool freehand.
The basic principle is simple: a circle-cutting jig turns the router into a powered compass. The pivot establishes the center, while the distance between the pivot and the router bit establishes the radius. Accuracy depends less on the router brand than on a rigid jig, an accurate radius setting, secure workholding, an appropriate bit, and controlled cutting passes.
Source: cdn.shopify.com
What Is Router Circle Cutting?
Router circle cutting is the process of guiding a handheld router around a fixed center point so the router bit follows a circular path. The guide is commonly called a circle jig, circle guide, compass jig, or trammel. The router remains attached to the guide while the guide pivots around the center of the intended circle.
Unlike freehand routing, the jig constrains the router to a defined radius. If the pivot remains fixed and the router-to-pivot distance remains constant, the cutting edge follows a circular path. This makes the method useful when the edge needs to be round, repeatable, and relatively smooth.
The technique can be used for both external and internal circles. An external cut produces a round disc or tabletop, while an internal cut creates an opening such as a speaker hole, sink opening, or cable pass-through. Some jigs can also be adjusted to create circular rings.
Source: d4c5gb8slvq7w.cloudfront.net
Circle jig
A guide that positions the router at a fixed or adjustable distance from a pivot point.
Trammel
A long guide arm or auxiliary router base that lets the router rotate around a center point, particularly useful for large circles.
Pivot point
The fixed center around which the router travels. It may use a pin, screw, nail, dowel, or another purpose-built pivot depending on the jig.
Radius
The distance from the center of the circle to its edge. The desired diameter is twice the radius.
When Is a Router Better Than a Jigsaw?
A jigsaw can rough-cut a circle quickly, but its blade can flex and the result may require substantial sanding or routing afterward. A router guided by a rigid circle jig follows a controlled path and can produce a cleaner, more consistent edge. For a large solid circle, a practical workflow is often to rough-cut close to the final outline with a saw and then use the router to establish the finished edge.
For small openings, thin stock, or situations where a router cannot safely be used, another cutting method may be more appropriate. The router should be selected because its controlled circular motion suits the workpiece and cut, not simply because it can make a circle.
Tools and Materials You Need
The exact setup depends on the diameter and material, but a basic router circle-cutting operation does not require a complicated collection of tools. A plunge router is particularly convenient because it lets you start and stop the cut while the router remains supported by the jig. A fixed-base router can also work when the jig and cutting procedure are appropriate for that setup.
Use a router bit suitable for the material and the type of cut. Straight bits are common for circle cutting, while spiral bits can provide useful chip evacuation. The bit must be installed securely and used within the manufacturer’s recommended operating conditions.
For the jig, you can use a commercial circle guide or make a simple trammel from rigid plywood, MDF, or another suitable material. The guide must be stiff enough that it does not flex as the router moves around the circle.
Source: i.etsystatic.com
Router
A plunge router is convenient for controlled starting and repeated depth adjustments, while suitable fixed-base routers can also be used with compatible jigs.
Router bit
Choose a sharp straight or spiral bit appropriate for the material, shank size, cutting depth, and router.
Circle jig or trammel
Use a commercial guide or a rigid shop-made guide with a secure pivot and reliable radius adjustment.
Workholding equipment
Use clamps, double-sided woodworking tape, or another appropriate method to prevent the workpiece from shifting.
Backing material
A spoil board or sacrificial surface can protect the bench and help support the workpiece during a through-cut.
Safety equipment
Wear appropriate eye and hearing protection and control airborne dust with suitable extraction and respiratory protection when required for the material and workspace.
Commercial Jig or Homemade Trammel?
A commercial jig is convenient when you need repeatable adjustments or frequently cut circles. A homemade trammel can be inexpensive and highly adaptable, especially for unusually large diameters. The important characteristics are rigidity, secure router attachment, a stable pivot, and accurate radius adjustment.
For a homemade jig, use material that remains flat and rigid under the weight and movement of the router. Transfer the router’s mounting pattern carefully, provide enough clearance for the bit, and countersink mounting screws when necessary so the screw heads cannot interfere with the router’s movement.
How to Cut a Circle With a Router
The safest and most repeatable approach is to establish the center, set the radius, secure the workpiece, make a shallow first pass, and progressively deepen the cut. Do not rush the first pass because any error in the pivot location or radius setting will be reproduced around the entire circle.
Before switching on the router, move the tool through the complete intended rotation with the router unplugged. Check that the base, jig, cord, dust hose, clamps, and your hands have enough clearance throughout the full circle.
Source: images.ctfassets.net
1. Mark the center
Locate the exact center of the intended circle. If the center mark will be hidden, place the pivot hole on the underside when the construction allows it.
2. Prepare the workpiece
Place the material on a stable surface or spoil board and secure it so it cannot move as the router rotates.
3. Install the jig
Attach the router firmly to the circle jig or trammel. Confirm that the bit can rotate freely and that all mounting hardware is tight.
4. Set the radius
Adjust the distance from the pivot to the appropriate cutting reference on the router bit. Use the jig’s scale when available, but verify the setting with a test cut when accuracy matters.
5. Set a shallow depth
Set the router for a controlled initial pass rather than attempting to cut the entire thickness at once.
6. Make the first circle
Start the router according to the tool’s operating procedure and rotate it smoothly around the pivot. Maintain a steady feed rate without stopping in the cut.
7. Clear chips
Stop the router before making adjustments and remove accumulated chips when they obstruct visibility or interfere with the jig.
8. Increase depth gradually
After each completed pass, shut down the router and lower the bit by a controlled amount before making another revolution.
9. Finish the cut
For a through-cut, provide adequate support below the workpiece and complete the final pass carefully. For an edge cut, make a final light cleanup pass if necessary.
Which Direction Should You Move the Router?
For a handheld router using a pivoting jig, the direction of rotation matters because it affects how the bit engages the material. Many circle-jig procedures use a counterclockwise movement when viewed from above, but the correct feed direction depends on whether you are routing an outside edge or an inside opening, the router orientation, and the cutter geometry.
Avoid an uncontrolled climb cut unless you specifically understand the cutting geometry and have a reason to use it. A climb cut can pull the router along the work and make control more difficult. When grain direction creates tear-out, use an appropriate technique with a very controlled feed rather than simply increasing speed.
How Deep Should Each Pass Be?
There is no single safe depth that applies to every router, bit, material, and setup. A shallow pass reduces the amount of material removed at once and can make the router easier to control. Woodworking references commonly demonstrate repeated passes around 1/8 inch to 1/4 inch, but the appropriate depth should be reduced when the router struggles, the material is difficult to cut, the bit is large, or the setup becomes unstable.
The important rule is to follow the router and bit manufacturer’s limits and choose a depth that keeps the cut controlled. If the router slows significantly, chatters, burns the material, or requires excessive force, reduce the depth and reassess the feed rate and bit condition.
How to Set the Correct Circle Size
The key measurement in router circle cutting is the radius. For a simple outside circle, a target diameter of 24 inches corresponds to a 12-inch radius. The challenge is identifying exactly where the jig’s measurement is taken relative to the router bit and the intended finished edge.
Commercial jigs may provide a scale for inside and outside diameters, but a shop-made jig may require direct measurement. The measurement must be consistent with the bit and the type of cut. Changing bit diameter can change the relationship between the pivot and the finished edge, so a setup calibrated for one bit should not automatically be assumed accurate with another.
When accuracy matters, make a test cut in scrap material and measure the resulting circle. This is especially useful when building a homemade jig, using an unfamiliar router base, or working to a tight dimensional tolerance.
Source: i0.wp.com
Outside circle
For a solid round part, establish the pivot-to-cutting-edge relationship that produces the required outside radius.
Inside circle
For an opening, account for the position of the cutting edge relative to the desired inside wall rather than simply using the outside-circle measurement.
Ring
Cut the outside diameter and inside diameter separately, keeping the same center so the ring remains concentric.
Test cut
When the diameter is important, make a test circle in scrap before committing to the final workpiece.
Example Radius Calculation
Suppose you need a hypothetical 30-inch outside diameter. Divide the diameter by two: 30 inches ÷ 2 = 15 inches. The basic target radius is therefore 15 inches. The jig should be adjusted so the relevant cutting edge of the bit follows a 15-inch radius, with the exact reference point determined by the jig design.
If you need a 10-inch diameter opening, the target radius is 5 inches. For either example, confirm the actual result with a test cut when the finished dimension is important because jig geometry, bit diameter, and measurement reference can affect the final size.
Choosing the Router Bit and Cutting Technique
A sharp router bit appropriate for the material is more important than simply choosing the largest or smallest available cutter. Straight bits are commonly used for circle cutting, while spiral bits can provide efficient chip evacuation and may reduce some cutting problems depending on the material and setup.
Bit diameter affects both the cutting load and the geometry of the circle jig. A larger bit removes more material per revolution, while a smaller bit can require more passes but may be appropriate for tighter work. The router’s speed should be set according to the bit manufacturer’s guidance, particularly when using larger-diameter cutters.
Cutting direction and wood grain also affect the result. Solid wood can tear when the bit exits or engages difficult grain. A steady feed rate, sharp cutter, correct bit orientation, and multiple controlled passes can reduce the likelihood of tear-out.
Source: images.finewoodworking.com
Straight bit
A common general-purpose option for routing circular grooves and edges when used within its intended cutting range.
Spiral upcut bit
Can pull chips upward and is often useful for clearing waste from a cut, but the visible-face result depends on workpiece orientation and material.
Sharp cutter
A dull bit creates more resistance and heat, which can contribute to burning, poor surface quality, or difficult tool control.
Appropriate router speed
Follow the cutter manufacturer’s speed range and reduce speed when required for larger-diameter cutters or specific materials.
How to Reduce Tear-Out
Tear-out is often most noticeable where the bit cuts against unfavorable grain direction. A practical approach is to use a sharp cutter, take light passes, maintain a controlled feed rate, and support the material properly. A final cleanup pass can remove minor imperfections without asking the cutter to remove a large amount of material.
For a through-cut, a spoil board beneath the workpiece can support fibers at the exit side. When the visible face must remain clean, plan the cutting orientation and final pass so the desired face receives the least damaging cutting action possible.
Safety and Workholding for Router Circle Cutting
Secure workholding is one of the most important parts of circle cutting because the router is moving around a large arc. The workpiece must not shift when the router encounters changing grain or cutting resistance. The pivot must also remain fixed throughout the operation.
Before routing, unplug the router while checking the bit, adjusting the jig, repositioning clamps, or changing depth. After the router is running, keep your hands away from the cutter and maintain control of the router throughout the rotation.
Wood dust should be controlled with appropriate dust collection and ventilation. Wear eye protection and hearing protection, and use respiratory protection appropriate to the material and workspace when dust cannot otherwise be adequately controlled. Follow the safety instructions supplied with the router, bits, and dust-control equipment.
Source: adaptool.co.uk
Secure the workpiece
Use clamps or an appropriate attachment method that prevents movement without placing hardware in the router’s path.
Check the complete rotation
With the router unplugged, rotate the jig through the entire circle and check for clamps, cords, dust hoses, bench edges, or other obstructions.
Protect the underside
Use a suitable spoil board when making through-cuts so the bit does not contact the workbench and the exit side receives additional support.
Control dust
Use dust extraction where practical and avoid allowing chips to accumulate around the router or obstruct the cutting path.
Keep the pivot stable
A pivot that shifts even slightly can change the radius and create an out-of-round cut.
What Should You Do Before Starting the Router?
Complete a dry run with the router unplugged. Confirm that the jig is firmly attached, the pivot is seated correctly, the bit is at the intended height, and the router can complete the entire rotation without contacting clamps or other objects. Check that the workpiece is supported and that the intended cut does not intersect hidden fasteners.
Only start the router after the setup passes this clearance check. If anything feels loose or obstructed, stop and correct the setup rather than trying to compensate while the router is running.
Common Router Circle Cutting Problems and Fixes
Most circle-cutting problems can be traced to setup, measurement, workholding, bit condition, or cutting technique. Diagnose the cause before making another pass because simply cutting deeper can make the defect worse.
If the circle is the wrong size but remains round, check the radius measurement and the reference point used to set the jig. If the circle is not truly round, inspect the pivot for movement and the jig for flex. If the edge is rough or burned, examine the bit, feed rate, depth of cut, and router speed.
Source: i.etsystatic.com
The circle is too large or too small
Recheck the pivot-to-bit measurement, confirm whether the jig scale describes radius or diameter, and make a test cut before returning to the final material.
The circle is out of round
Look for pivot movement, jig flex, loose mounting hardware, an uneven workpiece, or a radius adjustment that was not fully locked.
The router chatters
Reduce the depth of cut, check the bit installation, confirm that the jig is rigid, and use a controlled feed rate.
The wood is burning
Check for a dull or dirty bit, excessive router speed, slow feeding, or a cut that is too deep for the material and bit.
The edge has tear-out
Reduce the depth per pass, improve workpiece support, consider a different bit geometry, and adjust the cutting approach for the grain.
The router becomes difficult to control
Stop the operation and inspect the setup. Excessive cutting depth, an unstable jig, inadequate workholding, or an unsuitable bit can all increase tool resistance.
The pivot hole is visible
When the finished face must remain clean, consider placing the pivot on the underside or using a sacrificial pivot block or another jig design that keeps the finished surface intact.
How Can You Make Multiple Identical Circles?
For repeated parts, keep the jig calibrated and use the same router, bit, and reference method. If the workpieces can be safely stacked or templated, consider a workflow that allows the same pivot location and jig setting to be reused without recalibration.
Before producing a batch, make one test part and measure it. If the dimension is correct, lock the jig setting and record the setup so it can be reproduced later. Do not assume that changing to a different router bit will preserve the same calibration.
Frequently Asked Questions
Q
Can I cut a large circle with a small router?
Yes, provided the router and circle jig are suitable for the job. The diameter is largely determined by the length and rigidity of the trammel or guide. For very large circles, the jig must remain stiff enough to prevent flexing, and the workpiece must provide enough room for the router to rotate safely.
Q
Can I use a trim router for circle cutting?
A trim router can be used when the router, base, bit, and circle jig are designed for the required operation. Compact routers are convenient for smaller circles, but the available power, base stability, bit capacity, and jig compatibility become increasingly important as the cut gets deeper or the material becomes thicker.
Q
What is the best bit for cutting circles with a router?
There is no single best bit for every circle-cutting job. A straight bit is a common choice, while a spiral bit can provide useful chip evacuation. Choose a sharp bit that is correctly sized for the material and compatible with the router, then follow the bit manufacturer’s operating guidance.
Q
How do I cut a circle without leaving a center hole?
One option is to place the pivot on the underside of the workpiece when the finished face permits it. Another is to attach a sacrificial pivot block or template to the underside. The exact solution depends on the workpiece thickness, whether either face can contain a small hole, and how the circle jig is designed.
Q
Why is my router-cut circle not perfectly round?
Check whether the pivot moved, the jig flexed, the router shifted on the jig, or the radius adjustment loosened. Also verify that the workpiece itself is stable and flat. If the circle changes size during the rotation, inspect the guide and pivot before making another cutting pass.
Q
Should I rough-cut the circle before using the router?
For large solid circles, rough-cutting can reduce the amount of material the router needs to remove. A saw can remove most of the waste while leaving a small amount for the router to trim to the final circular path. This can reduce cutting load and make the final routing operation more manageable.
✦ Wrapping Up
Conclusion
Router circle cutting becomes straightforward once the router is constrained by a rigid jig and a stable center pivot. The essential measurements are the circle’s center and radius, while the essential process is controlled material removal through several passes.
For reliable results, spend more time on setup than on the actual cut. Verify the radius, secure the workpiece, check the router’s complete travel path, choose an appropriate bit, and test the setup on scrap when dimensional accuracy matters. If the finished circle is large or the material is thick, rough-cutting the waste before the final router pass can make the operation easier to control.
💡 Key Takeaway
For your next router circle cutting project, mark the center, calculate the required radius, secure the material to a suitable backing surface, calibrate the jig with a test cut, and remove material in controlled passes while keeping the router and pivot stable.