
Wood joints are how we connect boards for strength, accuracy, and clean looks.
A solid Wood Joint Guide shows you what joint to use, why it works, and how to cut it right. I have built furniture, stairs, and shop jigs for years. This Wood Joint Guide blends hands-on tips, clear steps, and proven rules so you can build with skill and confidence.

What Is a Wood Joint and Why It Matters
A wood joint links two or more pieces into one strong part. It shares load, guides alignment, and adds style. The right joint saves time and avoids cracks, squeaks, and racking. The wrong joint can fail fast.
Wood moves across the grain. It swells in humid months and shrinks in dry ones. Good joinery lets parts move as needed and still stay tight. This Wood Joint Guide keeps that front and center.
Glue bonds are strong on long grain. End grain is weak with glue alone. Many joints turn end grain into long grain faces. That is why they hold so well.

The Wood Joint Guide at a Glance: Types and Uses
Here are the main joint families and what they do best.
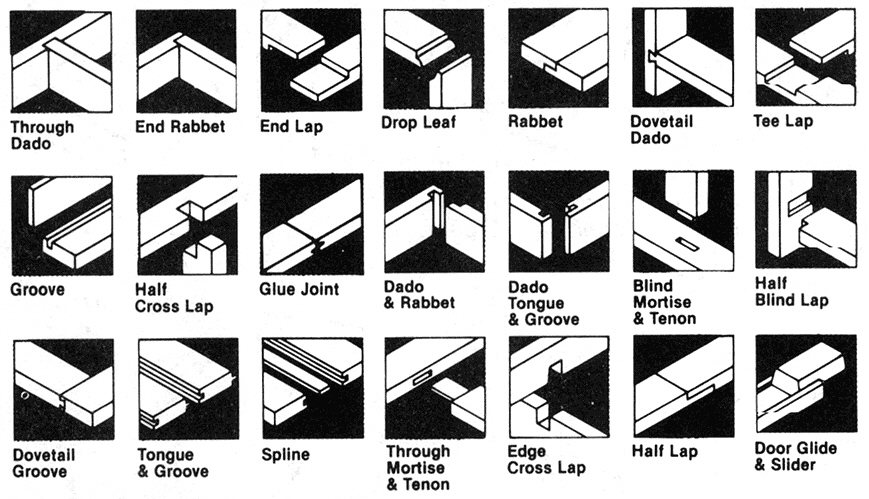
- Butt joint. Fast and simple. Best with screws or dowels for support. Good for shop jigs.
- Lap joint and half-lap. Large glue area and easy to align. Great for frames and stretchers.
- Bridle joint. Tenon at the end of one piece fits a slot in the other. Strong for frames and legs.
- Mortise and tenon. Classic, strong, and clean. Use in chairs, tables, and doors.
- Dowel joint. Pins add alignment and strength. Good for casework and rails.
- Biscuit and plate joiner. Quick alignment for panels and boxes. Not for heavy loads.
- Domino or floating tenon. Precise, fast, and very strong. Ideal for pro shops.
- Pocket hole. Fast and hidden screws. Great for face frames and utility builds.
- Dovetail. Strong in tension. Perfect for drawers and boxes.
- Box or finger joint. Lots of glue area and a bold look. Good for small boxes.
- Rabbet. A step cut at the edge. Strong with glue and fasteners in cases.
- Dado and groove. A slot across the grain. Holds shelves and panels.
- Tongue and groove. Boards interlock and align. Good for panels and floors.
- Spline. A thin key in matching slots. Adds strength to miters and edges.
- Miter and miter with spline or key. Clean look on frames. Add splines for strength.
- Scarf joint. Joins boards end to end. Use for long runs like trim or rails.
- Specialty Japanese joints. Complex, tight, and beautiful. Best for advanced users.
This Wood Joint Guide shows where each shines. Pick the joint that fits the load, the look, and your tools.

How to Choose the Right Joint for Your Project
Think about load first. Will the joint see pull, push, or twist? Dovetails resist pull. Mortise and tenon stop twist. Laps spread load well.
Check how the wood will move. Across-grain glue locks can split boards. Use floating panels or long slots for screws when needed. This Wood Joint Guide will point out safe paths.
Match the joint to your skill and tools. Pocket holes and biscuits are fast with jigs. Dovetails and hand-cut tenons need practice. Plan your time and test on scrap.
Look matters too. A miter hides end grain. A dovetail shows craft. For paint-grade work, pick fast and strong. For heirlooms, use joinery that can be seen.
Tools, Materials, and Setup
You do not need every tool. Start with a few that you can tune well. Add more as you grow.
- Hand tools. Sharp chisels, a marking knife, a square, a mallet, and a fine saw. A router plane helps fit tenons and dados.
- Power tools. A table saw, a router with edge guide, and a drill or drill press. A planer and jointer help with flat stock.
- Jigs. A pocket hole jig, a dowel jig, or a Domino if you have the budget. Straightedge guides and story sticks keep cuts true.
- Clamps. Bars, F-style, spring clamps, and cauls. Use just enough to close the joint.
- Adhesives. PVA for most work. Type II or Type I for water duty. Epoxy for gaps and oily woods. Hide glue for repairs and long open time.
- Fasteners. Screws with pilot holes. Confirmat screws for MDF. Brad nails for light holds while glue dries.
- Stock. Use kiln-dried wood at stable moisture. Aim for 6–9% MC indoors. Joint and plane faces square.
A clean setup saves time. Mark clear lines. Dry fit parts. This Wood Joint Guide will help you build habits that last.

Step-by-Step: Cutting Four Essential Joints
Use these steps as a base. Practice on scrap first. Tune your tools. Work slow and steady.
Mortise and tenon
- Lay out the tenon shoulders with a knife and square.
- Saw the cheeks or cut on the table saw or router.
- Chop or route the mortise to depth. Keep walls straight.
- Test the fit. Aim for a light press fit by hand.
- Glue the cheeks, not the mortise bottom. Clamp across the shoulders.
Dovetail (through)
- Gauge the baseline to match board thickness.
- Saw tails first. Keep a steady angle.
- Transfer tail lines to the pin board with a sharp knife.
- Saw pins to the lines. Chop waste to the baseline.
- Test, adjust with light paring, then glue.
Pocket hole
- Set screw length for stock thickness.
- Drill pocket holes on the back side.
- Clamp parts flush. Drive screws with a steady hand.
- Add glue for extra hold on long grain.
Dado or rabbet
- Mark width with the mating piece.
- Use a router with a straight bit or a dado stack.
- Take light passes. Sneak up on the fit.
- Check for snug slide, not force.
This Wood Joint Guide favors clean layout. Good marks beat guesswork every time.

Strength, Glue, and Wood Movement
Most long-grain glue joints are stronger than the wood. Lab shear tests back this up. End grain is weak with glue alone. Use joinery that adds long-grain faces.
Follow good glue rules.
- Fit first. Glue does not fix big gaps.
- Use enough glue to wet both sides. No dry spots.
- Clamp with even pressure. Do not starve the joint.
- Mind open time and clamp time. Warm shops speed cure.
- Clean squeeze-out after it gels. It will scrape off easy.
Size joints with care. Tenon thickness near one-third the rail is a safe rule. Keep shoulders tight to stop racking. Add pegs or drawbore pins for pull strength.
Plan for wood movement. Let panels float in grooves. Slot screw holes in cross-grain parts. Seal all faces to slow swings in moisture. This Wood Joint Guide keeps strength and movement in balance.
Plywood, MDF, and Sheet Goods Joinery
Sheet goods are stable and flat. They need joints that hold in thin face plies or fiber.
- Dados and rabbets. Great for cases. Use a sharp bit or blade for clean walls.
- Confirmat screws. Strong threads for particleboard and MDF. Drill the right pilot.
- Pockets with glue. Fast and strong for face frames on plywood boxes.
- Splined miters. Clean look on veneered boxes. Add a spline to fight shear.
- Dowels or Domino. Precise and repeatable for shelves and carcasses.
- Edge banding. Protects edges and hides cores. Apply heat or glue-on strips.
Plywood edges can split. MDF can swell with water. Seal edges and pick the right fasteners. The Wood Joint Guide keeps you on safe ground here.
Exterior and High-Stress Applications
Outside builds face sun, rain, and stress. Choose joints and glue that last.
- Use rot resistant wood. Think cedar, white oak, teak, or sapele.
- Pick waterproof glue. Type I PVA, epoxy, or polyurethane.
- Favor joinery with shoulders and pegs. Through tenons shed water if edges are eased.
- Add sealers and film finishes. Renew them on a set cycle.
- Avoid tight cross-grain locks. Use slotted holes and breathable design.
For gates and benches, a wedged through tenon works well. For long rails, a scarf joint with epoxy shines. This Wood Joint Guide leans on field use and proven fixes.
Common Mistakes and How to Fix Them
I have made every mistake in this book. Here is how I fixed them and what I learned.
- Gappy joints. Slight gaps can take a thin veneer shim with glue. Color-match the grain. For tiny gaps, use glue and fine dust from the same wood.
- Too tight tenon. Pare the cheeks, not the shoulders. Aim for burnish, not force.
- Misaligned panels. Use cauls and more dry fits. Mark parts with triangles so you keep the order.
- Tear-out in dados. Score cut lines with a knife. Use backer boards.
- Weak end-grain glue-ups. Add splines, dowels, or a tongue. Never trust end grain alone.
Slow down on layout. Sharp tools matter. This Wood Joint Guide will help you avoid my early stumbles.
Safety, Accuracy, and Quality Checks
Safety and accuracy go hand in hand. Set up right and you stay safe.
- Wear eye and ear protection. Use a dust mask when routing or sanding.
- Use guards, riving knives, and push sticks. Keep hands clear of blades.
- Make test cuts on scrap. Dial in depth and fit before the real parts.
- Check square, flat, and twist. A straightedge and winding sticks tell the truth.
- Dry fit every joint. If it fights you dry, it will fail wet.
Record settings in a shop notebook. You will thank yourself later. The Wood Joint Guide is not only how, but also how to check.
Cost, Time, and Skill: Planning Your Build
Plan the joint to fit your budget and skill. Fast is not always cheap if it fails.
- Entry level. Pocket holes, biscuits, rabbets, and dados. Low tool cost. Great for shop and home builds.
- Intermediate. Dowels, half-laps, bridle, and basic mortise and tenon. More set-up. Strong and clean.
- Advanced. Dovetails, complex mortise and tenon, splined miters, and scarf joints. Time heavy. High pride.
Estimate time with practice. A pocket-hole frame may take one hour. A dovetailed drawer may take two to three by hand. A Domino speeds pro work. Buy jigs that match how often you build. This Wood Joint Guide helps you choose the right path for your goals.
Frequently Asked Questions of Wood Joint Guide
What is the strongest wood joint for furniture?
Mortise and tenon is the classic pick for strength and racking. Dovetails are best when you need pull resistance, like drawers.
Which glue should I use for outdoor projects?
Use waterproof PVA Type I, epoxy, or polyurethane glue. Seal end grain and renew the finish on a schedule.
Are biscuits strong or just for alignment?
Biscuits add some strength but shine at alignment. For high loads, use dowels, Domino, or a mortise and tenon.
How tight should a tenon fit?
Aim for a light press fit by hand. If a mallet is needed, it is too tight and may split the mortise.
Can I trust pocket holes for cabinets?
Yes for face frames and carcasses when used with glue and proper screws. Avoid them in joints that take heavy racking without support.
How do I allow for wood movement in panels?
Let panels float in grooves and avoid cross-grain glue locks. Use slotted holes for screws that cross the grain.
What joint is best for MDF?
Confirmat screws, dados with glue, and dowels work well. Seal edges to cut swelling and chipping.
Conclusion
You now have a clear path from idea to strong, clean joinery. This Wood Joint Guide showed what each joint does, how to choose it, and how to cut it well. You learned how glue works, how wood moves, and how to avoid the traps that waste time and money.
Pick one joint to master this week. Practice on scrap. Build a small piece and test it to failure. The best shop teacher is the one you make. If this Wood Joint Guide helped, subscribe for more tips, ask a question, or share your next build.