
Woodworkers often ask which joint is strongest. That sounds simple, but there is no single answer for every project. A dining chair, wall cabinet, drawer, workbench, and outdoor gate place very different forces on their joints. The strongest choice is the joint that controls those forces without weakening the wood around it.
For a U.S. homeowner building garage shelves or a professional making furniture, **Wood Joint Strength** should be treated as a system. The joint shape matters, but so do grain direction, moisture, glue coverage, clamping, wood defects, and part size. A useful real-world lesson is simple: never judge a joint only by how difficult it is to cut. A basic joint with good long-grain contact can outperform fancy joinery that fits poorly.
What Does Wood Joint Strength Mean?
**Wood Joint Strength** describes how well a connection between two or more pieces of wood resists failure. Failure can mean the pieces pull apart, slide, split, rotate, crack, or become permanently loose. A joint may resist one type of force very well and perform poorly against another.
This is why joint strength should not be reduced to one number. A joint that handles pulling force may not handle twisting force equally well. The direction of the load often matters as much as the amount of load.
The wood itself is also part of the joint. If the glue line remains intact but the wood tears beside it, the adhesive may not be the weak point. In many well-made joints, failure begins in the surrounding wood rather than at the bond.
- ✦ Load capacity
The joint must carry the expected force without breaking or slipping.
- ✦ Stiffness
A strong joint should resist unwanted movement before complete failure occurs.
- ✦ Durability
The connection should remain useful after repeated loading, humidity changes, vibration, and normal wear.
- ✦ Failure behavior
A good design controls where stress collects and reduces the chance of sudden splitting.
Strength Is Not the Same as Rigidity
A joint can remain unbroken yet still feel weak because it flexes. This matters in chairs, tables, doors, and frames. Small movement can grow over time and create larger gaps.
- ✦ Strength
Describes resistance to actual failure.
- ✦ Rigidity
Describes resistance to bending, twisting, or movement under normal load.
The Main Forces That Affect Wood Joints
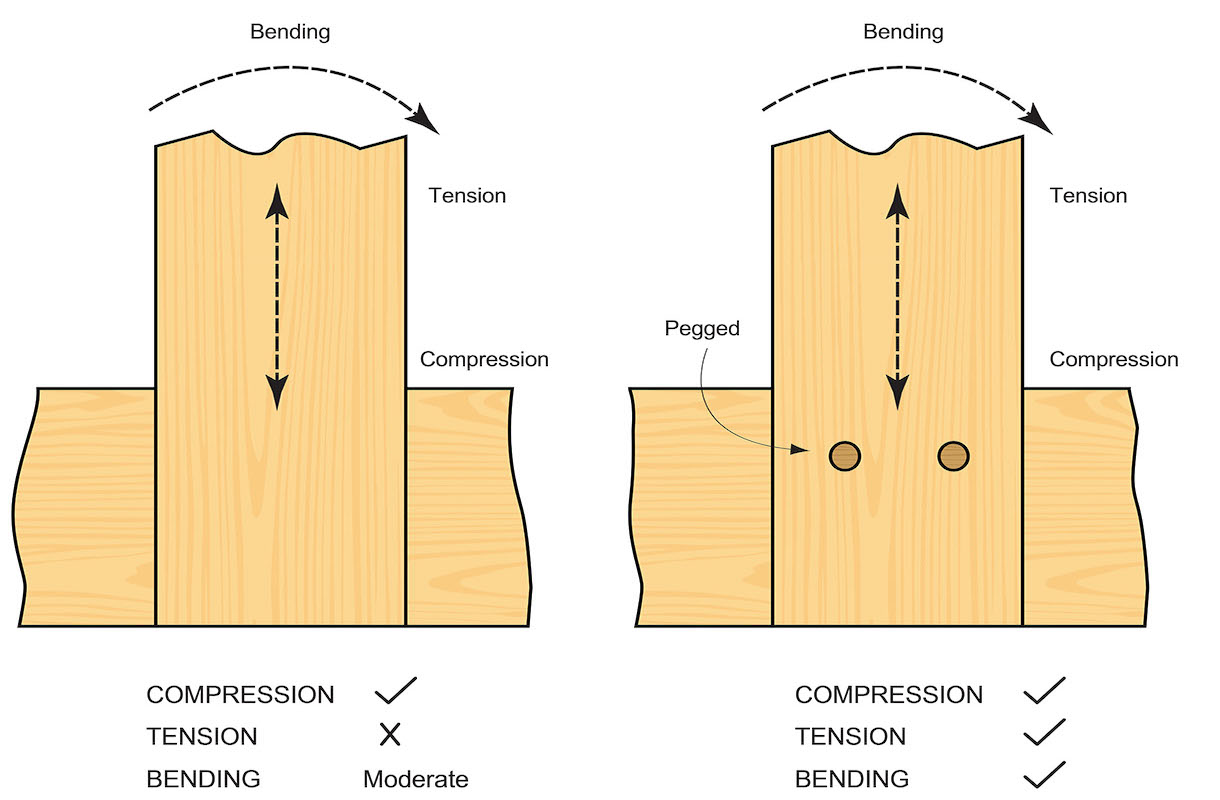
Understanding force is one of the best ways to improve **Wood Joint Strength**. A woodworking joint rarely experiences pure force from one direction. Furniture often sees a mix of tension, compression, shear, bending, and twisting.
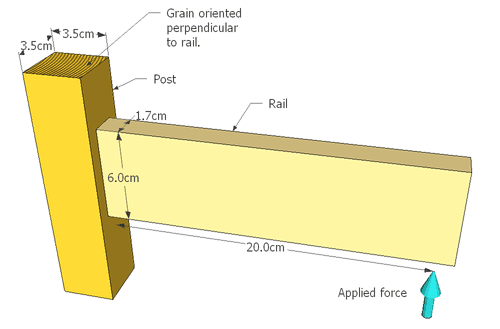
Think about a chair. Sitting creates downward force, but leaning back also creates leverage at the leg and rail joints. That leverage can place far more stress on a small part of the joint than the user’s body weight alone suggests.
Good joinery spreads force across more wood. It also avoids sharp stress points where cracks can start.
- ✦ Tension
Tension tries to pull connected parts away from each other.
- ✦ Compression
Compression pushes parts together and can crush soft fibers if the contact area is too small.
- ✦ Shear
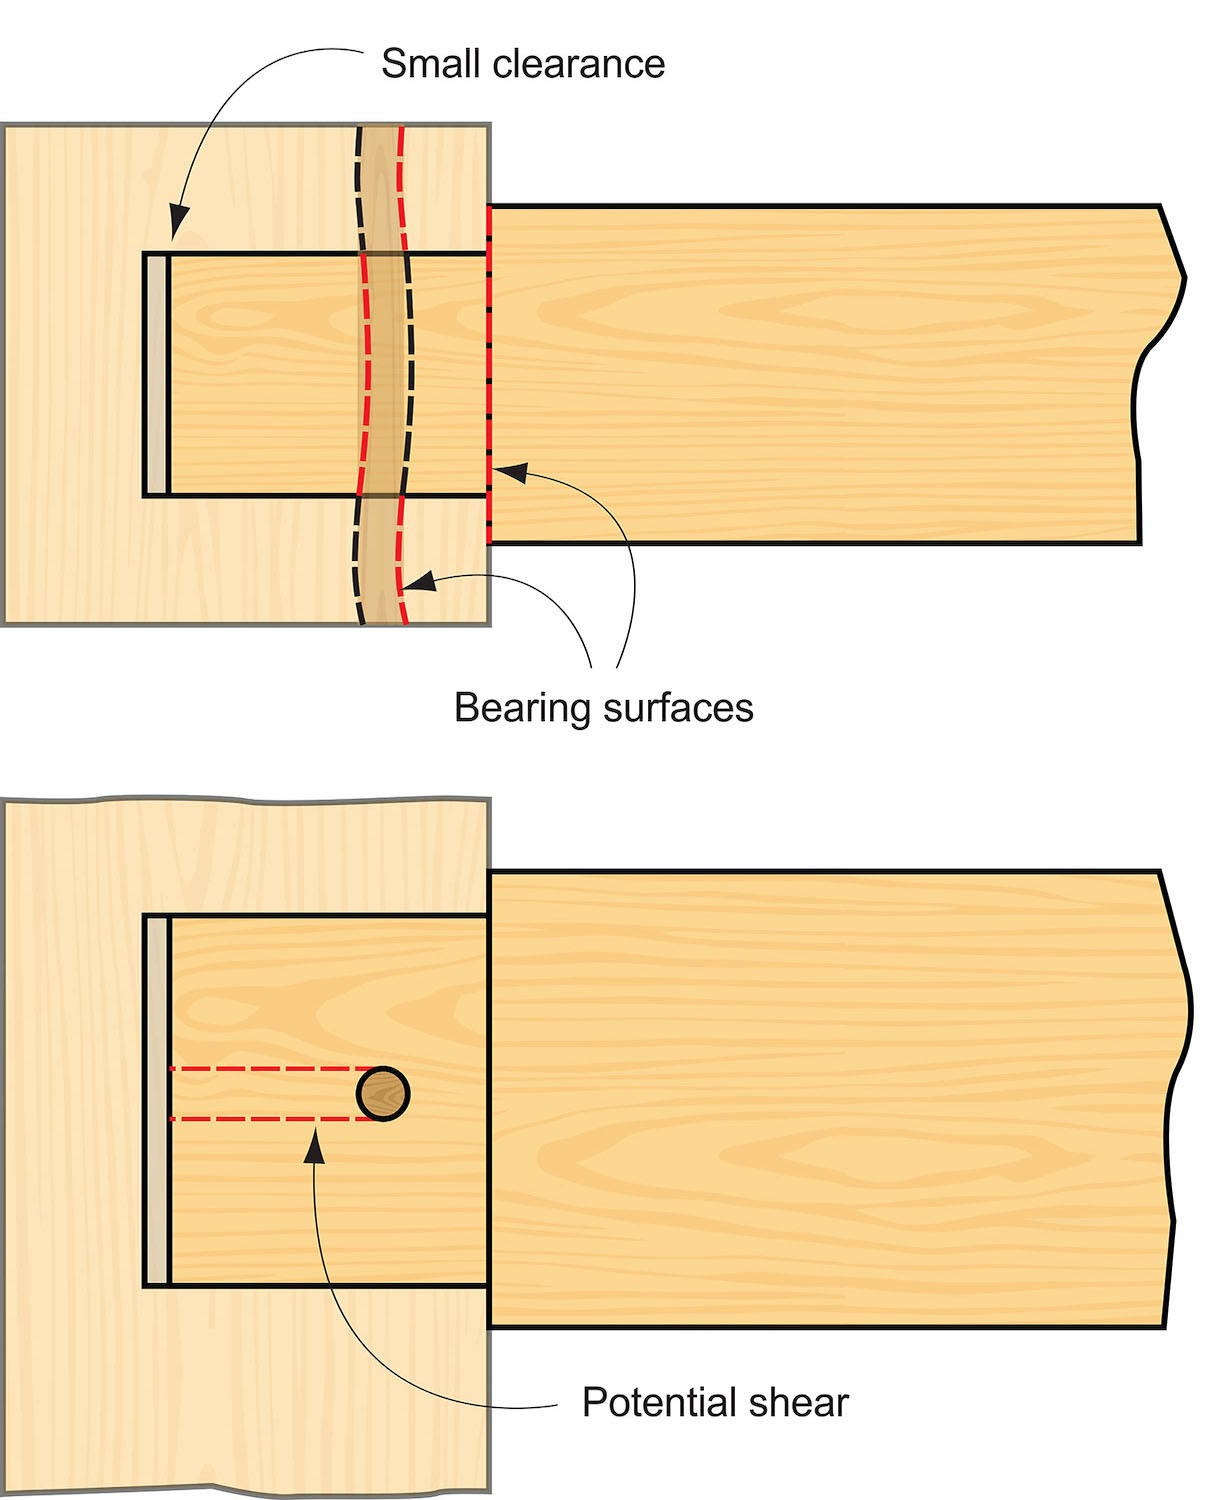
Shear tries to slide one part across another. Fasteners and glue surfaces often resist this force.
- ✦ Bending
Bending creates tension on one side of the joint and compression on the other.
- ✦ Torsion
Torsion twists the connection and can loosen joints that have little resistance to rotation.
Why Leverage Can Destroy an Otherwise Strong Joint
Long parts act like levers. A modest force applied far from a joint can create high stress where the pieces meet. This is one reason table legs and chair legs need joints with good depth and resistance to rotation.
- ✦ Reduce leverage
Use braces, stretchers, wider rails, or better joint placement when the design allows.
- ✦ Increase joint depth
A deeper joint can often resist rotation better than a shallow connection.
What Factors Control Wood Joint Strength?
Several factors work together to determine **Wood Joint Strength**. Focusing on just the joint name can hide important weaknesses. The same mortise-and-tenon joint can be excellent or poor depending on how it is sized, cut, and glued.
The strongest designs use enough sound wood around the joint. Removing too much material can create thin walls that split. Leaving too little glue area can also reduce the joint’s ability to spread stress.
- ✦ Joint geometry
The shape determines how much surface area carries the load and how well the parts resist movement.
- ✦ Grain direction
Wood behaves differently across and along the grain. Joint layout should account for that difference.
- ✦ Fit
Parts should meet closely without needing extreme force to assemble.
- ✦ Glue area
More useful long-grain bonding area can improve strength when the joint remains well proportioned.
- ✦ Wood species
Density, grain structure, brittleness, and natural oils can change joint behavior.
- ✦ Moisture content
Wood movement caused by moisture changes can stress joints after assembly.
- ✦ Workmanship
Accurate cutting, clean surfaces, correct adhesive use, and proper clamping all affect the final result.
Why Tight Does Not Always Mean Strong
A joint should fit closely, but forcing an oversized tenon into a mortise can split the surrounding wood. Very tight fits can also scrape away too much adhesive during assembly. The goal is controlled contact, not maximum pressure.
- ✦ Good fit
The joint seats fully with firm but reasonable hand or clamp pressure.
- ✦ Bad fit
The joint needs heavy force, leaves large gaps, rocks, or prevents full assembly.
Long Grain Versus End Grain in Glued Joints
Grain orientation has a major effect on **Wood Joint Strength**. Most common woodworking glues perform best when they bond clean, close-fitting long-grain surfaces. A joint with broad long-grain contact can form a very reliable connection.
End grain behaves differently. It can absorb adhesive quickly, and its structure does not provide the same bonding surface as face grain or edge grain. A simple end-grain butt joint therefore depends heavily on added support, mechanical fasteners, or better joint geometry.
This does not mean every joint that includes end grain is weak. Mortise-and-tenon, dovetail, box, and finger joints use geometry to create useful bonding surfaces and mechanical resistance.
- ✦ Long-grain bonding
Usually provides the most useful glue surface for standard furniture joints.
- ✦ End-grain bonding
Usually needs more design support because adhesive alone may provide limited resistance.
- ✦ Mechanical interlock
Tenons, dovetails, fingers, and similar shapes help the joint resist movement beyond glue alone.
Why Simple Edge Joints Can Be Very Strong
A properly prepared edge-to-edge panel joint has broad long-grain contact. When the mating edges fit well, the glue line can become highly dependable. Biscuits, dowels, or splines may help alignment, but they are not always required for basic panel strength.
- ✦ Flat surfaces
Edges should meet without large gaps.
- ✦ Even pressure
Clamp pressure should close the joint without bending the panel.
How Common Wood Joints Compare
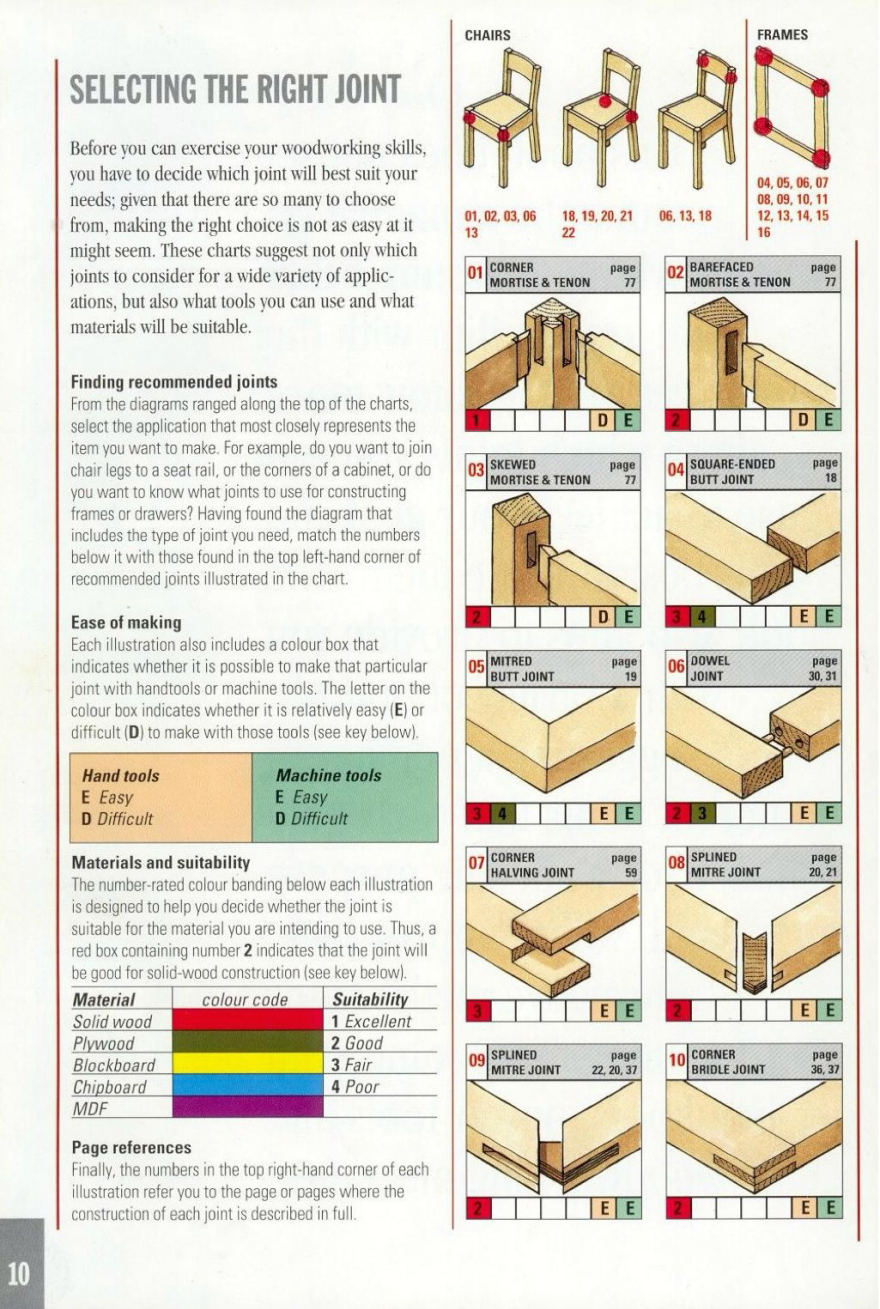
No reliable discussion of **Wood Joint Strength** should rank every joint with one universal score. Each joint works best in certain shapes and load directions. A dovetail can be excellent for a drawer but makes little sense for many table-leg connections.
The better approach is to compare how each joint carries force. Look at glue area, mechanical lock, resistance to rotation, and how much wood must be removed to create the joint.
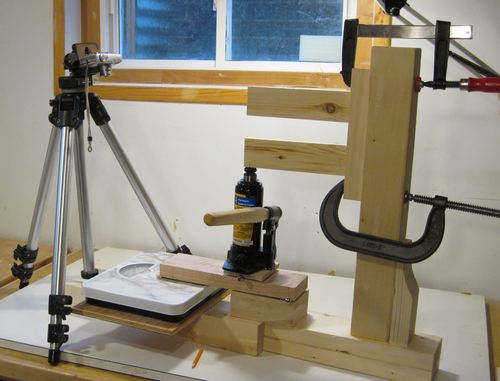
Tests can help, but shop tests usually represent one wood species, one joint size, one adhesive, and one loading method. A test result should guide design rather than become a universal rule.
- ✦ Mortise and tenon
Excellent for frames, chairs, tables, and doors because it offers useful glue area and strong resistance to rotation.
- ✦ Dovetail
Excellent where parts must resist being pulled apart, such as drawer corners.
- ✦ Box joint
Provides many interlocking fingers and a large glue area, making it useful for boxes and casework.
- ✦ Bridle joint
Offers broad long-grain contact and good frame strength but leaves more end grain exposed.
- ✦ Half-lap joint
Provides a broad contact area and useful resistance when two members cross or overlap.
- ✦ Dowel joint
Can perform very well when hole placement, dowel fit, grain, and glue coverage are controlled.
- ✦ Biscuit joint
Useful for alignment and some reinforcement but normally offers less mechanical lock than larger structural joints.
- ✦ Pocket-hole joint
Fast and useful for many frames and cabinets, but performance depends on screw direction, wood thickness, and loading.
- ✦ Butt joint
Simple but often dependent on glue, screws, nails, blocks, or other reinforcement.
Which Wood Joint Is the Strongest?
A well-proportioned mortise-and-tenon joint is often one of the strongest practical choices for furniture frames. Dovetails and box joints can be stronger choices for drawers and boxes because their shapes resist separation. The best answer depends on where the joint is used.
- ✦ Frames
Mortise-and-tenon and bridle joints are strong options.
- ✦ Drawers
Dovetails and box joints provide strong corner connections.
- ✦ Panels
Good edge-to-edge glue joints can provide excellent strength.
- ✦ Quick cabinet frames
Dowels, screws, pocket screws, and reinforced butt joints may provide practical strength when designed correctly.
Mortise-and-Tenon Joint Strength
Mortise-and-tenon joinery remains a standard choice when high **Wood Joint Strength** and stiffness are needed. The tenon enters a matching cavity and creates several useful glue surfaces. The shape also helps control twisting and movement.
However, bigger is not always better. An oversized mortise can leave thin walls that split under load. A very thin tenon can break, while a very thick tenon may weaken the mortised part.
Good proportions depend on stock size, grain, wood species, load, and project design. The goal is to keep enough wood in both parts while creating enough joint area to transfer force.
- ✦ Adequate tenon length
A useful tenon needs enough depth to transfer load without leaving weak material at the bottom of the mortise.
- ✦ Healthy mortise walls
Leave enough wood around the mortise to resist splitting.
- ✦ Good shoulder contact
Clean shoulders help the joint seat squarely and can improve rigidity.
- ✦ Proper grain
Avoid short grain or defects near the mortise and tenon whenever possible.
Common Mortise-and-Tenon Failure
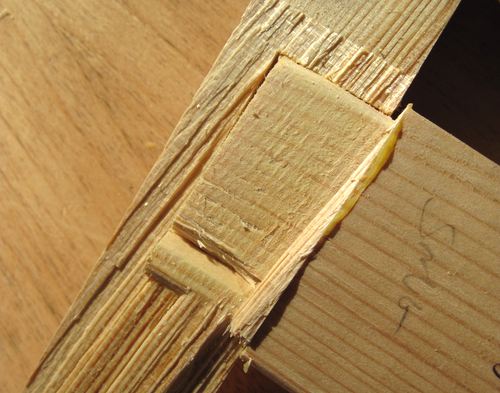
One common failure begins when the mortise wall splits. Another occurs when a thin tenon breaks near its shoulder. These failures show why removing extra material does not automatically make the connection stronger.
- ✦ Split mortise
Often linked to thin walls, excessive fit pressure, weak grain, or high leverage.
- ✦ Broken tenon
Can occur when the tenon is too thin, contains weak grain, or sees high bending stress.
How Screws and Fasteners Affect Wood Joint Strength
Screws can add useful strength, especially in cabinet construction, shop fixtures, outdoor projects, and repairs. They can provide immediate clamping force and resist parts sliding apart. Still, screw strength depends heavily on how the fastener interacts with the wood.
A screw near the end of a board can split the wood. A screw that is too short may have little holding area. A screw that is too large can also damage the fibers around it.
Pilot holes often help control splitting, especially in dense hardwoods or near board ends. Correct screw length and placement matter more than simply using the largest screw available.
- ✦ Withdrawal resistance
This describes how well the screw resists being pulled straight out of the wood.
- ✦ Shear resistance
This describes how well the connection handles forces that try to slide the parts sideways.
- ✦ Edge distance
More sound wood around the screw usually reduces the risk of splitting.
- ✦ Pilot hole size
A suitable pilot hole can reduce splitting while allowing the threads to grip effectively.
Why More Screws Do Not Always Mean More Strength
Adding many screws close together can weaken the wood between them. Each hole removes material and adds local stress. Fastener spacing should leave enough intact wood to carry the load.
- ✦ Avoid crowding
Space screws so their stressed areas do not create one weak line.
- ✦ Use sound material
Do not place critical fasteners through cracks, knots, or damaged fibers.
How Wood Glue Changes Joint Performance
Adhesive plays a major role in many types of **Wood Joint Strength**, but glue cannot fix poor design. A glue line works best when the mating surfaces fit well and provide useful contact area. Large gaps reduce the quality of many common woodworking bonds.
Fresh, clean surfaces usually give better results than dusty or contaminated surfaces. Glue should cover the mating areas evenly. Too little adhesive can leave dry spots, while excessive pressure can create other problems if it prevents the joint from seating correctly.
Glue choice also depends on the project. Indoor furniture, outdoor structures, cutting boards, repairs, and unusual oily woods can require different products. Always follow the adhesive maker’s directions for open time, clamping, cure time, temperature, and moisture conditions.
- ✦ Surface preparation
Remove dust, loose fibers, oil, or contamination that can interfere with bonding.
- ✦ Glue coverage
Spread enough adhesive to wet the intended bonding surfaces.
- ✦ Assembly time
Join and clamp the parts within the working time given for the adhesive.
- ✦ Full cure
Do not assume a joint has reached full strength as soon as the clamps come off.
Can Wood Glue Be Stronger Than Wood?
A well-made long-grain glue joint can sometimes remain intact while the nearby wood fibers fail. That does not mean every glue joint is automatically stronger than every board. Joint fit, species, grain, adhesive, temperature, and application quality still matter.
- ✦ Good sign
Wood fibers tear away while much of the glue line remains bonded.
- ✦ Warning sign
A clean separation along most of the glue line may point to poor bonding or surface preparation.
Wood Species, Grain, and Defects Matter
Joint design cannot be separated from the material. Different woods have different density, hardness, grain patterns, and tendencies to split. These traits change how joints, screws, and adhesives behave.
Straight, sound grain near a joint is usually desirable. Knots, checks, short grain, decay, and other defects can create weak points. A beautiful board may still be a poor choice for a highly stressed connection if its grain runs badly through the joint.
Softwood can compress around fasteners or joint shoulders more easily than many hardwoods. Dense hardwood can hold details well but may split if fasteners are placed without care.
- ✦ Straight grain
Usually provides a more predictable path for carrying force.
- ✦ Short grain
Small sections where fibers run out of the part can break more easily.
- ✦ Knots
Knots can interrupt grain and change strength near a critical joint.
- ✦ Density
Density can influence fastener grip, crushing, machining, and glue preparation.
Why Grain Runout Deserves Attention
A joint can be cut perfectly and still fail if its load crosses weak grain. Look at how the fibers travel through the part before marking the joint. This matters most near narrow tenons, chair parts, handles, and curved members.
- ✦ Inspect before cutting
Choose the best orientation before the joint removes material.
- ✦ Avoid weak zones
Move critical joints away from severe grain changes when possible.
Wood Movement and Long-Term Joint Strength
Wood gains and loses moisture as indoor conditions change. This causes movement mainly across the grain. A strong joint must allow or control that movement without creating damaging stress.
This issue matters across the United States because indoor humidity can change with seasons, heating, air conditioning, and regional climate. A solid-wood tabletop may shrink during a dry winter and expand during a humid summer. Fastening it rigidly across its full width can lead to cracks or distorted joints.
Good furniture design plans for this movement before glue is applied. **Wood Joint Strength** is not only about surviving a shop test. It is also about remaining sound after years of seasonal change.
- ✦ Cross-grain restraint
Avoid locking wide solid-wood parts in a way that blocks normal movement.
- ✦ Seasonal gaps
Some assemblies need space or flexible attachment methods to move safely.
- ✦ Stable moisture
Let wood reach suitable shop conditions before final sizing and assembly.
- ✦ Outdoor exposure
Rain, sun, and wide moisture swings increase the need for durable design and suitable adhesives.
A Practical Tabletop Example
Consider a solid oak tabletop attached to a base. The top needs enough freedom to expand and shrink across its width. Slotted holes, suitable clips, or similar methods can hold the top while allowing movement.
- ✦ What to avoid
Do not rigidly screw a wide solid top to a fixed base at many points across its width.
- ✦ Better approach
Use attachments that secure the top while allowing normal cross-grain movement.
Why Wood Joints Fail
Studying failure is one of the fastest ways to understand **Wood Joint Strength**. A broken joint tells you where the design concentrated stress. It may reveal a glue problem, weak grain, bad proportions, poor fit, or an unexpected load.
Do not look only at the point where the parts separated. Inspect cracks, compressed fibers, bent fasteners, split mortise walls, and broken grain. The first failure may have started away from the final break.
Repeated small loads also matter. A chair joint may survive one heavy push but loosen after thousands of smaller movements. Durability requires both strength and stiffness.
- ✦ Glue-line failure
Can result from poor fit, contamination, wrong adhesive use, insufficient cure, or unsuitable conditions.
- ✦ Wood splitting
Often occurs near thin walls, fasteners, short grain, or high leverage.
- ✦ Fastener pullout
Can occur when thread engagement, spacing, or wood quality is inadequate.
- ✦ Joint loosening
Repeated movement can enlarge holes or wear mating surfaces even without sudden breakage.
- ✦ Crushing
High pressure over a small contact area can compress wood fibers and create movement.
Failure in the Joint Versus Failure in the Wood
If the adhesive bond separates cleanly, the bond may need attention. If wood tears away from both sides, the bond may have transferred the force effectively. The exact pattern gives useful clues for the next version of the joint.
- ✦ Inspect the fracture
Look at both mating surfaces rather than only the visible crack.
- ✦ Change one variable
When testing prototypes, changing one factor at a time makes the result easier to understand.
How to Improve Wood Joint Strength
Improving **Wood Joint Strength** usually comes from many small decisions rather than one special technique. Start with sound material and choose a joint that matches the load. Then focus on accurate cutting, useful glue surfaces, and sensible proportions.
A stronger joint does not always require more material. The best design places wood where it carries force efficiently. Extra thickness in the wrong place may add weight without fixing the weak point.
Dry fitting before final assembly can reveal problems while they are still easy to correct. Check that the joint closes, sits square, and allows clamps to reach useful areas.
- ✦ Match the joint to the force
Choose joinery that resists the actual direction of pulling, sliding, bending, or twisting.
- ✦ Protect long grain
Preserve strong fibers around the joint instead of removing unnecessary material.
- ✦ Increase useful glue area
Favor well-fitting long-grain contact where the design allows.
- ✦ Avoid stress risers
Sharp internal corners, thin walls, and crowded fasteners can create local weak points.
- ✦ Control fit
Aim for close contact without crushing fibers or forcing parts together.
- ✦ Use proper clamping
Apply enough pressure to close the joint without distorting the assembly.
- ✦ Respect cure time
Allow the adhesive to develop strength before applying heavy loads.
Reinforcement Options
Dowels, loose tenons, splines, pins, corner blocks, gussets, and fasteners can strengthen certain designs. Reinforcement works best when it addresses a known weakness instead of being added at random.
- ✦ Dowels
Can add alignment, shear resistance, and bonding area.
- ✦ Loose tenons
Can provide substantial long-grain contact without cutting traditional tenons on the main parts.
- ✦ Corner blocks
Can reduce movement and spread load across a wider area.
How to Test Wood Joint Strength
Professional engineering tests use controlled samples, known loads, and standardized procedures. A home workshop usually lacks that level of control. Still, simple comparison tests can teach a lot if the samples are built consistently.
Make several joints with the same wood, dimensions, moisture level, adhesive, and cure time. Change only the feature you want to study. For example, compare two tenon lengths while keeping every other dimension the same.
Apply force in a repeatable direction. Record how the joint moved, where the first crack appeared, and how final failure occurred. The failure pattern can be more useful than a single maximum-load number.
- ✦ Use matching samples
Keep wood species, stock size, grain, and joint dimensions as consistent as possible.
- ✦ Control adhesive use
Use the same glue amount, clamping method, and cure period.
- ✦ Repeat the test
One sample can contain an unusual defect, so several samples provide better insight.
- ✦ Record failure mode
Note whether the glue, fastener, tenon, mortise wall, or surrounding wood failed first.
Why Small Shop Tests Have Limits
Wood varies naturally from board to board. Grain, density, moisture, and small defects can change the outcome. Treat informal tests as comparisons between similar samples, not as certified structural ratings.
- ✦ Useful purpose
Compare design choices for furniture prototypes and noncritical woodworking.
- ✦ Important limit
Do not use informal shop tests as a substitute for engineering requirements in structural construction.
Choosing the Right Joint for Common Projects
Choosing joinery becomes easier when you start with the job rather than the joint. Think about load direction, appearance, production time, tools, wood thickness, and expected service conditions. That approach produces better **Wood Joint Strength** than simply choosing the most complex joint you can make.
For household furniture, stiffness often matters as much as ultimate breaking strength. A table or chair that moves under normal use feels poorly built even if it never breaks. Strong joinery should make the finished piece feel stable.
- ✦ Dining tables
Mortise-and-tenon, loose-tenon, dowel, or similar frame joints can work well at leg-to-apron connections.
- ✦ Chairs
Use joints with good depth and resistance to repeated bending and racking forces.
- ✦ Drawers
Dovetails, box joints, dowels, or reinforced rabbets can provide practical corner strength.
- ✦ Cabinets
Dados, rabbets, dowels, screws, biscuits, loose tenons, and pocket-hole systems can all work when used in suitable locations.
- ✦ Boxes
Box joints, dovetails, miters with reinforcement, and rabbets are common choices.
- ✦ Outdoor projects
Plan for moisture, drainage, wood movement, corrosion-resistant hardware, and suitable exterior adhesive.
When Simpler Joinery Makes Sense
Complex joints take more time and can introduce more chances for poor fit. A well-designed dowel, screw, or lap joint may be the better choice for shop furniture or utility work. Strength should serve the project rather than show off the method.
- ✦ Production speed
Simple repeatable joints can improve consistency across many parts.
- ✦ Repair needs
Some projects benefit from mechanical fasteners that can be removed later.
Common Mistakes That Reduce Wood Joint Strength
Many joint failures come from preparation errors rather than the choice of joinery. Rushing assembly can turn a proven joint into a weak one. Small mistakes also tend to combine, making the final problem harder to diagnose.
A common example is cutting a joint slightly loose, adding excessive glue to compensate, then clamping the assembly out of square. Each issue may seem small. Together, they reduce stiffness, contact, and long-term durability.
- ✦ Loose-fitting parts
Large gaps reduce contact and can allow movement.
- ✦ Overly tight joints
Excessive force can split the wood or prevent full assembly.
- ✦ Dirty surfaces
Dust, oil, and loose fibers can interfere with adhesive contact.
- ✦ Poor grain placement
Short grain or defects near stressed areas can become the true weak point.
- ✦ Wrong fastener position
Fasteners placed too close to edges or ends can cause splitting.
- ✦ Ignoring wood movement
Rigid cross-grain construction can create cracks even when the initial joint is strong.
- ✦ Loading too soon
Heavy force before the adhesive has cured can damage a fresh joint.
Why Accuracy Beats Complexity
A simple lap joint with full contact can be more reliable than a complex joint with gaps and damaged fibers. Accurate layout and clean cuts give the joint a better chance to carry force as intended.
- ✦ Dry fit first
Find problems before glue limits your working time.
- ✦ Measure the actual fit
Do not assume a joint is correct simply because the machine or jig was set to a marked dimension.