
Choosing glue looks simple until the joint has to survive real use. A product that works well on dry wood may fail on oily metal, flexible rubber, smooth plastic, or a part left inside a hot car. This Adhesive Selection Guide helps you compare the factors that matter before you open the bottle.
For U.S. homeowners, makers, contractors, repair shops, and manufacturers, the best adhesive is not always the strongest one on the shelf. The better choice is the adhesive that fits the materials, load, temperature, moisture, joint design, and work time. In practical bonding work, many failures come from poor matching or poor surface prep rather than weak glue.

Why Adhesive Selection Matters
An adhesive forms a bond between two surfaces called substrates. The bond must stay attached to each surface while also handling the forces placed on the joint. A poor match can peel away, crack, soften, creep, or release even when the adhesive itself seems strong.
The Adhesive Selection Guide process should therefore start with the full job, not the product label. Think about what you are bonding, how the joint will be loaded, where it will be used, and how fast you need the assembly to set. These factors narrow the choices much faster than shopping by brand alone.
A common mistake is to focus only on advertised strength. High strength means little if the adhesive cannot wet the surface, cannot tolerate movement, or loses performance in heat or moisture. **Compatibility comes before maximum strength.**

- ✦ Material compatibility
The adhesive must attach well to both surfaces in the joint.
- ✦ Load type
The bond may face tension, shear, peel, impact, or a mix of several forces.
- ✦ Service environment
Water, sunlight, heat, cold, chemicals, and vibration can affect bond life.
- ✦ Assembly needs
Open time, clamp time, cure time, gap size, and application method all affect workflow.
Adhesive Strength Is Only One Part of the Decision
A rigid adhesive may hold two metal plates very well but perform poorly between parts that flex. A flexible adhesive may survive vibration better but provide less stiffness. The right choice balances strength with the way the joint actually moves.
- ✦ Strong but rigid
Often useful for stable structural joints where movement stays low.
- ✦ Flexible and tough
Often better where vibration, impact, expansion, or bending occurs.
Step 1: Identify the Materials You Need to Bond
Material type is the first filter in any Adhesive Selection Guide. Wood, steel, aluminum, glass, ceramic, rubber, foam, and plastic all have different surface properties. Some materials accept glue easily, while others need sanding, cleaning, primers, or special adhesive chemistry.
You also need to consider mixed-material joints. Bonding wood to wood is different from bonding wood to painted steel. Plastic to rubber presents different problems than aluminum to glass.
Do not assume that all plastics behave the same way. Some plastics, such as polyethylene and polypropylene, have low surface energy and can be difficult to bond. A standard household glue may stick at first and then peel away with light force.

- ✦ Wood
Common choices include PVA wood glue, polyurethane adhesive, epoxy, and construction adhesive.
- ✦ Metal
Epoxy, acrylic, cyanoacrylate, polyurethane, and specialty structural adhesives are common options.
- ✦ Glass and ceramic
Clear epoxy, silicone, UV-cure products, and specialty glass adhesives may work well depending on the joint.
- ✦ Plastic
The exact plastic type matters. ABS, PVC, acrylic, polycarbonate, polyethylene, and polypropylene can need different products.
- ✦ Rubber
Flexible contact adhesives, rubber cements, cyanoacrylates, and specialty rubber adhesives may be suitable.
- ✦ Fabric and foam
Flexible spray, contact, hot-melt, or fabric adhesives are often more useful than rigid structural glues.
Why Surface Energy Matters
Adhesive must spread across a surface before it can form a good bond. High-surface-energy materials such as clean metal and glass are often easier to wet. Low-surface-energy plastics can resist wetting, so they may require a special primer or adhesive.
- ✦ Good wetting
The adhesive spreads over the surface instead of pulling into beads.
- ✦ Poor wetting
The adhesive may sit on top of the material and produce a weak interface.
Check Coatings Before Bonding
Paint, powder coating, oil, wax, plating, release agents, and protective films can change the bonding surface. Your adhesive may bond to the coating instead of the base material. If that coating releases, the whole joint can fail.
- ✦ Inspect the real bonding layer
Know whether you are bonding bare material, paint, plating, laminate, or another finish.
Step 2: Understand the Main Adhesive Types
The next part of this Adhesive Selection Guide is learning the main adhesive families. Each type cures or sets in a different way. That affects strength, flexibility, gap filling, work time, and resistance to the environment.
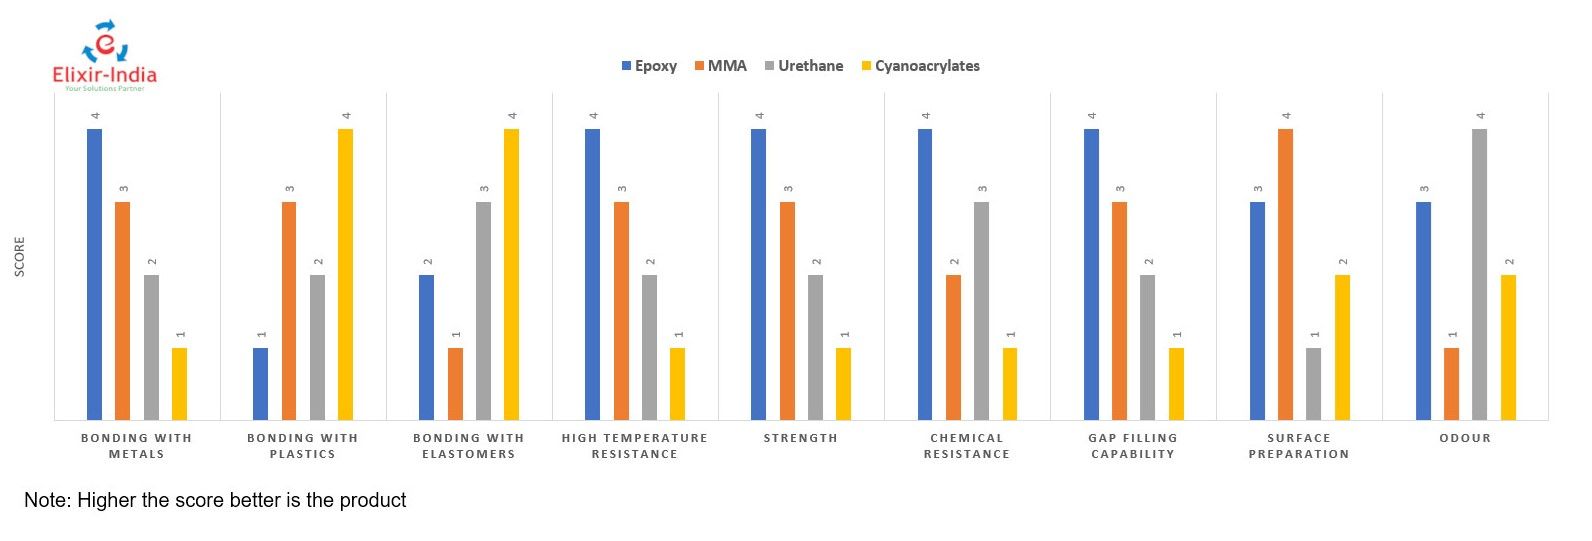
There is no single adhesive type that wins every job. A quick-setting glue may be perfect for a small repair but frustrating during a large assembly. A slow epoxy may offer more working time and gap filling but delay the next production step.

- ✦ PVA adhesive
Easy to use and common for wood, paper, and porous materials. Many formulas clean up with water before curing.
- ✦ Epoxy
Usually supplied as resin and hardener. It can offer high strength, good gap filling, and strong bonding to many rigid materials.
- ✦ Cyanoacrylate
Often called super glue. It sets quickly and works best on small, close-fitting joints.
- ✦ Polyurethane adhesive
Useful for many porous and nonporous materials. Some formulas handle moisture well and expand as they cure.
- ✦ Contact adhesive
Often applied to both surfaces before they are pressed together. It is common for laminates, rubber, leather, and flexible materials.
- ✦ Hot-melt adhesive
It sets as it cools. It is useful for packaging, crafts, light assembly, and some production work.
- ✦ Silicone adhesive
Flexible silicone products can bond and seal while handling water, vibration, and temperature changes.
- ✦ Acrylic adhesive
Structural acrylics can provide fast cure, high strength, and good bonding to many metals and plastics.
One-Part Versus Two-Part Adhesives
One-part products are simple because they require no mixing. Two-part products start curing when their components are combined. Two-part systems can provide strong and predictable bonds, but the mix ratio and application time matter.
- ✦ One-part
Good when simple application and low preparation time matter.
- ✦ Two-part
Useful when the job needs structural strength, controlled cure, or better gap filling.
Step 3: Match the Adhesive to the Type of Load
A bond does not experience strength in just one way. The direction of the force changes how well a joint performs. This is why load type should be part of every serious Adhesive Selection Guide.
Adhesive joints usually perform well when forces spread across a wide bonded area. They can struggle when a force concentrates along one edge. Joint design can therefore matter as much as adhesive chemistry.
- ✦ Shear
The bonded surfaces try to slide past each other. Many adhesives handle distributed shear loads well.
- ✦ Tension
The surfaces pull directly away from each other across the bond.
- ✦ Peel
Force lifts one edge away from the other surface. Peel can place high stress on a small bond area.
- ✦ Cleavage
The joint opens from one side while the opposite side stays closer together.
- ✦ Impact
A sudden shock hits the joint. Tough adhesives can perform better than very brittle ones.
- ✦ Vibration
Repeated movement can fatigue a rigid bond over time.
Choose Toughness When the Joint Moves
Very hard adhesives can work well on rigid parts. They may be less forgiving when the assembly flexes or expands. Toughened epoxy, acrylic, polyurethane, and flexible sealant-style adhesives can suit moving joints better.
- ✦ Static joint
A rigid adhesive may work well when movement stays very low.
- ✦ Dynamic joint
A tougher or more flexible bond may survive repeated movement more effectively.
Increase Bond Area When Possible
A larger overlap can spread force across more adhesive. Lap joints often give adhesives more useful bond area than narrow edge joints. Good joint design also reduces peel stress.
- ✦ Spread the load
Use broad contact areas instead of concentrating force on a small point.
Step 4: Consider Water, Heat, Chemicals, and Outdoor Exposure
A strong indoor bond may not survive outside. Moisture, temperature swings, sunlight, cleaners, fuel, oils, and chemicals can change adhesive performance. The service environment must therefore be defined before you select a product.
For an outdoor project in the United States, think about local climate as well. A bond in Arizona may face high surface heat and strong sun. A joint in Florida may see high humidity, rain, and heat, while a northern climate may add freeze-thaw cycles.
- ✦ Water exposure
Check whether the adhesive is intended for dry indoor use, damp conditions, weather exposure, or immersion.
- ✦ Heat
Look at the service temperature range, not just the temperature needed during application.
- ✦ Cold
Some adhesives become hard or brittle at low temperatures.
- ✦ UV exposure
Sunlight can discolor or weaken some adhesives and sealants.
- ✦ Chemicals
Fuel, oil, solvents, acids, cleaners, and other chemicals can attack certain adhesive systems.
- ✦ Humidity
Long-term moisture can weaken some bonds even without direct water contact.
Application Temperature and Service Temperature Are Different
Application temperature describes the conditions needed while you apply and cure the adhesive. Service temperature describes the range the cured joint can handle later. Do not confuse these two specifications.
- ✦ Application range
Controls whether the adhesive can spread and cure as intended during installation.
- ✦ Service range
Shows what temperatures the finished bond is designed to handle.
Step 5: Compare Open Time, Set Time, Clamp Time, and Full Cure
Time terms can cause confusion during adhesive selection. Open time tells you how long you can work before the adhesive becomes difficult to assemble. Fixture or set time tells you when the parts can usually stay in place with less support.
Clamp time is the period during which pressure or support may be needed. Full cure is the point when the adhesive reaches its intended final properties. These times can be very different.
The Adhesive Selection Guide choice should fit your workflow. A fast adhesive helps with small repairs and production speed. A slower system gives you more time to position large or complex parts.
- ✦ Open time
The useful working window before assembly becomes difficult.
- ✦ Set or fixture time
The time needed before the assembly can often hold its position.
- ✦ Clamp time
The period during which pressure or mechanical support should stay on the joint.
- ✦ Full cure
The time needed for the adhesive to reach its intended final performance.
Faster Is Not Always Better
Fast cure can become a problem when a large part needs careful alignment. You may run out of working time before the surfaces are positioned. For detailed assemblies, a longer open time can reduce mistakes.
- ✦ Small repair
A short set time may make the job faster.
- ✦ Large assembly
A longer working time can make alignment and clamping easier.
Step 6: Check Gap-Filling Ability and Joint Fit
Some adhesives need very close-fitting surfaces. Others can fill small gaps while still developing useful strength. The gap between parts should therefore influence product choice.
Cyanoacrylate often performs best in thin bond lines. Thickened epoxy and some construction adhesives can handle larger gaps. However, gap filling should not become an excuse for poor joint design.
When possible, make the parts fit well before bonding. A controlled bond line gives more predictable results and reduces the amount of adhesive needed.
- ✦ Tight joint
Thin adhesives can spread well when two surfaces fit closely.
- ✦ Small irregular gap
A medium-viscosity or gap-filling product may give better contact.
- ✦ Large gap
Use an adhesive designed for gap filling rather than assuming extra glue will solve the problem.
Viscosity Affects Application
Low-viscosity adhesives flow easily into narrow spaces. Thick products stay in place better on vertical surfaces and uneven joints. Choose a viscosity that suits both the joint and the way you need to apply the glue.
- ✦ Thin adhesive
Useful for tight gaps and surfaces where good flow is needed.
- ✦ Thick adhesive
Useful for vertical work, uneven surfaces, and some gap-filling jobs.
Step 7: Prepare the Surface Before Applying Adhesive
Good adhesive selection cannot overcome poor surface preparation. Dust, grease, oxidation, wax, loose paint, and release agents can block direct contact with the surface. Cleaning and preparation often make the difference between a lasting bond and an early failure.
Follow the adhesive maker’s instructions for the exact material. Some surfaces need only cleaning. Others benefit from sanding, abrasion, chemical treatment, or a primer.
One practical lesson from failed repairs is simple: **never judge surface cleanliness by sight alone.** A surface can look clean while still carrying oil, silicone, wax, or mold-release residue.
- ✦ Remove loose material
Clear away dust, rust flakes, weak paint, old adhesive, and other unstable layers.
- ✦ Degrease when required
Remove oil and contamination with a cleaner that is safe for the material.
- ✦ Abrade when recommended
Light sanding can increase surface area and remove weak surface layers on some materials.
- ✦ Remove sanding dust
Loose particles can stop the adhesive from contacting the actual substrate.
- ✦ Prime if needed
Some plastics, metals, and difficult surfaces require a compatible primer.
- ✦ Bond soon after prep
Freshly cleaned surfaces can collect dust, moisture, or oxidation if left exposed too long.
Dry-Fit Before You Add Adhesive
Assemble the parts without glue first. Check alignment, clamping access, joint gaps, and the order of assembly. Dry fitting prevents rushed changes after the adhesive starts curing.
- ✦ Plan the assembly
Know where every clamp, fastener, spacer, and part will go before applying adhesive.
Step 8: Choose the Right Adhesive for Common Materials
A useful Adhesive Selection Guide should turn technical factors into practical choices. The following matches are good starting points, but product data should still be checked before an important repair or structural bond.
The best adhesive can change when two different materials are joined. It can also change when the same material moves from indoor use to outdoor service. Treat these choices as a screening tool rather than a substitute for the product instructions.
- ✦ Wood to wood
PVA wood glue is common for close-fitting indoor joinery. Water-resistant PVA, polyurethane, or epoxy may suit tougher conditions.
- ✦ Metal to metal
Epoxy and structural acrylic adhesives are common choices when high strength is needed.
- ✦ Metal to plastic
Epoxy, acrylic, polyurethane, or specialty plastic adhesives may work depending on the exact plastic.
- ✦ Glass to glass
Clear epoxy, UV-curing adhesive, or silicone may work depending on appearance and load.
- ✦ Rubber to metal
Flexible contact adhesive, cyanoacrylate systems, and specialty rubber-bonding products are common options.
- ✦ Laminate to wood
Contact adhesive is widely used where a broad, thin, even bond is needed.
- ✦ Foam
Use an adhesive labeled safe for the exact foam because some solvents can damage foam materials.
- ✦ PVC
PVC solvent cement is common for compatible rigid PVC pipe systems, while other PVC products may need different adhesives.
When Bonding Dissimilar Materials
Different materials can expand at different rates when temperature changes. A rigid adhesive may place more stress on the joint as the two parts move. A tougher or more flexible adhesive can sometimes handle that movement better.
- ✦ Check thermal movement
Consider how each material changes size as temperature rises or falls.
- ✦ Check stiffness
A flexible adhesive layer can sometimes reduce stress between materials with different movement.
Step 9: Consider Appearance, Color, and Finish
Bond strength is not the only concern in visible work. The adhesive may need to dry clear, match a color, accept paint, or stay hidden under a thin joint. These needs can remove otherwise suitable options.
Clear adhesives can still yellow with age or sunlight. Some flexible sealants cannot be painted. Others may leave a thick bond line that is easy to see through glass or clear plastic.
Include appearance in your Adhesive Selection Guide checklist before the final test. It is much easier to choose the right finish before assembly than to hide the wrong adhesive later.
- ✦ Color
Choose clear, white, tan, gray, black, or another finish that works with the project.
- ✦ Bond-line thickness
A thick adhesive layer may stay visible on clear or fine-finish work.
- ✦ Paintability
Confirm that coatings will stick if you plan to paint over the cured adhesive.
- ✦ Yellowing
Check UV stability for clear bonds exposed to light.
Test Clear Bonds on a Sample
Clear parts show bubbles, squeeze-out, haze, and bond-line defects easily. Make a sample joint first when appearance is important. This also lets you check cure clarity and cleanup methods.
- ✦ Use a scrap piece
A small test can reveal visual problems before they affect the finished project.
Step 10: Review Safety and Application Requirements
Adhesives can contain reactive chemicals, solvents, or other ingredients that require careful handling. Read the current product label and Safety Data Sheet before use. Follow the maker’s rules for ventilation, skin protection, eye protection, storage, and disposal.
This part of an Adhesive Selection Guide matters even for products sold at common U.S. hardware stores. A product that is easy to buy is not automatically safe to use without controls. Work conditions should match the safety needs of the adhesive.
Also check whether the adhesive is suitable for the intended application. Projects involving food contact, potable water, medical equipment, electrical systems, children’s products, or regulated construction work may require specific approvals or standards.
- ✦ Ventilation
Use the product only in conditions that meet its ventilation instructions.
- ✦ Skin and eye protection
Use suitable protective gear when the label or Safety Data Sheet calls for it.
- ✦ Flammability
Keep flammable solvent-based products away from sparks, heat, and open flames.
- ✦ Storage
Keep adhesive within its specified temperature range and close the container after use.
- ✦ Special applications
Verify required ratings or certifications before using an adhesive in regulated work.
Do Not Mix Products Unless the System Requires It
Mix only components that the manufacturer designed to work together. Adding solvents, hardeners, accelerators, or other chemicals without guidance can change cure, strength, and safety. Two-part adhesives also require the correct mix ratio.
- ✦ Follow the specified ratio
Incorrect proportions can leave a two-part adhesive soft, brittle, or partly cured.
Adhesive Selection Guide Checklist
A short checklist can prevent most selection mistakes. Work through these questions before buying or applying glue. If one answer is uncertain, check the manufacturer’s technical data before moving forward.
For critical joints, document the exact product, lot, surface preparation, cure conditions, and test results. This creates a repeatable process instead of relying on memory. It is especially useful in shops, maintenance teams, and small production settings.
- ✦ What are the two materials?
Identify the exact substrate on each side of the joint.
- ✦ Are the surfaces coated?
Check for paint, plating, oil, wax, laminate, or other surface layers.
- ✦ How strong must the joint be?
Separate light-duty attachment from structural bonding.
- ✦ What loads will occur?
Consider shear, tension, peel, impact, vibration, and repeated loading.
- ✦ Will the joint flex?
Choose enough toughness or flexibility for expected movement.
- ✦ What temperatures will it face?
Check both application conditions and long-term service temperature.
- ✦ Will it get wet?
Define whether exposure means humidity, splashes, weather, or continuous immersion.
- ✦ Will chemicals contact the bond?
Consider oils, cleaners, fuel, solvents, acids, and other chemicals.
- ✦ How much working time is needed?
Allow enough time for spreading, positioning, fastening, and clamping.
- ✦ How large is the gap?
Match adhesive viscosity and gap-filling ability to the joint.
- ✦ Does appearance matter?
Check color, clarity, yellowing, squeeze-out, and paintability.
- ✦ Can you test first?
Make a sample bond when failure would be costly, unsafe, or hard to repair.
A Simple Selection Example
Suppose you need to bond a metal bracket to a rigid plastic housing. Start by identifying the plastic because that may control adhesive choice. Then check heat, vibration, gap size, cure time, and whether the bond needs structural strength.
You might narrow the options to epoxy, acrylic, or a specialty plastic adhesive. A small sample test can then show whether the product wets both surfaces, cures well, and survives the expected load. This process is more reliable than choosing the package with the largest strength number.
- ✦ Screen first
Remove adhesives that do not suit the materials or service conditions.
- ✦ Test second
Compare the strongest remaining candidates under conditions close to real use.
Common Adhesive Selection Mistakes
Many adhesive failures are predictable. They happen when users skip material identification, surface preparation, cure requirements, or environmental limits. Avoiding these errors often improves results more than simply moving to a more expensive product.
The Adhesive Selection Guide method works best when selection and application receive equal attention. A technically correct product can still fail when mixed poorly, applied too thick, disturbed during cure, or used on contaminated surfaces.
- ✦ Choosing by strength alone
A high strength rating does not prove compatibility with your materials or joint design.
- ✦ Ignoring the exact plastic
Different plastics can have very different bonding behavior.
- ✦ Skipping surface cleaning
Oil, dust, wax, and release agents can cause adhesive failure at the surface.
- ✦ Applying too much adhesive
A thick bond line is not always stronger and can slow cure or increase movement.
- ✦ Loading before full cure
A joint may feel firm long before it reaches final strength.
- ✦ Ignoring outdoor conditions
Water, UV light, heat, and cold can shorten the life of an unsuitable adhesive.
- ✦ Using old or poorly stored adhesive
Age, freezing, excessive heat, or contamination can change product performance.
- ✦ Skipping a test bond
A small test can expose problems before they affect the final assembly.
Why More Glue Does Not Always Mean More Strength
Many adhesives perform best within a recommended bond-line thickness. Excess glue can create a thick, soft, brittle, or slow-curing layer depending on the chemistry. Apply enough for good contact, but follow the product’s instructions rather than assuming more is better.
- ✦ Control the bond line
Use the amount and thickness recommended for the adhesive and joint.
How to Test an Adhesive Before Final Use
Testing is one of the most useful steps in an Adhesive Selection Guide. Use scrap pieces made from the same materials and prepare them the same way you will prepare the final parts. Apply and cure the adhesive under similar conditions.
After full cure, place the sample under a realistic load. If moisture, heat, cold, or cleaners will affect the real joint, expose the sample to similar conditions when practical. The goal is to find weak points before the final bond matters.
Look closely at how the sample fails. If adhesive cleanly separates from a surface, the interface may be the problem. If the adhesive tears internally or the material itself breaks, the bond may be stronger than the substrate in that test.
- ✦ Use matching materials
Test the same substrate, finish, and coating found in the real project.
- ✦ Copy the surface prep
Use the same cleaning, sanding, and priming process.
- ✦ Follow full cure time
Do not judge final performance from a joint that has only reached handling strength.
- ✦ Simulate real loads
Test the type and direction of force the finished joint will face.
- ✦ Inspect the failure
The failure location can help identify whether the problem is adhesion, cohesion, or the substrate.
When Professional Validation Makes Sense
Simple sample testing works well for many household and shop projects. Structural, safety-critical, regulated, or high-value assemblies may need engineering review or formal testing. In those cases, use the adhesive manufacturer’s technical support and the standards that apply to the project.
- ✦ Escalate critical bonds
Seek qualified technical guidance when bond failure could cause injury, major damage, or regulatory problems.