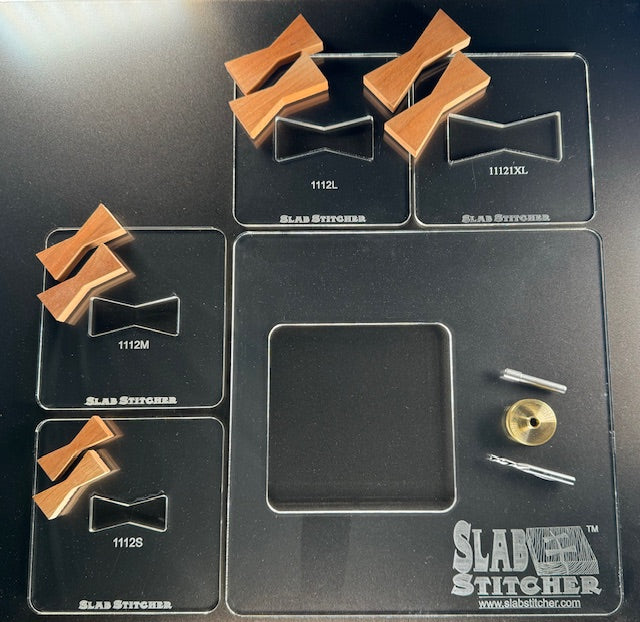
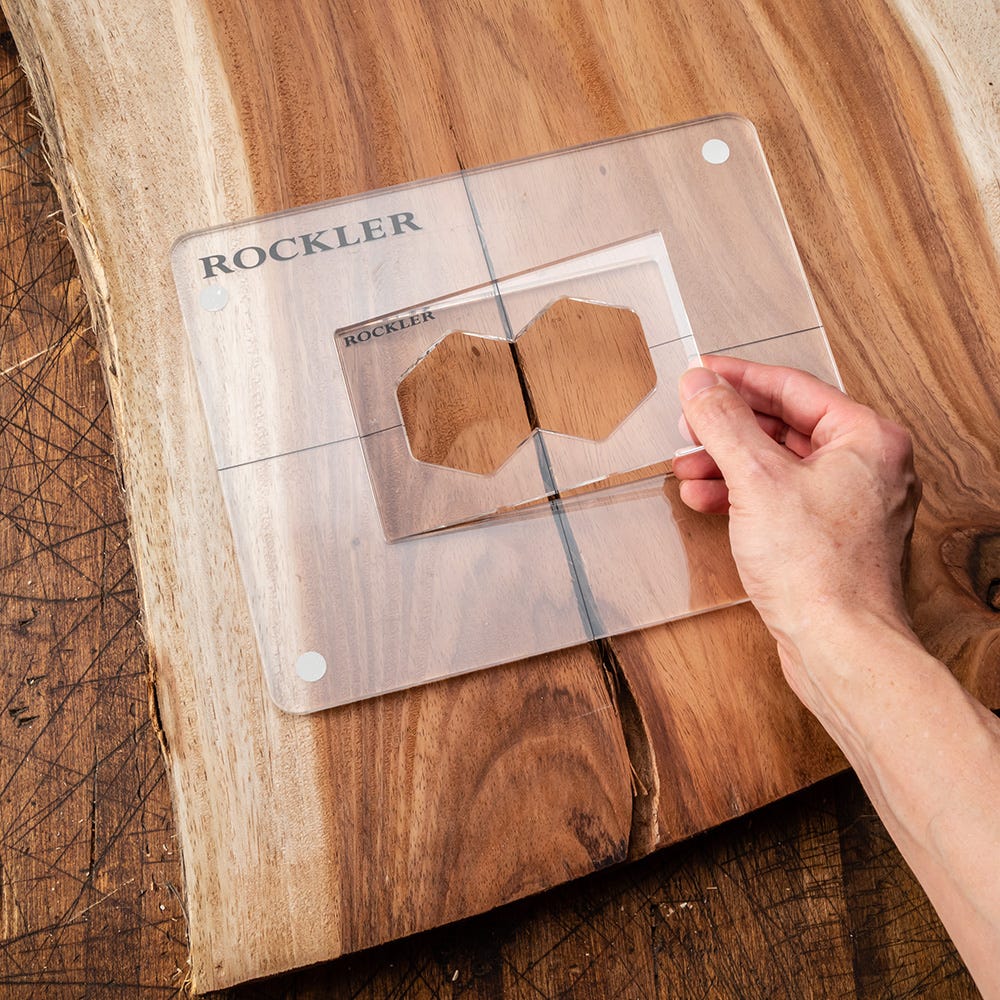
A router inlay is made by using a template and guide bushing to cut a recessed pocket, then using the same template setup to cut a matching piece that fits into the pocket.
For woodworkers in the United States, a plunge router is one of the most practical power tools for making repeatable decorative inlays in cutting boards, furniture, boxes, tabletops, signs, and other projects. A properly centered router bit, a rigid template, and a compatible inlay guide bushing let you cut both the recess and the insert from the same pattern. The key is controlling the offset between the guide bushing and the router bit rather than trying to make two unrelated cuts match by hand.
The process is straightforward, but small errors become obvious when the contrasting wood is installed. Template movement, an off-center guide bushing, excessive cutting depth, a dull or fragile bit, and routing too aggressively can all produce gaps or damaged edges. This guide explains the complete workflow, including how the template system works, how to choose materials, how to route the pocket and insert, how to correct common problems, and how to finish the inlay flush with the surrounding surface.
Source: trend-uk.com
What Is a Router Inlay?
A router inlay is a contrasting piece of material fitted into a recessed pocket cut into a larger workpiece. The insert may be made from another wood species, veneer, acrylic, metal-compatible material, or cured resin depending on the project. Wood-on-wood inlays are especially common because they can create strong visual contrast without requiring complicated hand-cut joinery.
The most useful router-based method uses one template for both operations. A guide bushing with a removable collar creates one offset while cutting the pocket. Removing the collar changes the effective guide diameter, allowing the same template to cut the insert to a complementary size. This relationship is what makes a properly configured inlay system capable of producing a close-fitting pair.
Router inlays are different from simple routed grooves. A groove normally removes material along a line or channel, while an inlay requires a defined pocket and a separate insert that occupies the removed area. Designs can include letters, geometric shapes, logos, butterflies, stars, hearts, ovals, and other patterns.
Source: slabstitcher.com
Pocket
The recessed area routed into the finished workpiece to receive the inlay.
Inlay or plug
The separate piece of material routed to fit inside the pocket.
Template
A rigid pattern that guides the router and establishes the shape and position of the cut.
Guide bushing
A ring mounted to the router base that follows the template while positioning the cutting bit.
Why the Same Template Matters
Using the same template for both the pocket and the insert reduces the amount of independent measuring and layout required. The bushing offset creates the dimensional difference between the two cuts. This is more reliable than cutting the recess and insert from separate patterns that may differ slightly in size or position.
The template must remain stable throughout the process. Even a small movement can change the shape or location of the cut, which may create a visible gap around the finished inlay.
Tools and Materials You Need
Before routing the finished workpiece, assemble the complete setup and verify that every component is compatible. A plunge router is generally the most suitable choice because the bit can be lowered into an interior area while the router base remains supported by the template or surrounding workpiece.
A typical router inlay setup includes a plunge router, an appropriate router bit, a guide bushing or dedicated inlay bushing, a removable collar when required by the system, a rigid template, clamps or suitable double-sided woodworking tape, the inlay material, the workpiece, adhesive, and tools for leveling and finishing.
Small-diameter bits are commonly used for detailed inlays. Because smaller cutters are more fragile and can remove material less aggressively, they should be handled carefully and used at the speed and feed rate specified by the bit manufacturer and router instructions.
Source: rockler.com
Plunge router
Provides controlled entry into an interior pocket and makes it easier to start and stop within the template.
Inlay router bit
A small straight or spiral bit suited to the template and bushing system. Verify shank diameter and cutting diameter before installation.
Guide bushing and collar
The guide assembly establishes the offset between the template opening and the router bit.
Rigid template
MDF, acrylic, plywood, or another stable template material can be used when its thickness and geometry suit the router setup.
Clamps or double-sided tape
The template and workpiece must remain stationary while routing.
Inlay stock
Choose flat material with enough thickness to produce the desired insert and allow for final leveling.
Glue and leveling tools
Wood glue may suit wood-to-wood inlays, while the adhesive should be selected for the specific materials being joined.
Choosing the Inlay Material
For a wood inlay, choose a stable, flat piece that contrasts clearly with the base wood. Maple and walnut are a common visual pairing, but many hardwood combinations can work. The important factors are flatness, thickness, grain direction, color contrast, and compatibility with the adhesive and finish.
For cutting boards or other surfaces that may contact food, select materials, adhesives, and finishes that are appropriate for that application. Do not assume that every decorative resin, pigment, adhesive, or finish is suitable for food contact.
How to Cut a Router Inlay Step by Step
The basic sequence is to prepare the pattern, center the guide bushing, secure the template, cut the recess, change the bushing configuration, cut the inlay piece, test the fit, glue the insert, and level the surface. Always make a test cut in scrap material when setting up a new combination of router, bit, bushing, and template.
Do not begin by cutting the finished workpiece at full depth. Establish the setup first and confirm that the guide bushing is centered around the bit. An alignment pin or centering accessory can make this adjustment more accurate, depending on the router and baseplate.
Source: rockler.com
1. Prepare the template
Make or select a template with the exact shape and opening needed for the project. Smooth the template edges so the guide bushing can travel without catching.
2. Mark the workpiece
Establish centerlines or reference marks that let you position the template accurately. This is especially useful for symmetrical designs.
3. Secure the template
Use suitable clamps, double-sided tape, or the template frame recommended for the system. Check that nothing can shift before starting the router.
4. Install and center the guide
With the router unplugged, install the guide bushing and bit according to the manufacturer’s instructions. Confirm that the bit is centered in the guide opening.
5. Set the depth
Set the plunge depth according to the thickness of the intended inlay and the requirements of the adhesive and final leveling process. For delicate bits, use multiple shallow passes rather than forcing the full depth in one cut.
6. Rout the pocket perimeter
Start the router safely and guide the bushing against the template edge. Follow the routing direction specified for your particular template and router setup. Keep the router base flat and move at a controlled feed rate.
7. Remove the interior waste
After establishing the perimeter, remove the remaining material inside the pocket with overlapping passes. Avoid forcing the bit into a heavy cut.
8. Clean the pocket
Stop the router, wait for the bit to stop completely, and remove dust and chips. Check that the pocket bottom is reasonably flat and reaches the intended depth.
9. Change the bushing configuration
With the router unplugged, remove or install the collar as required by the inlay system. The change in guide diameter creates the offset needed for the insert.
10. Secure the inlay stock
Attach the same template to a sufficiently thick, flat piece of inlay material. Make sure the stock is supported and cannot move during routing.
11. Rout the inlay piece
Set the depth so the bit cuts through or sufficiently into the inlay stock as required by the setup. Keep the guide firmly against the template and maintain a flat router base.
12. Remove the insert
Turn off the router and allow the cutter to stop completely before lifting or moving the router. Carefully free the inlay piece without damaging its edges.
13. Test fit
Place the insert into the pocket without forcing it. It should locate correctly and seat consistently. Do not hammer a tight insert into place because doing so can split the surrounding wood.
14. Glue and clamp
Apply a suitable adhesive to the mating surfaces, seat the inlay, remove excessive squeeze-out, and use a caul or clamp when necessary to maintain even pressure.
15. Level the surface
After the adhesive has fully cured, bring the inlay flush with the surrounding surface using an appropriate scraper, plane, sanding method, or carefully controlled flush-trimming setup.
How the Bushing Offset Creates the Fit
The dimensional relationship between the guide bushing and router bit determines how far the cutting edge sits from the template. For a conventional guide bushing, the radial offset can be represented as half the difference between the bushing’s outside diameter and the bit diameter. In practice, dedicated inlay systems use a removable collar or bushing arrangement that changes this offset between the pocket cut and the insert cut.
For example, if a template opening defines the nominal shape, increasing the effective guide diameter moves the bit farther from the template edge and changes the size of the routed shape. Removing the collar moves the bit closer to the template edge. The exact relationship depends on the dimensions of the guide, collar, and cutter, so use the dimensions supplied with the particular system rather than assuming that components from different manufacturers will match.
Best practice
Keep the same router, bit, template, and guide assembly together when making the matching cuts.
Avoid mixing systems
A bushing and collar that look similar may have different dimensions. A small offset error can create a visible gap around the entire inlay.
How Deep Should a Router Inlay Be?
The correct depth depends on the inlay material, its thickness, the adhesive, and the intended finishing method. The insert generally needs enough engagement to remain secure while leaving enough material for final leveling. Many woodworking procedures deliberately leave the insert slightly proud so it can be brought flush after glue-up.
Avoid taking the full depth in one pass when the cutter, template, or material calls for shallow passes. Some manufacturer instructions specifically limit each pass to a fraction of an inch to reduce stress on small router bits.
Common Router Inlay Problems and How to Fix Them
Most router inlay failures come from setup errors rather than the basic concept of the technique. Check the template, guide centering, cutting depth, material support, and bit condition before changing the design or trying to force the insert into place.
When troubleshooting, stop routing before investigating a problem. Unplug the router before changing the bit, bushing, template, or workpiece position, and wait until the cutter has completely stopped.
Source: woodcraft.com
The inlay is too loose
The template may have shifted, the guide offset may be incorrect, the guide may not have remained against the template, or the pocket and insert may have been cut using mismatched components. Test the complete setup on scrap and verify the bushing dimensions.
The inlay is too tight
The insert may have been cut too large, the pocket may be undersized, or debris may remain in the recess. Clean the pocket and check the setup before removing material from the finished insert.
The corners are rounded
A router bit follows a circular path, so internal corners produced by routing will normally have a radius. If the design requires a sharp corner, square it carefully with a sharp chisel or knife after routing.
The router gouges the inlay
The router base may have tilted, the bit may have entered too aggressively, or the guide may have moved away from the template. Keep the base supported and make controlled passes.
The template moves
Improve the clamping or tape arrangement and make sure the workpiece itself is secure. A template that moves during either cut can ruin both the pocket and the insert.
The bit burns the wood
A dull bit, excessive feed pressure, incorrect speed, or an unnecessarily heavy cut can contribute to burning. Use a sharp cutter, appropriate router speed, adequate chip removal, and shallow passes when appropriate.
The insert breaks
Small or narrow inlays are fragile. Avoid prying them sideways and use support beneath the inlay stock during routing. Prepare spare material when the design is difficult or the insert is especially delicate.
The inlay sits below the surface
The pocket may be too deep or the insert may be too thin. A recessed inlay can sometimes be corrected by replacing it with thicker material, depending on the project.
Glue squeeze-out stains the surface
Use an appropriate amount of adhesive rather than flooding the pocket. Remove excess according to the adhesive manufacturer’s instructions and avoid spreading wet glue into open wood pores.
What to Do if the Fit Has a Small Gap
A tiny gap may result from normal setup error, template movement, or slight variation in the material. Do not immediately enlarge the entire pocket. First determine whether the gap is localized or runs consistently around the complete shape.
For a small localized gap in a wood-on-wood inlay, compatible wood dust mixed with an appropriate adhesive is sometimes used as a cosmetic filler. However, the repaired area may remain visible after finishing, especially with contrasting woods. If the gap is substantial or the project is highly visible, making a new insert or repeating the pocket is usually more predictable.
Router Inlay Safety Boundaries
Wear appropriate eye and hearing protection and control airborne wood dust with effective dust collection and suitable respiratory protection when needed. Keep hands away from the bit path, secure loose clothing and hair, and never make bit or bushing changes while the router is connected to power.
A plunge router can move unexpectedly if the base loses support or the cutter catches. Keep the router flat, maintain a stable stance, secure the workpiece, and follow the router and bit manufacturer’s operating instructions. Small router bits can break when overloaded, so never force the cutter through material.
Finishing a Router Inlay for a Clean Surface
The final result depends as much on leveling and finishing as it does on routing. After the adhesive has cured fully, remove any remaining proud material carefully so the transition between the inlay and surrounding wood is smooth.
A sharp hand scraper or plane can provide excellent control on suitable wood projects, while sanding can work when the entire surface needs to be prepared for finish. A flush-trimming router setup can also be used when it is properly supported and configured, but it requires careful control because a mistake at this stage can damage an otherwise finished project.
Work progressively rather than trying to remove a large amount of material at once. Once the inlay is flush, inspect the joint under good lighting. A narrow shadow line may reveal a gap that was not obvious before leveling.
Source: finewoodworking.com
Scraping
A sharp card scraper can provide controlled removal and is useful when the inlay is only slightly proud.
Planing
A hand plane can level wood inlays efficiently when the grain direction and workpiece geometry allow safe, controlled cuts.
Sanding
Sand progressively and avoid concentrating pressure directly over a softer surrounding wood, which can create an uneven surface.
Flush trimming
A suitable router jig can trim proud inlays, but the router must have stable support and the bit must be set to remove only the intended material.
Choosing a Finish
The finish should suit both the base wood and inlay material. Clear finishes can emphasize the contrast between species, while oils may produce a different visual effect. Before applying finish to the project, test the finish on offcuts containing the same woods and adhesive whenever possible.
If resin is used instead of wood, follow the resin manufacturer’s cure, sanding, ventilation, and finishing instructions. Epoxy and other resin systems can have different curing and sanding characteristics, so wood-inlay methods should not automatically be applied to every resin product.
Router Inlay Design Tips and Practical Examples
Simple geometric shapes are the best place to learn because they make template alignment and fit easier to inspect. Once the setup is reliable, you can move to more detailed patterns with tighter curves and smaller features.
Keep the physical limitations of the router in mind when designing a pattern. A router bit has a diameter, so very small inside corners will receive a radius rather than a sharp point. Extremely narrow sections can also become fragile when cut from thin stock.
Source: greatwesternsaw.com
Geometric inlays
Squares, diamonds, circles, ovals, hexagons, and simple repeating patterns are useful for learning the technique.
Butterfly or bow tie keys
These can be decorative and, when properly designed and installed across a crack, can also serve a structural purpose in appropriate solid-wood applications.
Lettering
Letters can create attractive signs and personalized projects, but narrow strokes may require a smaller cutter and more careful material selection.
Contrasting species
Dark walnut against light maple or light-colored wood against darker species can make the pattern easier to see.
Resin inlays
Epoxy can fill routed grooves and more complicated patterns, but resin-specific mixing, curing, ventilation, and finishing requirements must be followed.
When a Router Is Not the Best Tool
A router is not the only way to make an inlay. Very small details may be easier with hand tools, a CNC router, a scroll saw, a laser cutter, or a combination of methods depending on the design and available equipment.
If a design has extremely sharp internal corners, delicate fibers, or a geometry that does not provide enough support for the router base, hand tools may provide better control. The goal is a clean, stable joint, not using a router simply because the project is described as a router inlay.
Use hand tools
Consider chisels and knives when the design contains tight internal corners that naturally exceed the router bit’s radius.
Use CNC routing
CNC equipment can be useful for repeatable or complex designs when the operator has suitable tooling, workholding, and machine knowledge.
Use resin
Resin can simplify highly detailed patterns where cutting a fragile solid insert would be impractical.
A Simple Practice Project
For a first project, use a small square or oval in contrasting hardwood on a scrap board. Make the template, route the pocket, change the guide configuration, route the insert from matching stock, and test the fit before gluing. This lets you identify centering, depth, and offset problems without risking an expensive tabletop or finished cabinet component.
Once the basic setup produces a clean fit, repeat the process with a more decorative shape. Keeping notes about the router, bit, guide dimensions, template thickness, and cutting depth can make future inlay projects easier to reproduce.
Frequently Asked Questions
Q
Can I make a router inlay without a dedicated inlay kit?
Yes, depending on the design and router setup. A conventional guide bushing and carefully calculated template offset can be used for some inlay work. Dedicated inlay bushings and removable collars simplify the process because they are designed to create the complementary offsets needed for the pocket and insert.
Q
What router bit is best for wood inlays?
A small straight or spiral router bit that matches the inlay system is commonly used. Spiral bits can provide useful chip evacuation and clean cutting, but the correct choice depends on the material, router, template system, shank size, and manufacturer’s instructions. Always verify that the bit is rated for your router’s speed range.
Q
Why does my router inlay have gaps around the edges?
Common causes include template movement, an incorrectly centered guide bushing, mismatched guide and collar dimensions, using different templates for the two cuts, or allowing the guide to move away from the template. Test the complete setup on scrap before attempting another finished cut.
Q
How do I get sharp corners in a router inlay?
Router bits cut rounded internal corners. If the design requires a sharp inside corner, route as much of the shape as possible and square the remaining corner with a sharp chisel or knife. The required amount of hand work depends on the bit diameter and the shape of the template.
Q
Should the inlay be flush or slightly proud before finishing?
Leaving the inlay slightly proud can make final leveling easier because the insert provides material to remove after the adhesive cures. The exact amount depends on the material and finishing method. Avoid leaving it excessively proud, which increases the amount of material that must be removed.
✦ Wrapping Up
Conclusion
A router inlay becomes much more predictable when the template, guide bushing, bit, and workpiece are treated as one system. The core method is simple: secure a precise template, cut the pocket with the appropriate guide configuration, change the offset, cut the matching insert from the same template, test the fit, glue it in place, and level the finished surface.
Accuracy comes from setup rather than speed. Center the guide, keep the template stationary, use a sharp and appropriate bit, make controlled passes, and practice on scrap before routing an important project. If the design demands sharp corners or extremely small details, combine router work with careful hand-tool work instead of forcing the router to produce geometry it cannot naturally cut.
💡 Key Takeaway
For your first router inlay, choose a simple contrasting-wood shape, use the same rigid template for both cuts, verify the guide-bushing offset on scrap, and only move to the finished workpiece after the test insert fits cleanly.