
Wood Glue Temperature affects much more than drying speed. It changes how easily glue spreads, how long a joint stays workable, and how well the adhesive forms a strong bond. In many U.S. garages and basement shops, temperature becomes a major issue during winter and summer.
A practical shop rule is simple: do not judge conditions by air temperature alone. The boards and glue bottle may still be cold after the heater turns on. For reliable work, let the glue, wood, and workspace reach a suitable temperature before assembly.
What Is the Best Wood Glue Temperature?
The best Wood Glue Temperature depends on the adhesive formula. Many common woodworking glues perform well around normal indoor room temperature. A shop near 65°F to 75°F gives most woodworkers a useful working range.
The minimum application temperature matters more than many people expect. Some glues can work near 50°F, while special cold-weather formulas may allow lower temperatures. Always check the bottle because one product’s safe limit may not match another.
Temperature also applies to the wood itself. Boards stored overnight in a cold garage can stay much colder than the surrounding air. Warm the stock before spreading glue if you want a more consistent bond.

- ✦ Comfortable working range
A moderate indoor temperature often gives glue enough open time while still allowing normal curing.
- ✦ Minimum temperature
Never assume every wood glue can cure safely near freezing. Follow the maker’s stated minimum.
- ✦ Wood temperature
Cold boards can cool the glue at the joint even when the room already feels warm.
Why About 70°F Is a Useful Workshop Target
Around 70°F, many water-based woodworking glues spread with a normal texture. Open time is easier to predict, and water can leave the glue line at a steady rate. This makes assembly less stressful for most furniture and cabinet projects.
- ✦ Predictable flow
The glue usually spreads more evenly than it does when very cold.
- ✦ Useful open time
You often have enough time to align parts and apply clamps without rushing.
How Cold Temperatures Affect Wood Glue
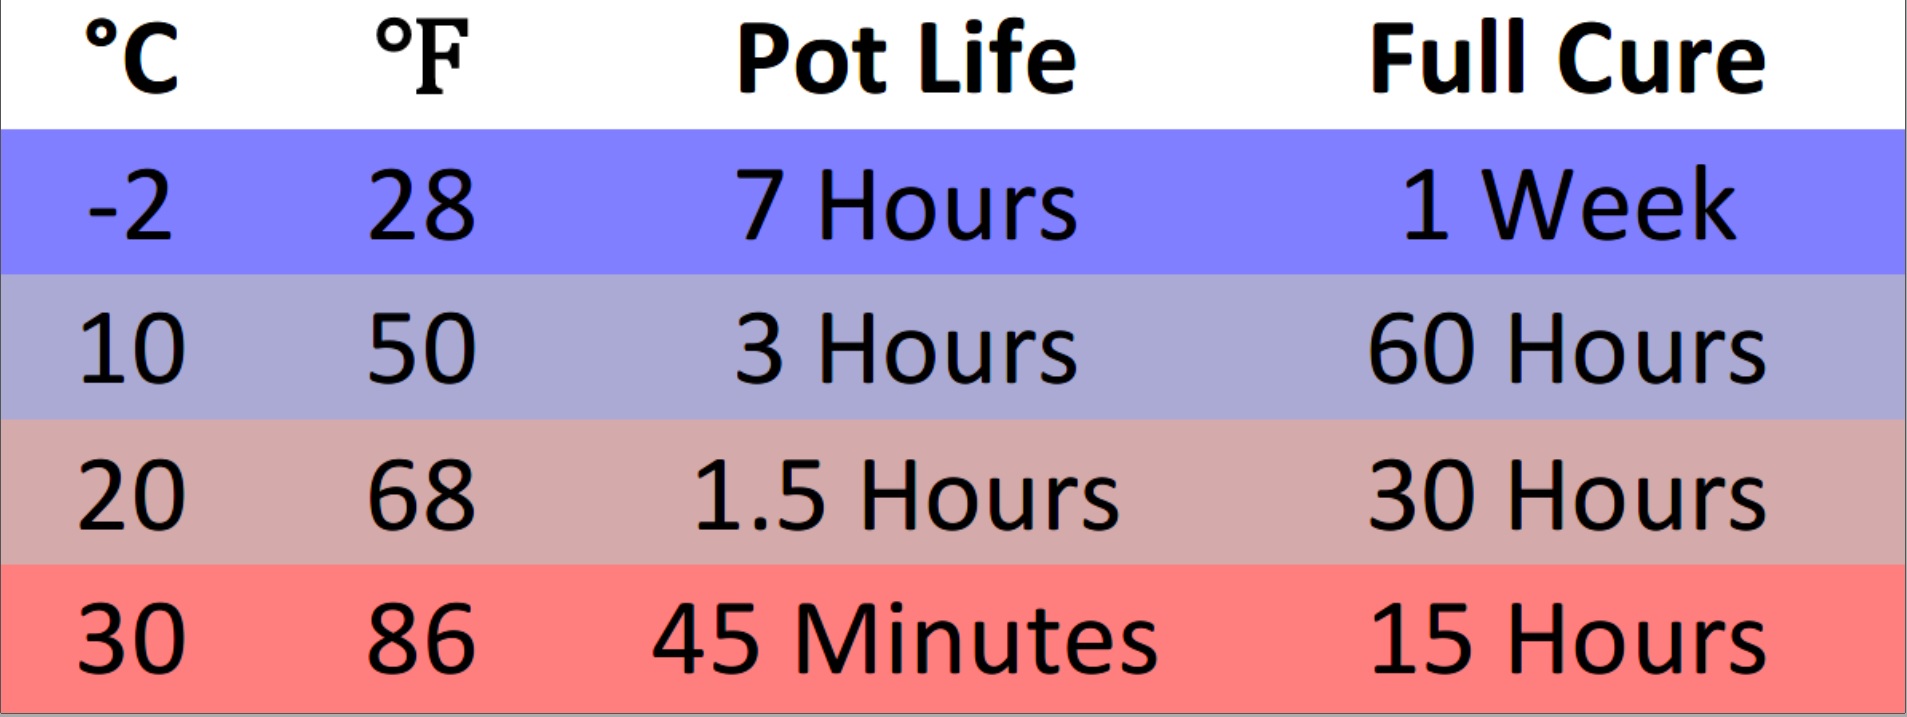
Low Wood Glue Temperature can cause several problems at once. The adhesive may become thicker, spread poorly, and take longer to set. A joint that normally becomes firm within a short period may need much more time in a cold shop.
Water-based glues face another risk. If the temperature drops below the product’s safe working range, the glue may not form its normal film. The cured glue line can look pale, chalky, or unusually weak.
Cold weather also slows moisture loss from the joint. That means clamp time and cure time may increase. Removing clamps too early can allow parts to move before the bond has gained enough strength.

- ✦ Thicker glue
Cold adhesive does not flow or wet wood fibers as easily.
- ✦ Longer curing
Low temperatures slow the processes that help many glues set and gain strength.
- ✦ Film formation problems
Some water-based glues can form a weak or chalky bond when used below their minimum temperature.
Can You Use Wood Glue in a Cold Garage?
Yes, but only if the glue and wood stay within the adhesive maker’s approved range. Heating the air for a few minutes may not be enough. Thick boards, clamps, and the glue bottle can remain cold for hours.
- ✦ Preheat the space
Warm the shop before starting the glue-up.
- ✦ Warm the materials
Bring cold lumber and glue indoors long enough to reach a safer working temperature.
- ✦ Keep heat steady
Maintain suitable conditions during the early cure instead of turning off the heat as soon as clamps go on.
How High Temperatures Affect Wood Glue
Hot conditions create a different Wood Glue Temperature problem. Heat can shorten open time. The glue may begin setting before all parts are aligned and clamped.
This matters during large assemblies. A cabinet, tabletop, or chair with many joints may take several minutes to assemble. In a hot garage, the first joints can begin to skin over while you are still applying glue to later parts.
Warm air can also increase water loss from some adhesives. Faster drying sounds helpful, but drying too fast can reduce the time available for proper wetting and pressure. A strong joint needs enough time for the adhesive to contact both surfaces well.
- ✦ Shorter open time
You may have less time to spread glue, align parts, and install clamps.
- ✦ Faster skinning
The exposed glue surface may begin drying before the joint closes.
- ✦ More assembly pressure
Large glue-ups become harder when the adhesive starts setting quickly.
Managing Glue-Ups in a Hot Workshop
Prepare every clamp and part before opening the glue bottle. Dry-fit the assembly first. For complex jobs, divide the project into smaller glue-ups when the design allows it.
- ✦ Dry-fit first
Confirm that every joint closes before adding glue.
- ✦ Stage clamps
Place clamps within reach so you do not waste open time.
- ✦ Use smaller assemblies
Breaking a large glue-up into stages can reduce stress during hot weather.
Wood Glue Temperature and Drying Time
Wood Glue Temperature has a direct effect on drying time. Warm, moderate conditions normally help many common glues set faster than cold conditions. However, drying speed also depends on humidity, wood species, joint design, and glue thickness.
A thin glue line between two dry boards behaves differently from a large bead inside a loose joint. Dense wood may also absorb moisture differently than soft, open-grained wood. Temperature is important, but it is not the only factor.
Do not treat a dry surface as proof of a fully cured bond. The glue inside the joint can still be gaining strength. Give the project the full cure time recommended by the adhesive maker before heavy loading or machining.
- ✦ Cold slows drying
Lower temperatures usually mean longer clamp and cure times.
- ✦ Heat can speed drying
Moderate warmth may help, but excessive heat can shorten working time too much.
- ✦ Full cure takes longer
A joint may feel firm long before the adhesive reaches its final strength.
Dry Time, Clamp Time, and Cure Time Are Different
Clamp time is the period when the joint should stay under pressure. Dry time describes moisture loss or surface drying. Cure time is the longer period needed for the adhesive to build its intended strength.
- ✦ Clamp time
Keep the parts fixed until the joint can resist movement.
- ✦ Dry time
The glue loses moisture or solvent and becomes firmer.
- ✦ Cure time
The adhesive continues developing strength after the clamps may already be removed.
Temperature Guidelines for Common Types of Wood Glue
Different adhesives respond to temperature in different ways. That is why there is no single Wood Glue Temperature rule for every bottle on the shelf. Product labels and technical sheets should always take priority.
PVA glues are common in furniture work. Polyurethane glue, epoxy, hide glue, and specialty exterior adhesives behave differently. The right choice depends on the joint, exposure, cure conditions, and project needs.
- ✦ PVA wood glue
Common yellow and white woodworking glues often prefer moderate indoor temperatures and can struggle when too cold.
- ✦ Polyurethane adhesive
These products cure through a different process and may have different temperature and moisture needs.
- ✦ Epoxy
Cold temperatures can greatly slow many epoxy systems, while high heat can shorten working time.
- ✦ Hide glue
Traditional hot hide glue has unique temperature needs because the adhesive must stay warm enough to remain fluid during assembly.
Why the Product Label Matters
Two glues that look similar may have different minimum application temperatures. One may be made for a heated cabinet shop, while another may support cooler jobsite use. Read the label before planning a winter glue-up.
- ✦ Check application limits
Look for the minimum and recommended working temperature.
- ✦ Check clamp guidance
Temperature can change the amount of time a joint should remain clamped.
- ✦ Check cure guidance
Do not load the finished joint before the maker’s stated cure period.
How to Glue Wood Successfully in Winter
Winter creates one of the most common Wood Glue Temperature challenges in U.S. home shops. An attached garage may feel workable during the day but fall close to freezing overnight. That temperature drop can affect a freshly assembled joint.
The safest approach is to control the full glue-up cycle. Warm the boards, adhesive, and workspace before assembly. Then keep the project warm through the important early cure period.
I recommend treating cold lumber as a separate problem from cold air. A heater can warm a small shop quickly, but a thick hardwood slab changes temperature much more slowly. Give large parts extra time to warm through.

- ✦ Condition the lumber
Move boards into a heated space before the glue-up whenever possible.
- ✦ Warm the adhesive
Store the glue where it stays within the maker’s storage range.
- ✦ Heat the cure area
Keep the assembled project above the adhesive’s minimum temperature.
- ✦ Allow extra time
Cold conditions may require longer clamping and curing than the fastest times on the label.
A Simple Winter Workshop Routine
Bring the glue and project parts into a conditioned space before work begins. Confirm that the boards no longer feel deeply chilled. After clamping, maintain steady warmth instead of allowing the project to freeze overnight.
- ✦ Before gluing
Warm the room, glue, wood, and clamps.
- ✦ During gluing
Work efficiently and close each joint before the adhesive begins to set.
- ✦ After gluing
Keep the project in suitable conditions until the early cure is complete.
How to Handle Wood Glue During Hot Summer Weather
Summer heat can make Wood Glue Temperature harder to manage, especially in garages without air conditioning. A shop can become much hotter than the outdoor weather report suggests. Direct sunlight can also heat lumber well above the room temperature.
Plan complex assemblies before spreading glue. Mark every part, arrange clamps, and complete a dry run. Good preparation matters more when heat cuts the available open time.
Avoid leaving glue bottles in direct sun or inside a hot vehicle. Extreme storage heat can damage some adhesives over time. Store the product according to the maker’s instructions.

- ✦ Work during cooler hours
Morning work can give you more open time than a late-afternoon glue-up in a hot garage.
- ✦ Shade the materials
Keep boards and glue away from direct sunlight before assembly.
- ✦ Prepare the full setup
Have clamps, cauls, mallets, and cleanup tools ready before applying adhesive.
Signs the Glue Is Setting Too Fast
Watch for glue that becomes tacky or develops a skin before the parts close. You may also notice poor transfer when the joint comes apart during a test fit. If working time becomes too short, cool the workspace or simplify the assembly.
- ✦ Surface skin
The exposed adhesive begins drying before clamping.
- ✦ Reduced transfer
Glue no longer spreads evenly across both mating surfaces.
Wood Temperature Matters as Much as Room Temperature
A common Wood Glue Temperature mistake is checking only the thermostat. The wood can remain much colder or hotter than the room. This is common with thick boards, plywood stacks, and lumber stored against an exterior wall.
When cold wood contacts warmer glue, the glue line can cool fast. That may push the adhesive below its safe application range. Very hot boards can create the opposite problem and shorten open time.
For critical work, give materials time to reach the shop temperature. A simple surface thermometer can also help when conditions are uncertain.
- ✦ Thick lumber changes slowly
Large slabs can stay cold inside long after the room warms up.
- ✦ Exterior storage affects stock
Boards stored in sheds or garages often need conditioning before gluing.
- ✦ Surface checks help
A thermometer can confirm whether the wood is actually ready for adhesive work.
Do Not Rush Lumber from Cold Storage
Moving frozen or very cold boards into a warm room does not make them ready at once. Let the material warm gradually. Also watch for surface moisture if condensation forms on cold wood.
- ✦ Allow conditioning time
Wait until the board temperature moves into the glue’s approved range.
- ✦ Keep surfaces dry
Do not trap condensation or visible water inside a joint unless the adhesive specifically calls for moisture.
How Humidity Works with Wood Glue Temperature
Temperature and humidity work together. Warm, dry air may speed moisture loss from water-based glue. Cool, damp air can slow it down.
Wood moisture also matters. Lumber that is much wetter than normal indoor stock can affect drying and joint stability. The best results come from properly conditioned wood, a suitable Wood Glue Temperature, and enough cure time.
Do not try to fix every slow glue-up with extra heat. Strong direct heat can dry exposed glue quickly while the material inside the joint still needs time. Gentle, steady conditions are easier to control.
- ✦ Cool and humid
Expect many water-based glues to dry more slowly.
- ✦ Warm and dry
Expect faster moisture loss and potentially shorter open time.
- ✦ Stable conditions
Moderate temperature and humidity make glue behavior easier to predict.
Why Stable Conditions Beat Extreme Heat
A steady shop temperature helps the whole joint cure more evenly. Blasting one area with intense heat can create uneven conditions. Moderate warmth is usually easier to manage than a rapid temperature swing.
- ✦ Avoid overheating
Do not place delicate projects too close to heaters.
- ✦ Avoid sudden cooling
Do not move a fresh glue-up into freezing conditions right after clamping.
Wood Glue Storage Temperature
Wood Glue Temperature matters during storage too. Many water-based woodworking glues should be protected from freezing. Repeated freeze and thaw cycles can damage some formulas.
High storage heat can also shorten useful shelf life. A vehicle, metal shed, or sunny window may become far hotter than the surrounding air. A stable indoor storage area is often the safer choice.
Inspect old glue before using it on an important project. Unusual lumps, separation that will not mix back together, or a major texture change can signal a problem. When in doubt, follow the manufacturer’s storage and shelf-life guidance.
- ✦ Prevent freezing
Keep water-based glue within the storage limits stated by the maker.
- ✦ Avoid extreme heat
Do not leave adhesive for long periods in a hot car or unconditioned metal building.
- ✦ Close the bottle
A tight cap reduces contamination and unwanted drying inside the container.
- ✦ Inspect before use
Check questionable glue before trusting it on furniture or structural parts.
What If Wood Glue Freezes?
Do not assume every frozen bottle is ruined, and do not assume it is safe either. Some products tolerate limited freeze and thaw cycles, while others may not. Let the bottle return to normal temperature and follow the manufacturer’s instructions before reuse.
- ✦ Do not force-thaw with extreme heat
Bring the adhesive back to room temperature gradually.
- ✦ Check texture
Look for permanent separation, graininess, or unusual thickening.
- ✦ Test doubtful glue
Use scrap wood for a test bond before risking an important assembly.
Common Wood Glue Temperature Mistakes
Many glue failures begin before the clamps go on. The woodworker may use cold stock, rush a hot-weather assembly, or remove clamps based on a normal-room-temperature schedule. These small choices can reduce reliability.
The most useful lesson is to treat temperature as part of the glue-up plan. Check the adhesive, the materials, and the room. Then adjust working and curing time to match the actual conditions.
- ✦ Using frozen-cold lumber
Cold boards can pull heat from the glue and push the joint below the safe working temperature.
- ✦ Heating only the air
The room may feel warm while lumber and glue remain too cold.
- ✦ Removing clamps too soon
Cold conditions can extend the time needed before the joint resists movement.
- ✦ Ignoring hot-weather open time
High temperatures can make large assemblies set faster than expected.
- ✦ Storing glue in a vehicle
Cars and trucks can expose adhesive to damaging heat or freezing conditions.
A Better Pre-Glue Checklist
Check the product label before every unusual-temperature glue-up. Confirm that the wood and adhesive are within the safe range. Dry-fit the project, prepare clamps, and allow enough cure time for the conditions.
- ✦ Check temperature
Measure or confirm the shop and material conditions.
- ✦ Check fit
A well-fitted joint needs less last-minute adjustment.
- ✦ Check timing
Know the expected open, clamp, and cure times before applying glue.
Practical Wood Glue Temperature Tips for Stronger Joints
Good glue joints come from controlled conditions and good preparation. You do not need a perfect climate-controlled shop for every project. You do need to keep the adhesive within its approved range.
For most home woodworkers, simple habits solve many temperature problems. Store glue indoors, condition cold lumber, dry-fit large assemblies, and protect fresh joints from sudden temperature drops. These steps cost little but improve consistency.
When a project carries weight or has high value, take a conservative approach. Give the adhesive extra cure time when conditions are cool. Never rush a glue joint just because the surface looks dry.
- ✦ Read the bottle
Use the manufacturer’s exact Wood Glue Temperature limits as your primary guide.
- ✦ Condition all parts
Bring glue, wood, and clamps into the working environment before assembly.
- ✦ Dry-fit first
Solve fit problems before the adhesive starts its working-time clock.
- ✦ Maintain temperature after clamping
Protect the joint during the early cure period.
- ✦ Allow more time when unsure
A little extra cure time is safer than stressing a cold joint too early.
The Simple Rule to Remember
Think about three temperatures: the room, the glue, and the wood. All three should stay within the product’s safe range. When they do, your glue-up becomes far easier to predict.
- ✦ Room
Keep the work area stable during assembly and early curing.
- ✦ Glue
Store and use the adhesive within its stated temperature range.
- ✦ Wood
Condition boards before gluing instead of relying only on room air temperature.