
A dado joint guide helps woodworkers understand one of the most useful joints in furniture and cabinet projects. This joint has been used by professionals for years because it adds strength without needing many screws or complicated hardware.
From building bookshelves in American homes to making custom cabinets in professional shops, dado joints provide clean support and accurate alignment. In my woodworking experience, a well-cut dado often makes the difference between a project that feels solid and one that feels weak.

What Is a Dado Joint?
A dado joint is a woodworking joint where a channel is cut into one piece of wood and another piece fits inside that channel. The cut usually goes across the grain and creates a strong mechanical connection.
Unlike a simple butt joint, a dado joint gives the connected board more support because the wood pieces lock together. This makes it popular for shelves, cabinet sides, and furniture frames.

- ✦ Strong support
The groove helps carry weight and keeps connected boards from moving easily.
- ✦ Clean appearance
A dado joint hides much of the connection, creating a professional finish.
Common Uses of Dado Joints
Woodworkers commonly use dado joints in bookcases, kitchen cabinets, entertainment centers, and drawer systems. The joint works especially well when a board needs support along a long edge.
- ✦ Shelving
Dado joints keep shelves stable and reduce sagging.
Types of Dado Joints Explained
There are several types of dado joints used in woodworking. Each type has a different shape and purpose depending on the project design.
Choosing the right dado style improves strength, appearance, and ease of assembly.

- ✦ Through dado
A cut that runs completely through the board from one edge to the other.
- ✦ Stopped dado
A dado that ends before reaching the edge, creating a cleaner look.
- ✦ Housing dado
A deeper dado designed to hold structural parts securely.
Dado Joint vs Groove Joint
A dado cut usually crosses the grain of the wood, while a groove normally follows the grain. Both create channels, but their uses are different.
Tools Needed to Make a Dado Joint
A clean dado joint depends on accurate tools and careful setup. Beginners can create good results with basic equipment, while professionals often use specialized machines.
Always test cuts on scrap wood before cutting the final project piece. This simple step prevents many mistakes.

- ✦ Table saw with dado blade
A dado blade stack creates precise and repeatable grooves.
- ✦ Router
A router with a straight bit works well for smooth dado cuts.
- ✦ Chisels and hand tools
Hand tools allow careful adjustments and traditional woodworking methods.
Safety Tips Before Cutting
Wear eye protection, keep hands away from cutting areas, and make sure tools are properly adjusted before starting.
- ✦ Measure twice
Accurate measurements reduce wasted material and poor-fitting joints.
How to Cut a Perfect Dado Joint Step by Step
Making a dado joint starts with marking the exact location of the groove. Good preparation creates better results than rushing into the cut.
After cutting, check the fit of the second board. It should slide into place without forcing or excessive movement.
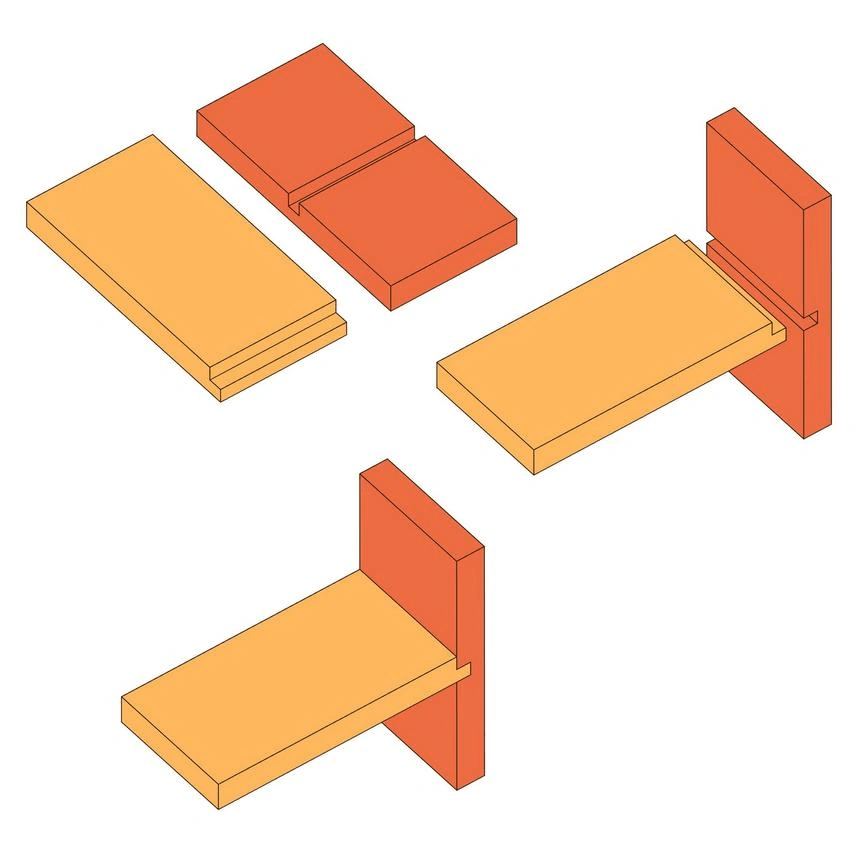
- ✦ Mark the dado location
Use a square and pencil to mark where the groove will go.
- ✦ Set cutting depth
Choose a depth that provides support without weakening the board.
- ✦ Test and adjust
Use scrap wood to confirm the fit before final assembly.
Benefits and Limitations of Dado Joints
A dado joint offers excellent strength and a clean look, but it is not perfect for every woodworking situation. Understanding its advantages and limits helps you choose the right joint.
For many cabinet and furniture projects, the benefits make dado joints one of the most practical options available.

- ✦ Benefits
Provides strength, improves alignment, and creates professional-looking furniture.
- ✦ Limitations
Requires accurate cutting and may not work well for very thin materials.