
A pocket hole is a simple woodworking joint that uses an angled hole and a special screw to connect two pieces of wood. This method is popular among American DIY builders because it saves time and does not require complex joinery skills.
In my woodworking experience, a good Pocket Hole Guide starts with understanding the jig, screw choice, and wood thickness. Many beginners focus only on drilling the hole, but accurate setup creates the strongest results.
Pocket hole joinery works for projects like shelves, tables, cabinets, and frames. It gives makers a practical way to build clean furniture with common tools found in home workshops.

What Is a Pocket Hole and How Does It Work?
A pocket hole is a drilled hole placed at an angle near the edge of a wood board. The hole creates a hidden space where a screw head sits below the surface.
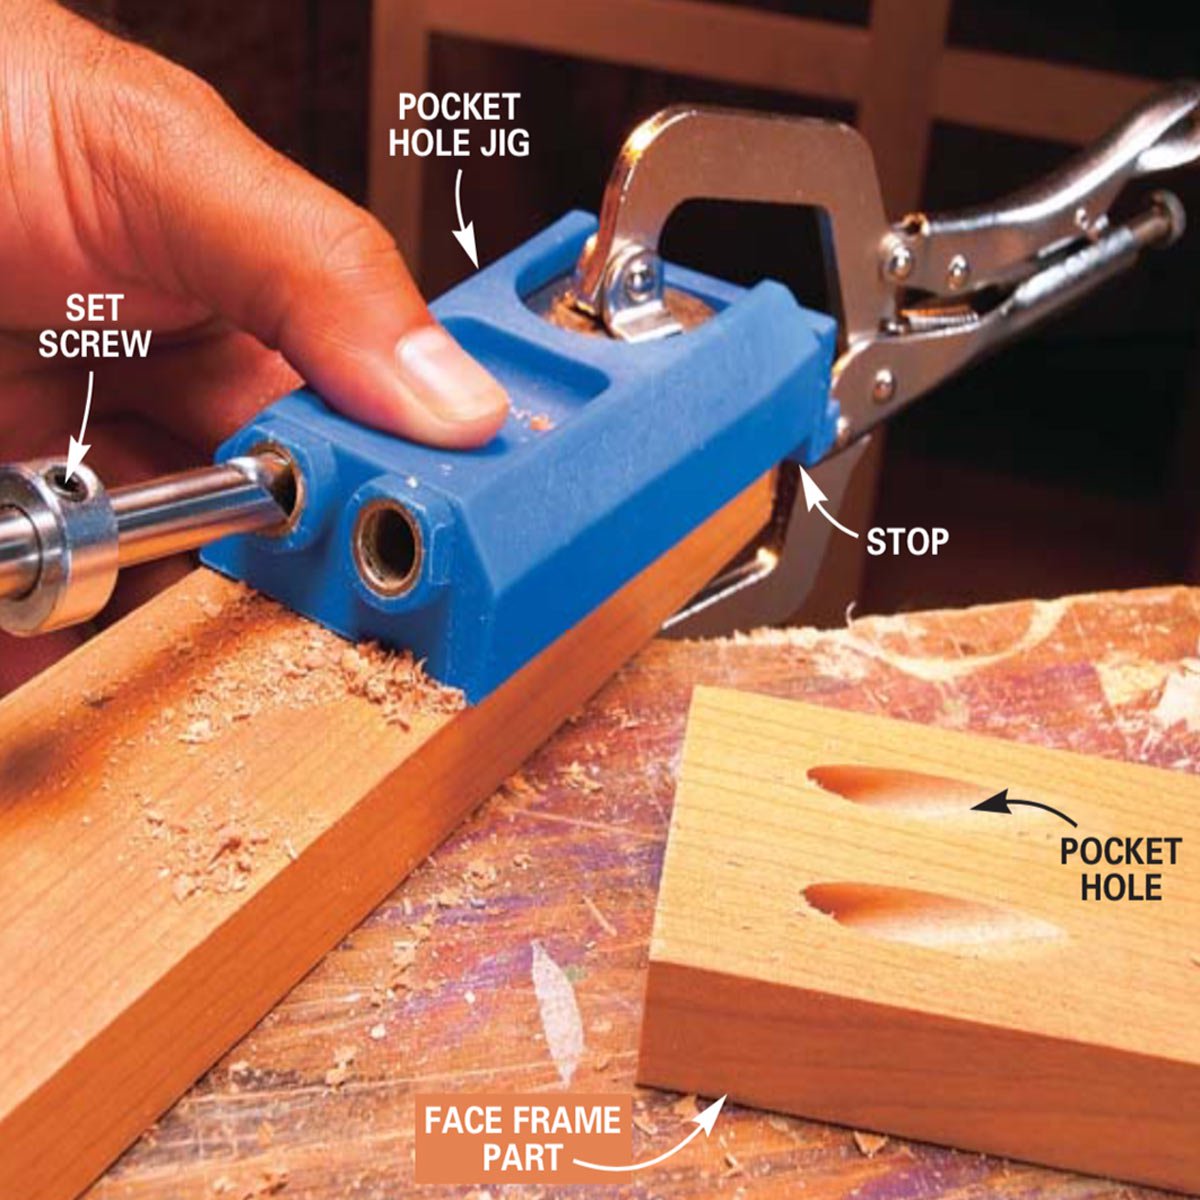
A pocket hole jig guides the drill bit at the correct angle, usually around 15 degrees. This keeps the screw path controlled and helps create a tight connection between boards.
This Pocket Hole Guide method is common in U.S. woodworking shops because it offers speed without needing expensive machines or advanced skills.

- ✦ Angled drilling
The jig creates a consistent angled hole that directs the screw into the second board.
- ✦ Hidden connection
The screw head stays inside the pocket hole, keeping the visible surface cleaner.
- ✦ Fast assembly
Woodworkers can build strong joints quickly compared with many traditional methods.
Main Parts of a Pocket Hole System
A basic system includes a pocket hole jig, special drill bit, depth collar, driver bit, clamp, and pocket hole screws. Each part has a role in creating a reliable joint.
- ✦ Pocket hole jig
The jig holds the drill guide in place and controls the drilling angle.
- ✦ Step drill bit
The bit creates both the pocket opening and the screw pilot path.
How to Use a Pocket Hole Jig Correctly
Using a pocket hole jig begins with measuring your wood thickness. The jig setting, drill depth, and screw length must match the material.
A common mistake in pocket hole projects is skipping the test piece. A quick test helps confirm that the screw reaches the correct depth without breaking through the wood surface.
This Pocket Hole Guide recommends slow and steady drilling. Clean holes reduce tear-out and help screws seat properly.

- ✦ Set wood thickness
Adjust the jig and drill collar based on the thickness of the board.
- ✦ Secure the jig
Use a clamp to stop movement while drilling the pocket hole.
- ✦ Drive screws carefully
Use controlled pressure to avoid splitting or over-tightening.
Step-by-Step Pocket Hole Process
Mark the joint location, set the jig, drill the pocket hole, align the boards, clamp them together, and drive the pocket screws. This simple process works for many furniture builds.
- ✦ Measure
Check board thickness before choosing settings.
- ✦ Drill
Create a clean angled pocket using the guide.
Choosing the Right Pocket Hole Screws
Pocket hole screws are designed with special heads and threads for pulling wood pieces together. Standard screws may not perform well because they can damage the joint.
The correct screw depends on wood thickness and material type. Hardwood and softwood often need different thread styles.
A complete Pocket Hole Guide should always include screw selection because the wrong screw can weaken an otherwise accurate joint.

- ✦ Coarse thread screws
Best for softwoods such as pine because they grip loose fibers well.
- ✦ Fine thread screws
Better for hardwoods because they reduce splitting risk.
- ✦ Screw length
Choose a length that joins boards without breaking through the surface.
Advantages and Limitations of Pocket Hole Joinery
Pocket hole joinery has become popular because it combines speed, simplicity, and strength. It allows beginners to build useful furniture without mastering advanced woodworking joints.
However, pocket holes are not perfect for every project. Visible pocket openings, limited strength compared with some traditional joints, and moisture concerns can affect where they should be used.
This Pocket Hole Guide helps you understand when this method is practical and when another joining technique may work better.
- ✦ Benefits
Fast setup, beginner-friendly operation, strong connections, and easy repairs.
- ✦ Limitations
Pocket holes may need plugs or covers when appearance matters.
Common Pocket Hole Mistakes and How to Avoid Them
Many failed pocket hole projects come from small setup errors. Incorrect depth, poor alignment, and wrong screws can reduce joint quality.
Professional woodworkers often test settings before building final pieces. This small step prevents wasted material and improves accuracy.

- ✦ Skipping clamps
Clamps keep boards aligned while screws pull the joint together.
- ✦ Using wrong screws
Regular screws may split wood or fail to hold correctly.
- ✦ Over-tightening
Too much force can damage the pocket or pull boards out of alignment.
Best Projects for Pocket Hole Joinery
Pocket holes are useful for many home projects across the United States. DIY builders often use them for furniture repairs, custom storage, and weekend woodworking builds.
The method works especially well when speed matters and the joint will not receive extreme stress.
- ✦ Furniture
Build tables, benches, shelves, and cabinets with simple connections.
- ✦ Home improvements
Create frames, storage units, and custom wood solutions.
- ✦ Workshop projects
Make jigs, stands, and organizers quickly.
When to Use Other Joinery Methods
For fine furniture, outdoor structures, or high-stress connections, traditional joints like mortise and tenon may provide better results.
- ✦ Heavy loads
Choose stronger structural methods for extreme weight.