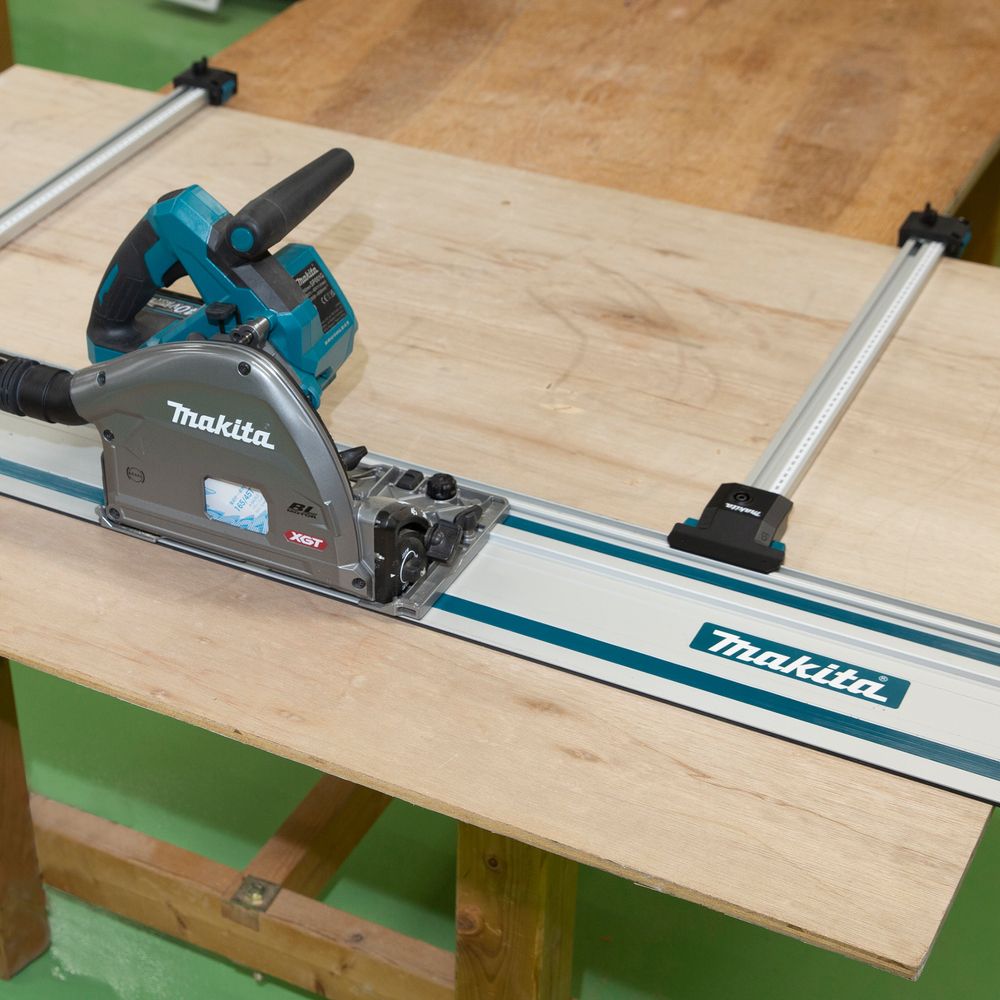
A track saw is a plunge-style circular saw that runs along a guide rail to make controlled, straight cuts. In a typical U.S. woodworking shop or jobsite, it is especially useful for breaking down plywood, MDF, panels, doors, countertops, and other large sheet materials when a table saw is inconvenient or unavailable.
For American woodworkers, cabinet installers, remodelers, finish carpenters, and serious DIY users, a track saw combines the portability of a circular saw with the guided movement of a rail system. The saw rides in or against the guide rail, while an anti-slip surface helps keep the rail positioned on the material. Many systems also use an anti-splinter strip that follows the blade path, helping establish a cleaner cut edge.
The important part of a track saw setup is not simply the saw itself. Accurate results depend on matching the saw and rail, positioning the rail correctly, supporting the workpiece, selecting the correct blade and cutting depth, and keeping the rail and saw base free of debris. The exact adjustment procedure varies by manufacturer, so the tool and guide-rail manuals should always take priority over general instructions.
Source: images.bonnier.cloud
What Is a Track Saw?
A track saw is a circular saw designed to operate on a dedicated guide rail. Unlike a conventional handheld circular saw, the track saw is positioned on the rail so the saw follows a controlled path across the workpiece. Many models use a plunge mechanism, allowing the blade to enter the material at a selected point rather than requiring the blade to start at the edge.
The guide rail is usually an aluminum extrusion with an anti-slip surface and a straight reference edge. Some systems include an anti-splinter strip positioned close to the blade. Once the rail has been calibrated to the saw, that strip can serve as a practical visual reference for where the blade will cut.
Track saws are particularly useful when a large sheet of plywood or MDF needs to be reduced to manageable dimensions. A table saw can perform similar ripping operations, but handling a full 4-by-8-foot sheet on a table saw requires adequate infeed and outfeed space. A track saw instead travels across the sheet while the sheet remains supported on a work surface.
Source: bcommebois.fr
Track saw
The powered cutting tool that travels along the guide rail.
Guide rail
The straight rail that controls the saw’s path and provides a repeatable reference for the cut.
Anti-splinter strip
A replaceable edge strip that sits close to the blade and helps reduce tear-out while providing a cut-location reference after calibration.
Rail clamps
Optional clamps that can hold the guide rail securely when the rail’s built-in anti-slip surface is not sufficient for the task.
Track Saw vs. Circular Saw
A conventional circular saw can make straight cuts when used with a homemade or commercial straightedge, but the operator must maintain the correct offset between the saw base and the cutting line. A track saw integrates the guide system more directly with the saw, which simplifies repeated setup and makes plunge cuts possible on compatible models.
A regular circular saw may be the more practical tool for rough construction cuts where maximum portability and low equipment cost matter. A track saw becomes more useful when controlled cuts, sheet-goods breakdown, plunge cuts, bevel work, or cleaner finished edges are important.
Use a track saw when
You regularly cut large panels, need controlled plunge cuts, or want a dedicated guide system for repeatable work.
Use a conventional circular saw when
The work is primarily rough construction cutting and a dedicated rail system would add unnecessary equipment.
How Does a Track Saw Guide Rail Work?
The guide rail establishes a straight path for the saw. The saw base engages with the rail’s guiding surface, limiting sideways movement while allowing the tool to travel forward and backward along the length of the rail. The result is a cut that follows the rail rather than relying entirely on the operator’s ability to hold a circular saw against a pencil line.
The relationship between the rail and the blade is critical. On many systems, the anti-splinter strip is intentionally trimmed by the saw during initial setup. After that calibration cut, the edge of the strip corresponds closely to the blade’s cutting path for that specific saw and rail combination. If the saw, rail, or blade configuration changes, the cut reference should be checked again.
Guide rails are available in different lengths. A short rail can be convenient for cabinet components and doors, while longer rails are useful for sheet goods and large workpieces. Some manufacturers provide connectors for joining compatible rails into a longer track.
Source: koempf24.de
Rail alignment
Place the rail so its reference edge corresponds to the intended cut location, following the manufacturer’s measurement method.
Rail stability
Use the rail’s anti-slip surface or compatible clamps as required by the material, cut direction, and manufacturer’s instructions.
Rail cleanliness
Remove dust, chips, adhesive residue, and other debris that could affect how the saw base travels or how the rail contacts the workpiece.
Rail compatibility
Confirm that the saw and rail are designed to work together or that the required adapter is approved for the combination.
How to Calibrate the Anti-Splinter Strip
Calibration is normally performed with the saw attached to the rail and the blade set to the manufacturer’s recommended depth. With the power disconnected during setup, check that the saw is properly engaged with the rail. Follow the specific manual for the required initial trimming procedure, because the exact process differs between systems.
After the strip has been trimmed, make a test cut on scrap material. Measure the result rather than assuming the strip is perfectly positioned. If the saw has been adjusted, the rail has been damaged, or a different saw is being used, verify the reference edge again.
Success sign
A test cut follows the intended line and the rail edge corresponds to the calibrated blade path.
Failure sign
The cut is consistently offset from the rail edge or the saw does not travel smoothly along the rail.
How to Set Up a Track Saw for a Straight Cut
A straight track-saw cut starts with stable material, a correctly positioned rail, and sufficient blade clearance below the workpiece. For large plywood panels, use a cutting surface that supports the sheet without obstructing the blade. The support pattern should also prevent the cut-off section from dropping or closing against the blade.
Before powering the saw, read the manufacturer’s instructions for the exact model. Disconnect the power source when installing or changing the blade, adjusting the saw, or performing setup tasks that could allow accidental activation.
Source: m.media-amazon.com
1. Prepare the work area
Clear the cutting area and place the sheet on stable supports. Confirm that the intended blade path will not strike a support, clamp, fastener, or other object.
2. Mark the cut
Measure the required dimension and mark the workpiece. Use the measuring method specified for your rail system to account for the relationship between the rail edge and blade.
3. Position the guide rail
Align the rail with the intended cut. Check both ends of the rail rather than relying on one measurement point.
4. Secure the rail if necessary
Use compatible rail clamps when the material, cutting angle, rail length, or work environment makes additional restraint appropriate.
5. Check the saw
Install the correct blade, set the cutting depth and bevel angle, and make sure the saw base engages the rail correctly.
6. Set the plunge depth
Set the blade deep enough to cut the material while avoiding unnecessary blade exposure below the workpiece. Follow the saw manufacturer’s instructions for the depth setting.
7. Make a controlled cut
Start the saw according to its manual, allow the blade to reach the appropriate operating condition, then advance the saw smoothly along the rail without forcing it.
8. Check the result
After the blade has completely cleared the workpiece and the saw is safely stopped, inspect the cut for straightness, tear-out, burning, and signs of binding.
How to Support Plywood for Track Saw Cutting
For a large plywood sheet, the cutting surface should support the panel while leaving enough clearance for the blade. Foam insulation boards are commonly used by woodworkers as a sacrificial cutting surface, provided the setup is appropriate for the saw and blade and the blade will not contact an underlying hard surface.
Avoid supporting only the two ends of a large sheet if that allows the panel to sag substantially near the cut. Excessive movement can change the cut and can increase the possibility of the blade becoming pinched. The goal is a stable panel with a predictable cutting path.
Stable material
The sheet should not rock or shift as the saw travels across it.
Clear blade path
The blade must have sufficient clearance below the panel and must not contact hidden supports.
Supported cutoff
The piece being removed should remain controlled rather than suddenly falling and changing the pressure around the blade.
Making Plunge, Bevel, and Long Cuts
A track saw becomes especially useful when the cut cannot conveniently start at an exposed edge. A compatible plunge mechanism allows the blade to enter the workpiece at a selected location. This can help when cutting openings, trimming panels in place, or making a controlled starting point.
For plunge cuts, mark the start and end positions carefully and verify what is underneath the material. Never assume an area behind a wall panel, countertop, floor, or cabinet is clear. Hidden electrical wiring, plumbing, fasteners, structural components, and other obstructions can create hazards.
Bevel cuts require additional attention because the saw base changes its relationship to the guide rail. Some track saw systems provide an anti-tip or similar feature for bevel work. Use the feature when the manufacturer specifies it and verify the rail is stable before starting the cut.
Source: toolnut.com
Plunge cuts
Useful for starting a cut inside a panel, but require careful inspection of the material and the area below or behind it.
90-degree cuts
The simplest rail-guided operation and a common application for breaking down plywood and sheet goods.
Bevel cuts
Require the saw’s bevel mechanism and rail relationship to be adjusted correctly; use manufacturer-specified anti-tip controls where provided.
Long cuts
Use a rail long enough for the entire cut or connect compatible rails using the manufacturer’s approved connector system.
How Long Should a Track Saw Rail Be?
Choose a rail based on the longest practical cut you need to make. For a standard 4-by-8-foot plywood sheet, a rail that spans the intended cut is more convenient than repeatedly repositioning a shorter rail. For cabinet parts and smaller components, a shorter rail can be easier to store and handle.
If two rails are joined, the connection must be straight and secure. A poorly aligned joint can introduce a deviation that becomes visible over a long cut. Use the connector and alignment method specified for the particular rail system.
Small components
A shorter rail is easier to handle and can be adequate for doors, cabinet panels, and smaller boards.
Full-size sheet goods
A longer rail reduces the need to reposition the guide during a long rip or crosscut.
Extra-long work
Compatible connected rails can extend the cutting path when the manufacturer permits rail joining.
Track Saw Blades, Dust Collection, and Accessories
The blade has a direct effect on cut quality. Choose a blade that is appropriate for the material and the saw. A fine-tooth blade may be appropriate for finish-oriented cuts in sheet goods, while a different tooth configuration can be more suitable for faster general-purpose cutting. Always stay within the saw manufacturer’s blade specifications.
Dust collection is another practical advantage of many track saw systems. A compatible vacuum connected to the saw’s dust port can reduce airborne sawdust and cleanup. Actual dust-capture performance depends on the saw, blade, material, extraction equipment, connection, and operating conditions, so a manufacturer’s stated efficiency should not be treated as a universal result.
Accessories can make a track saw more useful for repeatable work. Depending on the system, these may include rail clamps, connectors, parallel guides, stops, carrying bags, replacement anti-splinter strips, and adapters for compatible tools.
Source: hips.hearstapps.com
Correct blade
Use a blade compatible with the saw and intended material. Inspect the blade regularly for damage or excessive wear.
Dust extractor
Connect a suitable extraction system when supported, while still using appropriate respiratory and eye protection for the work environment.
Rail clamps
Useful when additional rail restraint is required or when the workpiece surface does not provide enough grip.
Parallel guides
Can help produce repeatable rip dimensions without measuring the rail position from scratch for every cut.
Rail connectors
Allow compatible rails to be joined for longer cuts when the connector system is designed for that rail.
Replacement splinter strips
Useful when the original edge strip becomes damaged or no longer provides an accurate cut reference.
Track Saw Maintenance
Keep the saw and rail clean enough that dust and chips do not interfere with movement. Inspect the guide surface, anti-slip material, splinter strip, power cord or battery interface, blade, guards, and adjustment mechanisms before use.
Store guide rails so they are protected from bending and impact. A damaged rail can produce inaccurate cuts even when the saw itself is functioning correctly. If the rail is visibly bent, cracked, or otherwise damaged, stop using it until the manufacturer or a qualified service source confirms that it remains safe and accurate.
Clean the rail
Remove accumulated dust and debris that could interfere with the saw base or rail contact.
Inspect the blade
Look for damaged, missing, or excessively worn teeth and replace the blade when necessary.
Check adjustments
Confirm that plunge, bevel, rail-fit, and other adjustments remain secure and operate as intended.
Track Saw Safety and Common Problems
A track saw is a powerful cutting tool, so setup errors can cause serious injury. Follow the operating manual for the exact saw and rail system, wear the personal protective equipment required for the work, and keep hands away from the blade path. Never defeat or remove a safety guard or other protective feature unless the manufacturer specifically requires a service procedure performed by an authorized person.
The workpiece and rail must remain stable during the cut. A moving panel can shift the rail, while a closing kerf can pinch the blade. If the saw binds, stalls, kicks back, behaves unexpectedly, or produces unusual noise or vibration, release the controls according to the manufacturer’s procedure and disconnect the power before investigating the cause.
Source: m.media-amazon.com
The cut is not straight
Check rail alignment, rail movement, saw-to-rail adjustment, workpiece movement, and whether the rail itself is damaged.
The saw feels difficult to push
Check the blade condition, cutting depth, material support, rail cleanliness, and signs of blade binding. Do not force the saw through a cut.
The edge splinters
Check blade suitability, blade condition, feed technique, material orientation, and the condition and calibration of the anti-splinter strip.
The rail moves
Stop and reposition the rail. Clean the contact surface and use compatible clamps if the system and material require additional restraint.
The saw rocks on the rail
Check the guide adjustment and confirm that the saw and rail are compatible. Follow the manufacturer’s adjustment procedure rather than improvising.
The cut burns the material
Inspect the blade, check whether the blade is appropriate for the material, and verify that the saw is not being forced or binding.
A Simple Pre-Cut Safety Check
Before starting the motor, confirm that the material is stable, the guide rail is positioned and secure, the blade is appropriate and undamaged, the cutting depth is set correctly, and the blade path is free of hidden supports or other obstructions. Confirm that the saw’s guard and other safety mechanisms operate normally.
For a plunge cut, inspect the full area where the blade will enter and travel. For a bevel cut, verify that the saw is correctly seated on the rail and that any manufacturer-specified anti-tip feature is engaged. If anything is uncertain, stop and resolve the issue before applying power.
Stop conditions
Stop work for a damaged blade, damaged rail, unstable workpiece, uncertain hidden obstruction, malfunctioning guard, or unexplained tool behavior.
After a jam
Do not immediately restart the saw. Disconnect the power source and determine why the blade bound or stalled before continuing.
When professional help is appropriate
Use qualified service support for electrical faults, damaged safety mechanisms, internal mechanical failures, or repairs outside the manufacturer’s user-service instructions.
Choosing a Track Saw Setup for Your Work
There is no single track saw configuration that suits every U.S. workshop or jobsite. The useful setup depends on the materials you cut, the longest cut you normally make, whether you need cordless operation, the precision required, and the accessories supported by the saw and rail.
For cabinetmaking and furniture work, a system with a stable rail, accurate adjustments, a suitable fine-finish blade, dust extraction, and repeatable guides can be particularly useful. For remodeling and jobsite work, portability, battery compatibility, rail length, and the ability to break down large panels efficiently may matter more.
Compatibility should be checked before buying accessories. Rail dimensions and saw interfaces are not automatically interchangeable just because two products are described as track-saw equipment. When an adapter or accessory is required, confirm that the manufacturer approves the combination.
Source: bcommebois.fr
For sheet-goods breakdown
Prioritize adequate rail length, stable material support, efficient setup, and a blade appropriate for plywood or the specific panel material.
For cabinet and furniture work
Consider repeatable parallel guides, accurate rail positioning, suitable finish blades, and dust extraction.
For remodeling
Consider portability, cordless operation if useful, compact rail options, and accessories that simplify cutting in existing spaces.
For occasional DIY work
A simpler compatible system may be sufficient if your projects do not require long cuts or repeated production work.
Track Saw Decision Table
Use the following as a practical selection framework rather than a product ranking. The right configuration depends on the work you actually perform.
Mostly 4-by-8-foot plywood
Look for a rail long enough for the intended cuts or a compatible rail-joining system.
Repeated cabinet components
Consider parallel guides or stops that can establish repeatable dimensions.
Finish-quality plywood edges
Pay attention to blade selection, material orientation, rail calibration, and anti-splinter-strip condition.
Frequent jobsite use
Consider battery platform, rail portability, storage, durability, and dust-management options.
Occasional home projects
Prioritize compatibility, ease of setup, and the rail length needed for your actual projects instead of buying accessories you will rarely use.
Frequently Asked Questions
Q
Can a track saw replace a table saw?
A track saw can handle many sheet-goods breakdown and straight-cut tasks that are commonly performed on a table saw, but the tools are not identical. A table saw is better suited to some repetitive ripping, crosscutting, joinery, and small-stock operations, while a track saw is particularly convenient for large panels and portable work.
Q
Can you use a track saw without clamps?
Some guide rails are designed with anti-slip surfaces that can hold the rail during appropriate cuts, while other situations may call for clamps. The correct approach depends on the rail design, workpiece surface, cutting direction, and manufacturer instructions. If the rail can move, stop and secure it before cutting.
Q
How deep should a track saw blade be set?
Set the blade depth according to the saw manufacturer’s instructions and the material being cut. The blade needs enough exposure to complete the cut, but unnecessary blade exposure should be avoided. The correct setting also depends on the material thickness and whether the saw is being used on a guide rail.
Q
Why is my track saw cut not perfectly straight?
Possible causes include a misaligned rail, rail movement, excessive play between the saw and rail, an uneven or damaged guide rail, unstable material, or forcing the saw through the cut. Check the setup in that order, starting with rail position and stability. Make a test cut on scrap material before repeating the finished cut.
Q
Can a track saw make bevel cuts?
Yes, compatible track saws can make bevel cuts within the angle range specified by the manufacturer. Because the saw changes position relative to the rail during a bevel cut, follow the model-specific instructions for rail engagement and anti-tip protection.
Q
Can you connect two track saw rails together?
Many rail systems offer dedicated connectors for joining compatible guide rails. The joined rails must remain straight and securely connected. Use the connector and alignment procedure specified by the rail manufacturer rather than improvising a joint.
✦ Wrapping Up
Conclusion
A track saw is fundamentally a guided circular saw system: the saw provides the cutting power, while the guide rail controls the path. Its biggest practical advantage is the ability to make long, controlled cuts on large panels without moving the entire sheet through a table saw.
Reliable results come from disciplined setup rather than the tool alone. Support the material properly, position and secure the rail, verify the saw-to-rail fit, select the correct blade, set an appropriate cutting depth, and make a test cut when accuracy matters. Keep the rail clean and inspect the equipment before use.
For beginners, the best way to learn is to start with straight 90-degree cuts on scrap material. Once the rail position, saw movement, and blade behavior are familiar, move to larger panels and then to plunge or bevel cuts according to the manufacturer’s instructions.
💡 Key Takeaway
Before your next track saw cut, check five things: stable material support, correct rail position, secure rail placement, appropriate blade and depth, and a clear blade path. If all five are confirmed, make a controlled test cut before committing to the finished workpiece.